有问题及时说咧OVO
https://cmd.dayi.ink/sUPF6_zfR-imTz3D2O7PeQ
第九周实训 ansible
切这个,然后右边的目录结构会清晰一点,暂时没写序号。

周一: https://blog.dayi.ink/?p=166
周二:https://blog.dayi.ink/?p=172
周一
Centos安装
1. 镜像下载
Centos7 今年6月就停止维护(会撤源,然后几乎就不能用了)

可以下百度网盘,也可以用这个地址(选7 (x86_64, DVD) )
https://mirrors.cernet.edu.cn/os/centos


2. 安装
推荐英文
- 可能需要的小点

- ISO镜像:

- 安装,选第一个INSTALL CENTOS7

- root用户名密码

- 进系统

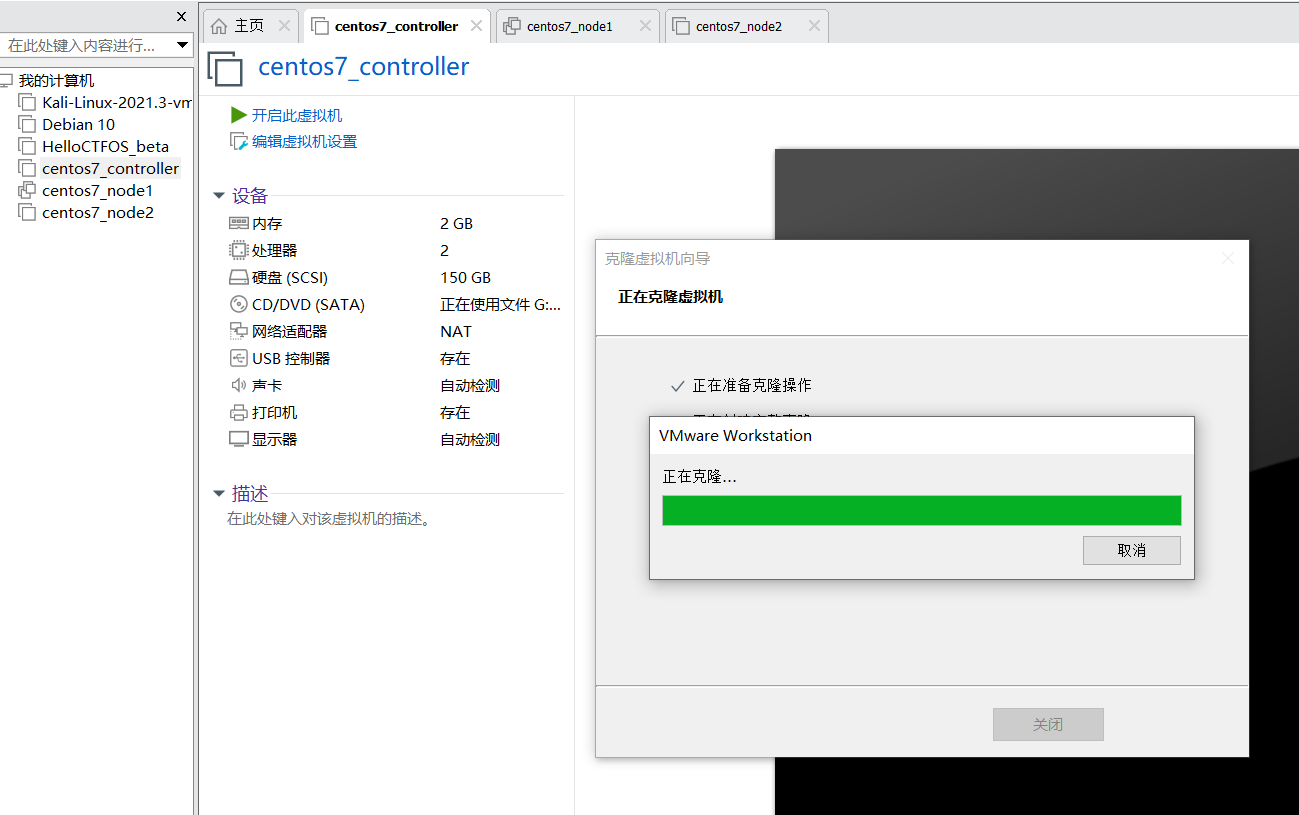
3. 克隆
可有可无,有被控机子就行。


配置EPEL源、安装Ansible
粘贴:CTRL+SHIFT+V
master(非克隆机子)上,开机,左上角,开终端
su
ping 223.5.5.5 #测试网络
yum install epel-release -y # EPEL源
yum install ansible -y

设置从节点主机名
不知道有没有必要性,可以先弄一下(
搭嘎这样:
su
hostnamectl set-hostname node1
[dayi@localhost ~]$ bash
[dayi@node1 ~]$ 
Centos关闭自动锁屏

配置免密登录
在主机生成RSA密钥对
su
ssh-keygen -t rsa
查看IP地址
先查看IP地址:
ip addr下面俩小节选一个就可以
【centos系】[被控机是centos 红帽子 系,一般是默认允许root直接ssh登录]
在master上:
su
ssh-copy-id root@[IP地址]
be-like:
[root@localhost ~]# ssh-copy-id root@192.168.59.156
/usr/bin/ssh-copy-id: INFO: Source of key(s) to be installed: "/root/.ssh/id_rsa.pub"
The authenticity of host '192.168.59.156 (192.168.59.156)' can't be established.
ECDSA key fingerprint is SHA256:QWGWPbUMNku1ClDrzhN2GOt3T7GfghnMIjj9b4J8qaA.
ECDSA key fingerprint is MD5:5d:bb:9b:49:c5:d9:37:c7:dd:60:dd:14:92:e9:f3:47.
Are you sure you want to continue connecting (yes/no)? yes
/usr/bin/ssh-copy-id: INFO: attempting to log in with the new key(s), to filter out any that are already installed
/usr/bin/ssh-copy-id: INFO: 1 key(s) remain to be installed -- if you are prompted now it is to install the new keys
root@192.168.59.156's password:

Number of key(s) added: 1

Now try logging into the machine, with:   "ssh 'root@192.168.59.156'"
and check to make sure that only the key(s) you wanted were added.

[root@localhost ~]#
【debian系】 [被控机是Debian 系,一般不允许root直接登录]
注意这个跟上面做一个就可以。【debian系和centos系】
跟作业一样啦:
- 先被控机允许ROOT登录
- 然后
ssh-copy-id复制秘钥到主机。
【debian系】先设置允许root通过ssh登陆
在被控机:
如果你发现root用户无法通过ssh登陆到主机(会提示密码错误什么的):(主控机和被控机)
su
echo "PermitRootLogin yes" >> /etc/ssh/sshd_config
systemctl restart sshd
这样就好啦。
主控机和被控机都做一下

如果你发现可以直接root登陆就不用做这一步了。
【debian系】设置免密登陆
debian系包括Debian kali ubuntu等
在master上
su #直接用root了,方便,可以用其他用户
ssh-keygen -t rsa # 生成RSA密钥 一直回车就可以
复制controler(master 机器)的公钥,到其他的几个被控机器上。(会提示输入密码和yes)(在master上输入)
su
ssh-copy-id root@192.168.59.154 [你的IP地址]
ssh-copy-id root@192.168.59.151
ssh-copy-id root@192.168.59.153
测试免密登陆
ssh root@192.168.59.154这样不输入密码就登陆上就可以啦(退出的话输入exit)

测试免密登录
su
ssh root@【被控机IP地址】
ssh root@192.168.59.156
ssh root@192.168.59.157
ssh root@192.168.59.153
大概就这样,想控几个配几个
Ansible配置
这个是ROOT用户的:原话:上午做的ROOT用户,下午要改。普通用户的。
如果你在图形化界面
su
mkdir -pv  /etc/ansible/
nano /etc/ansible/hosts
文件内容类似这样:
node1 ansible_host=192.168.59.156
node2 ansible_host=192.168.59.157
node3 ansible_host=192.168.59.153


[dayi]
node1
node2
node3

[ovo]
localhost ansible_connection=local
CTRL+W 写入文件
ctrl+s 保存文件(可能不同版本没有这个)
ctrl+x 退出

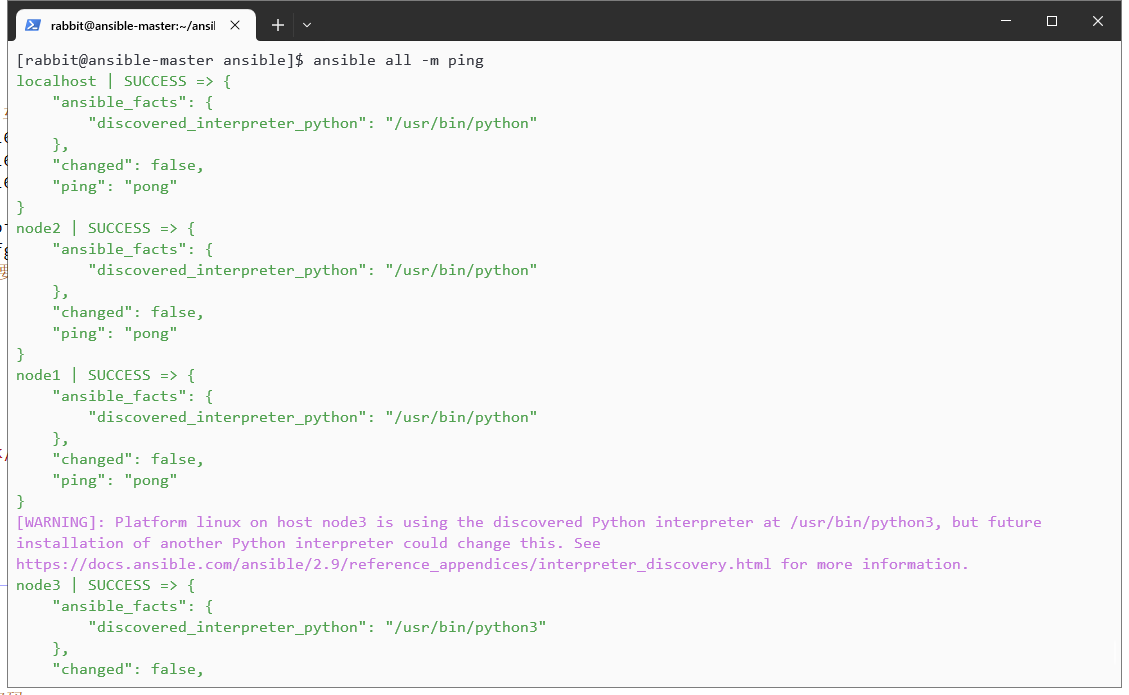
测试下:
ansible -m ping allbelike:

非ROOT用户使用ansible(救命)
配置sudo权限 【controller机子、和其他所有的机子】
这个命令要在所有机子上执行(controller(主机)和slaves(被控几)上)
su
#这一行尽量复制注意空格,(记得用户名改成你自己的)
echo "dayi ALL=(ALL) NOPASSWD: ALL">>/etc/sudoers
su dayi #切换到你的用户
sudo su #试试有没有权限
这样就可以了
记得被控机也弄一下

然后重新配置ansible (救命)
【controller机子的】
救命高建鑫没装ansible
su
sudo yum install epel-release -y # EPEL源
sudo yum install ansible -y
下一步
su dayi #你的用户名
cd ~
mkdir ansible
cd ansible
cp -a /etc/ansible/ansible.cfg . #这里有个[.]!!
需改配置1
su dayi #这里输入的root密码,意思是切换到你的用户,如果在了就不用了。
vim ~/ansible/ansible.cfg
VIM使用:(高建鑫打不上字看这个)
| 键盘 | 作用 |
|---|---|
| i | 输入模式 |
ECS -> 输入:wq | 保存+退出 |
这里两种改法:/home/dayi/ansible/inventory或者~/ansible/inventory, dayi是你的用户名

这里,改成False

需要改配置2
还是同样一个文件
在vim下搜索,先ESC退出插入模式,输入/privilege_escalation然后回车,然后再按I键把#去掉:

这样子。
输入ESC 然后输入 :wq 保存文件
复制controller的普通用户的公钥到slave普通用户的免密登录(again)
su dayi
ssh-keygen -t rsa #一路回车
ssh-copy-id dayi@192.168.59.156
ssh-copy-id dayi@192.168.59.157
ssh-copy-id dayi@192.168.59.153
测试免密登录
ssh dayi@192.168.59.156
ssh dayi@192.168.59.157
ssh dayi@192.168.59.153
这样就可以了
修改那个vim inventory
su dayi
nano ~/ansible/inventory
node1 ansible_host=192.168.59.156
node2 ansible_host=192.168.59.157
node3 ansible_host=192.168.59.153


[dayi]
node1
node2
node3

[ovo]
localhost ansible_connection=local
测试
cd ~/ansible
ansible all -m ping
这样就可以了。

常见错误

对于debian系统没有sudo
su
apt install sudo -y
echo "dayi ALL=(ALL) NOPASSWD: ALL">>/etc/sudoers
su dayi
echo "export PATH=\$PATH:/sbin" >> ~/.bashrc
source ~/.bashrc
sudo su #测试- 提示什么./.tmp/ XXXX没有权限 关键词“Permission denied”,这说明你在root用户下操作了一些在普通用户的文件:
#暴力解决
sudo su
rm -rf /home/dayi/.ansible

# 再试一试,如果可以了后面不用了


chmod +777 -R /home/dayi/.ansible
# 再试一试,如果可以了后面不用了

#暴力
chmod +777 -R /home/* #全部给全部权限,所有文件
su dayi
chmod +600 ~/.ssh/id_rsa #给太多了,修一个
chmod u+x,g-wx,o-wx ansible #第二个

#如果普通用户不行就root
修改IP地址
不知道为什么好像要固定IP,但是我好像没听清这个是不是必须的要求。
我只能说,改IP是个大活(
说是要改成这样:

先把分配IP的地方改过来:

机子执行命令
(没啥好命令,都很复杂,不同发行版系统差距大)图形化界面(UI)修改 centos7

关了再开:
查看生效(不生效重新设一次,重启试试)

SHELL修改 centos7
sudo su
nmtui #如果没有输入 yum install NetworkManager-tu
sudo systemctl restart network # 重启网络服务
SHELL修改 debian
debian不推荐用nmtui,因为默认的网络管理器不同,但是对于有线也可以用
nmtui 方法:
sudo apt-get install network-manager -y
sudo nmtui #但是要手动添加网络
推荐:
sudo nano /etc/network/interfaces
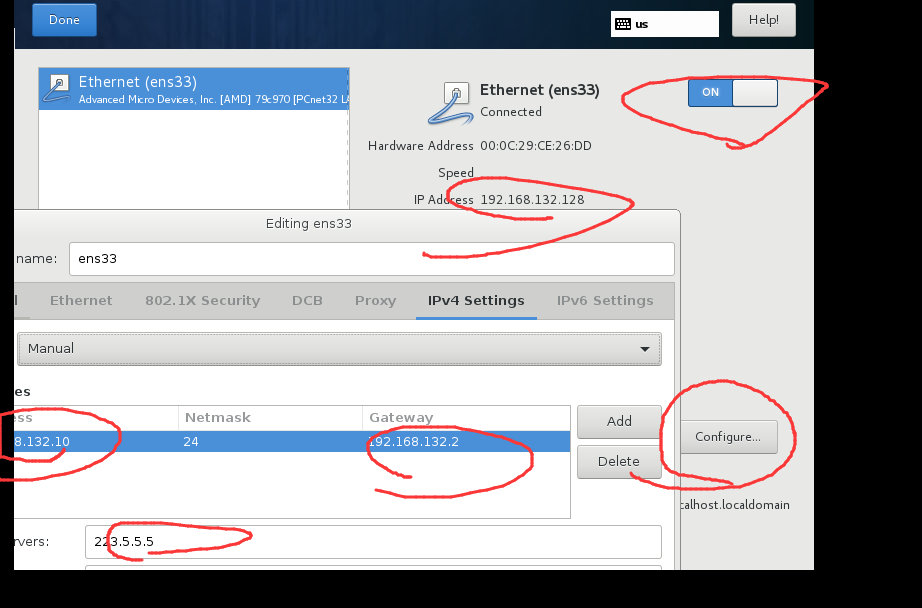
修改这里:

注意你不一定是ens33
iface ens33 inet static
        address 192.168.132.13/24
        network 192.168.132.0
        gateway 192.168.132.2
        dns-nameservers 223.5.5.5 192.168.132.2
重启网络服务
sudo systemctl restart networking
记得改完IP测下是否还可以上网
ping qq.com无损修改IP(DHCP分配)
感觉好像反而复杂了,干脆用【修改IP地址】章节手动改吧。
好像要一起固定IP?我好像没听清这个是不是必须的要求。
我现在的大概这个样子:
192.168.59.155 master
192.168.59.156 node1
192.168.59.157 node2
192.168.59.153 py-ovo3
要改成:
其实也挺好,那样后面的IP就统一啦。
无损(指不动现有的虚拟机、从DHCP来整)这样做:
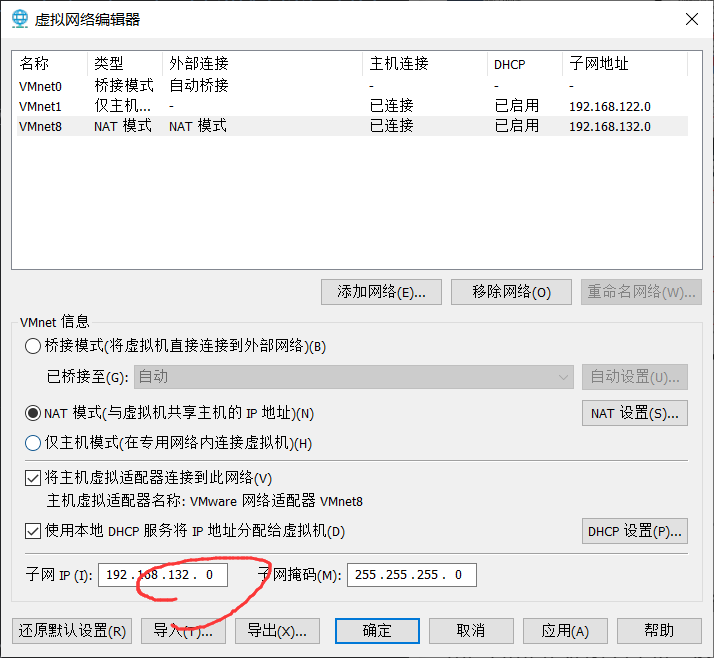
1. 虚拟网络管理器
2. 更改设置
3. 找那个NAT模式的
4. 改IP段,保存
5. 查MAC地址(四个机子的 记录下来)
6. WIN+X 选择管理员(终端 或者 powershell)
7. 写配置文件
8. 保存文件
9. 重启DHCP
10. 重启虚拟机
1-4步:
5步:
记录着三个地方的MAC地址:
ip addr
记录一下四个机子的IP地址

6步
在你的windows(宿主机)上,WIN+X打开cmd或者powershell或者记事本
输入
notepad C:\ProgramData\VMware\vmnetdhcp.conf
7步
很遗憾的是,【编辑】->【虚拟网络编辑器】后,会重置vmnetdhcp.conf文件 ,所以你改的这个内容,最好要备份一下)
输入
host ovo_controller {
    hardware ethernet 00:0c:29:3f:22:a2; #这里改为controller的地址
    fixed-address 192.168.132.10;
}
host ovo_node1 {
    hardware ethernet 00:0c:29:c9:96:7b; #这里改为node1的MAC地址
    fixed-address 192.168.132.11;
}
host ovo_node2 {
    hardware ethernet 00:0c:29:24:fb:d8; #这里改为node2的MAC地址
    fixed-address 192.168.132.12;
}
host ovo_node3 {
    hardware ethernet 00:0c:29:67:10:46; #这里改为node3的MAC地址
    fixed-address 192.168.132.13;
}
8步,塞后面。保存
保存不了可以另存为桌面,然后在手动复制到:C:\ProgramData\VMware\
9-10步
管理员终端
net stop VMnetDHCP
net start VMnetDHCP
然后把虚拟机重启了
也可以不重启,输入这个
systemctl restart network
改完IP 再改下配置文件
是这样的,再在controller做:
su
su dayi
nano ~/ansible/inventory
改下IP
救命,高建鑫没配置文件
node1 ansible_host=192.168.132.11
node2 ansible_host=192.168.132.12
node3 ansible_host=192.168.132.13


[dayi]
node1
node2
node3

[ovo]
localhost ansible_connection=local
正常修改只需要注意这三行
node1 ansible_host=192.168.132.11
node2 ansible_host=192.168.132.12
node3 ansible_host=192.168.132.13
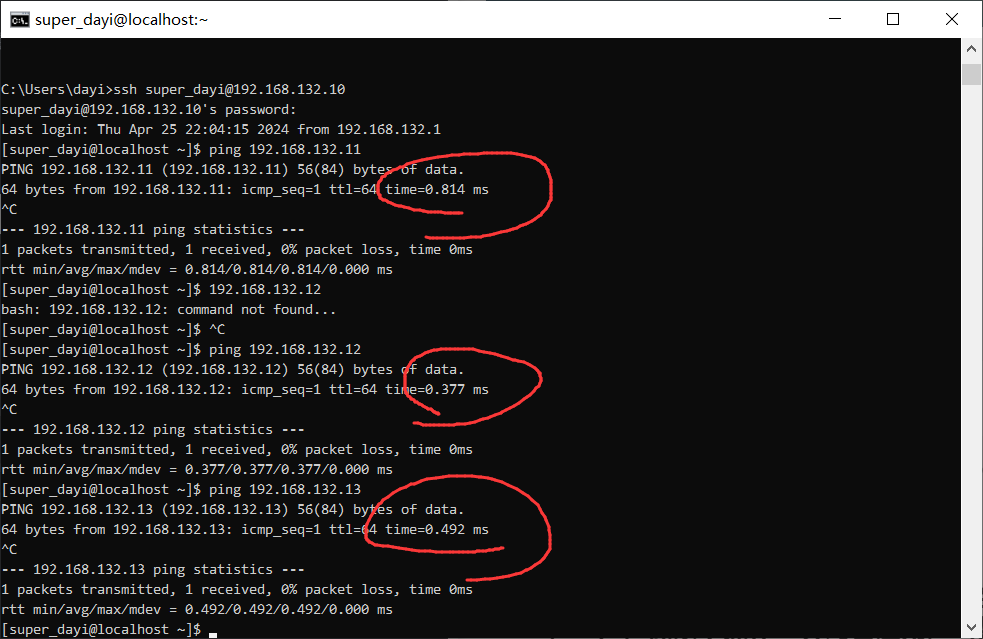
重新认下IP
# yes之后直接exit就行
ssh dayi@192.168.132.11
ssh dayi@192.168.132.12
ssh dayi@192.168.132.13
再测试一遍:
cd ~/ansible
ansible all -m ping
以上为周一。
周二
推荐ssh工具:Xterminal
配置文件:登录用户
可以不修改,不做这一步。
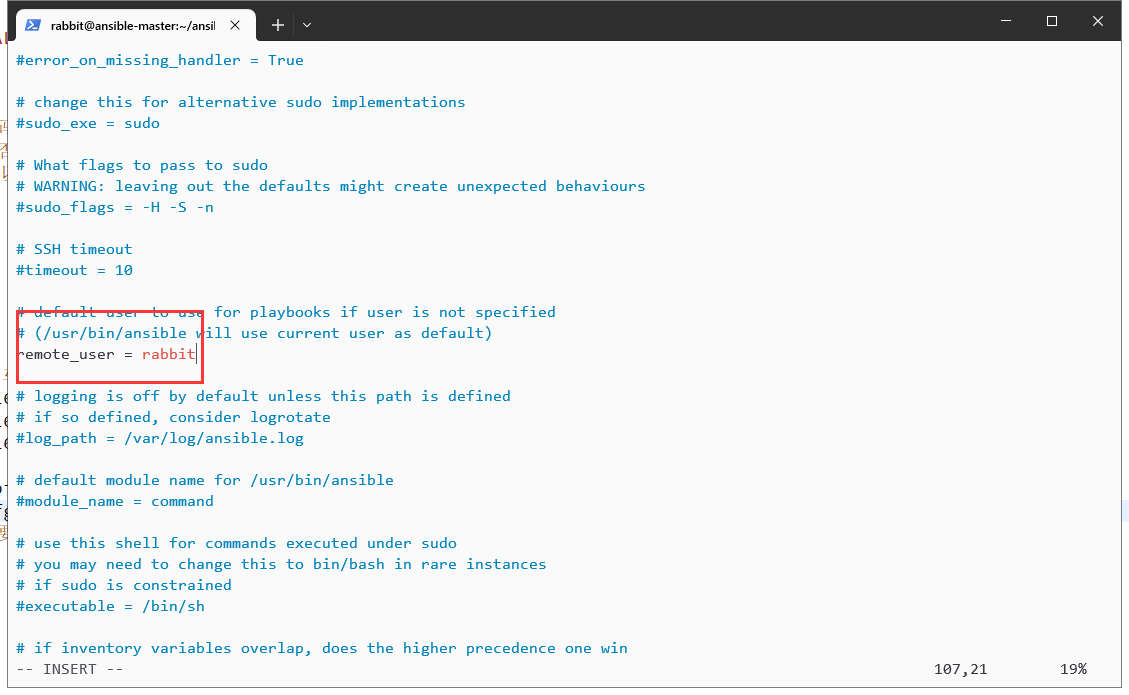
vim (文件位置vim ~/ansible/ansible.cfg)输入/remote_user可以找到这行,然后就可以改登录名了

比如这样(但默认也会是你默认当前登录的用户名)

inventory 配置文件
【仅为格式】不用复制进去。
#批量定义IP
192.168.132.[10-12]


# 父组儿子组
[sjc]
node2

[dev]
node1

[父组.儿子组]
dev
sjc
验证清单
# 查看node1
ansible node1 --list-host

ansible all --list-host #查看全部主机
[dayi@ansible-master ansible]$ ansible node1 --list-host
hosts (1):
node1
[dayi@ansible-master ansible]$ ansible dayi --list-hosts #其实是都可以
hosts (3):
node1
node2
node3
[dayi@ansible-master ansible]$ ansible dayi --list-host #查看组里的表
hosts (3):
node1
node2
node3
[dayi@ansible-master ansible]$

如果没有匹配,返回nothing to do

[debian] debian12安装python2
仅没有python2的环境,centos7比较老所以有
su
cd /opt
apt-get install build-essential
echo "deb http://mirrors.ustc.edu.cn/debian bookworm main contrib non-free non-free-firmware" >> /etc/apt/sources.list
echo "deb http://mirrors.ustc.edu.cn/debian bookworm-updates main contrib non-free non-free-firmware">>/etc/apt/sources.list
nano /etc/apt/sources.list #看看有没有重行
apt update
apt install gcc make -y
apt install zlib1g-dev libbz2-dev libssl-dev libncurses5-dev  libreadline-dev tk-dev libgdbm-dev libdb-dev libpcap-dev xz-utils libexpat-dev -y
apt-get install libssl-dev -y
apt-get install libsqlite3-dev -y
apt-get install libnsl-dev libtirpc-dev -y
wget https://www.python.org/ftp/python/2.7.13/Python-2.7.13.tgz
tar -zxxf Python-2.7.13.tgz
cd Python-2.7.13
./configure --with-pydebug
make -s -j16

# PATH添加 最后一行
nano /etc/profile
export PATH=$PATH:/opt/Python-2.7.13/
# 保存退出

# 链接文件
ln -s /opt/Python-2.7.13/python /usr/bin/
python -V

root@py-ovo3:/opt/Python-2.7.13# python -V
Python 2.7.13
指定配置文件路径
默认会寻找当前目录下的ansible.cfg找不到就用默认的/etc/ansible/ansible.cfg
具体就是:
- 当前目录 (
./ansible.cfg) > 主目录 (~/.ansible.cfg)>环境变量 ($ANSIBLE_CONFIG)>系统级配置文件 (/etc/ansible/ansible.cfg)

氢弹文件
ansible -i [清单inventory文件位置]
#或者
ansible --inventory
查看ansible-doc
ansible-doc ping【这里是模块名】查看全部模块
ansible-doc -l #q回车退出或者ctrl+c
ansible-doc -l |grep ^fetch #【筛选gerp】
模块命令
复制文件
controller -> node : copy 模块
node -> controller : fetch 模块
同步hosts
这里推荐一起执行了
su
vim /etc/hosts添加输入这个(i输入,:wq!保存)
192.168.132.10 controller
192.168.132.11 node1
192.168.132.12 node2
192.168.132.13 node3
然后复制文件
su dayi
cd ~/ansible/
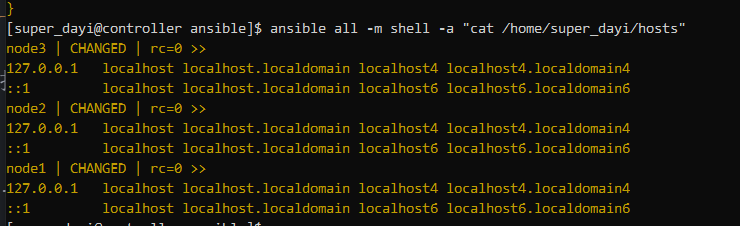
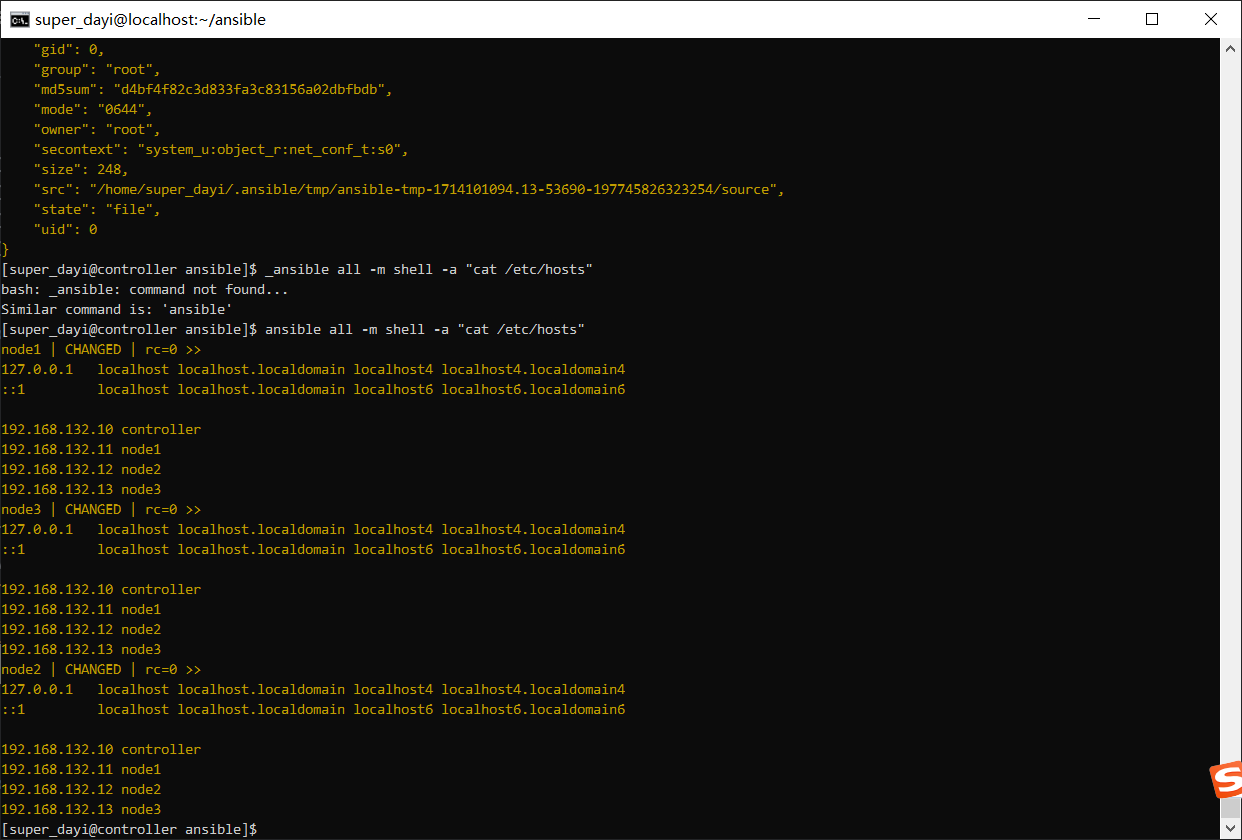
ansible all -m copy -a "src=/etc/hosts dest=/etc/hosts mode=644"
复制一个普通文件
su dayi
echo "ovo" >> ~/ovo.txt
ansible all -m copy -a "src=/home/dayi/ovo.txt dest=/home/dayi/ovo.txt owner=dayi mode=644"
从机上有了:

建用户
ansible all -m user -a "name=dayi_nologin comment=ovo uid=1200 group=root shell=/sbin/nologin"
查看当前用户们
compgen -u
lastlog
被控几上也有咧:
【课上作业1】1、通过fetch命令将node1上的/etc/resolv.conf 复制到control节点、2、利用file模块,在node1上创建一个软连接
要求
1、通过fetch命令将node1上的/etc/resolv.conf 复制到control节点的/home/upwen/shankeda/,并重命名为hello.conf
2、利用file模块,在node1上创建一个软连接,将hosts-link连接到/home/upwen/hosts
# 查看文档用
ansible-doc fetch
1. fetch
mkdir -pv ~/shankeda/
ansible node1 -m fetch -a "src=/etc/resolv.conf dest=~/shankeda/"
2. file
echo "ovo_ovo" >> ~/hosts
ansible all -m copy -a "src=/home/dayi/hosts dest=/home/dayi/hosts  owner=dayi mode=644"
ansible node1 -m file -a "src=/home/dayi/hosts dest=/home/dayi/hosts-link owner=dayi group=dayi state=link"

# ansible node1 -m file -a "src=/etc/hosts dest=/home/dayi/hosts owner=dayi group=dayi state=link"


模块命令2
shell模块
ansible node1 -m shell -a "ls /home/dayi"
yum模块
#塞进去
ansible all -m yum_repository -a " name=ali_centos7 description=epel baseurl=/mirrors.aliyun.com/epel/7/$basearch gpgcheck=1 gpgkey=file:///etc/pki/rpm-gpg/RPM-GPG-KEY-EPEL-7 enabled=1 "
# 看看有没有
ansible all -m shell -a " ls /etc/yum.repos.d/ |grep ali_centos7"
#查看仓库信息
ansible all -m shell -a " cat /etc/yum.repos.d/ali_centos7.repo"
# 测试可用 (我这里报错了,说没有前缀)
ansible all -m shell -a " yum info vsftpd  --enablerepo=ali_centos7 "
## 没报错不用继续了,小修:


## 字符串替换
ansible all -m shell -a " sudo sed -i 's#baseurl = /mirrors.aliyun.com/epel/7/#baseurl = https://mirrors.aliyun.com/epel/7/x86_64/#' /etc/yum.repos.d/ali_centos7.repo"

ansible all -m shell -a " cat /etc/yum.repos.d/ali_centos7.repo"

# 测试可用
ansible all -m shell -a " yum info vsftpd  --enablerepo=ali_centos7 "


# 应该是不可用,好像是没有包
ansible all -m shell -a "yum makecache&& yum info vsftpd --disablerepo=* --enablerepo=ali_centos7 "
我这里,node3炸了正常,因为不是centos


报错:
小修:

还是可能有问题,阿里云的锅。正常。
Playbook
COPY
如果觉得文本编辑很难用,推荐用xterminal vscode-ssh插件 xterminal mobaxterm 来进行修改
cd ~/ansible
nano copy_a_file.yaml
---
#开始play内容
#以- name开头,描述该play的作用,注意:和后边有空格
- name: copy a file
#描述主机清单列表
hosts: all
#写明任务
tasks:
#接下来就似乎编写playbook
#第一行- name写明你这个play下的tasks想要做什么(描述)
- name: Copy /home/upwen/ansible/inventory to nonde
#调用对应模块,如本tasks当中使用的是copy,并且通过ansible-doc copy可以查看到copy模块的具体使用方法;
#根据你的虚修来配置
copy:
src: /home/dayi/ansible/inventory/
dest: /home/dayi/hosts
owner: dayi
group: dayi
mode: '0666'验证+执行
ansible-playbook --syntax-check copy_a_file.yaml #检查缩进
ansible-playbook --check copy_a_file.yaml #预测结果
ansible-playbook copy_a_file.yaml -vv #真正执行

ansible all -m shell -a "cat /home/dayi/hosts" #查看

来份114514
echo "114514">>~/114514.txt
vim copy_11451.yaml
---
- name: Copy file to all nodes
hosts: all
become: yes
tasks:
- name: Copy ~/114514.txt to remote user home directory
copy:
src: ~/114514.txt
dest: "{{ ansible_user_dir }}/114514.txt"
owner: dayi
group: dayi
mode: '0644'
ansible-playbook --check copy_11451.yaml #预测结果
ansible-playbook copy_11451.yaml -vv #真正执行
ansible all -m shell -a "cat ~/114514.txt" #查看
镜像源
该过程约占用40G的空间
工具:
Xshell绿色版:https://p.dabbit.net/blog/pic_bed/sharex/_pn-2024-04-23-15-30-32_Murrelet_Junior_Realistic.7z
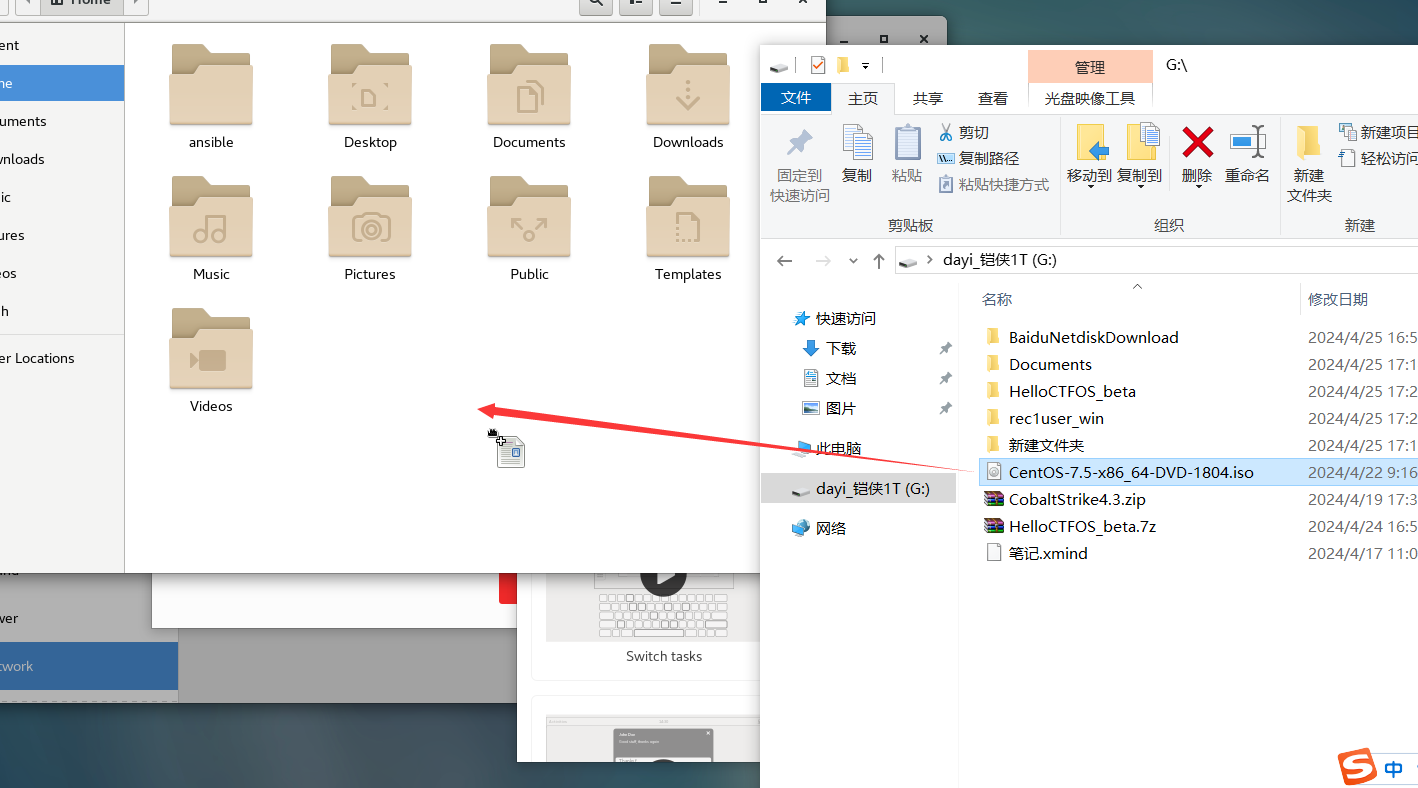
连接SSH,复制ISO镜像到/opt

这样子:

(谢邀,没磁盘空间了)

挂载镜像安装内容
如果你镜像名字不一样,对应改一下。
先把文件复制到/opt
[dayi@ansible-master ~]$ sudo su
[root@ansible-master dayi]# ls
114514.txt  CentOS-7.5-x86_64-DVD-1804.iso  Documents  hosts  ovo.txt   Public    Templates
ansible     Desktop                         Downloads  Music  Pictures  shankeda  Videos
[root@ansible-master dayi]# mv CentOS-7.5-x86_64-DVD-1804.iso /opt
从光盘复制yum文件到本地
然后挂载镜像,复制出来
我感觉有点奇怪,咱先照着做了.
这里特地一个修复的
sudo su
cd /opt
mkdir -p /mnt/cdrom/
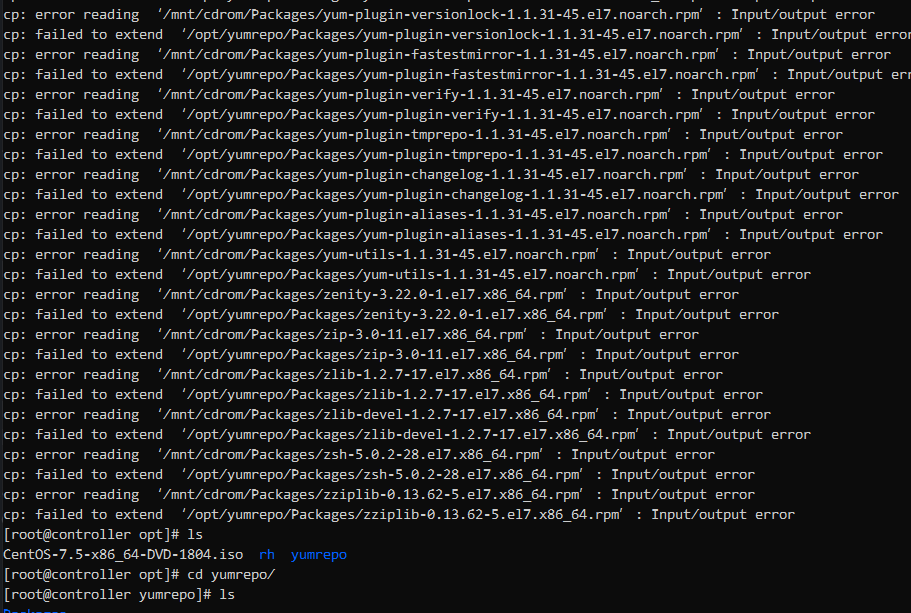
mount -t iso9660 /opt/CentOS-7.5-x86_64-DVD-1804.iso /mnt/cdrom/
mkdir -pv /opt/yumrepo #【关键】 #这行修复的,不加这行会复制到一个文件里。
sudo cp -a /mnt/cdrom/Packages/ ./yumrepo/
sudo cp -a /mnt/cdrom/repodata/ ./yumrepo/
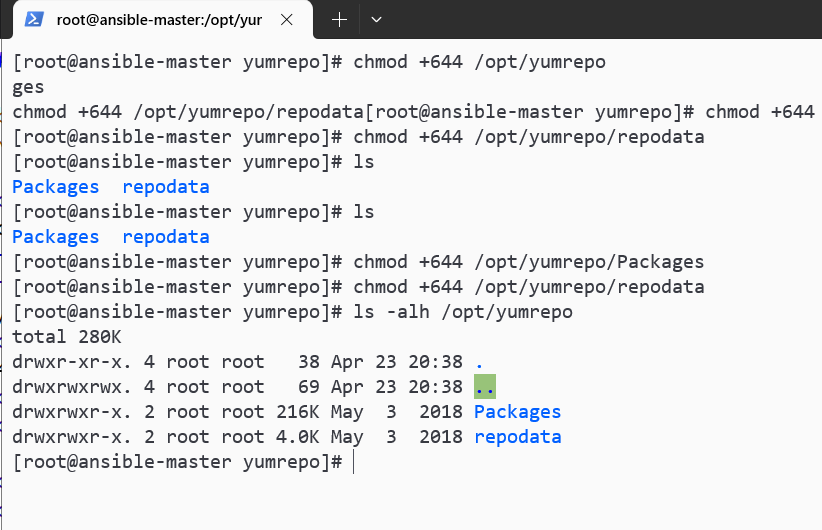
sudo chmod +644 /opt/yumrepo
sudo chmod +644 /opt/yumrepo/Packages
sudo chmod +644 /opt/yumrepo/repodataoppos

这里,如果你虚拟机分了20G磁盘,很容易出现磁盘空间不足导致的错误!
关键词:"IO ERROR" "NO SPACE"
可以看一看这个文章,对的扩容磁盘超级超级麻烦!
https://zhuanlan.zhihu.com/p/83340525
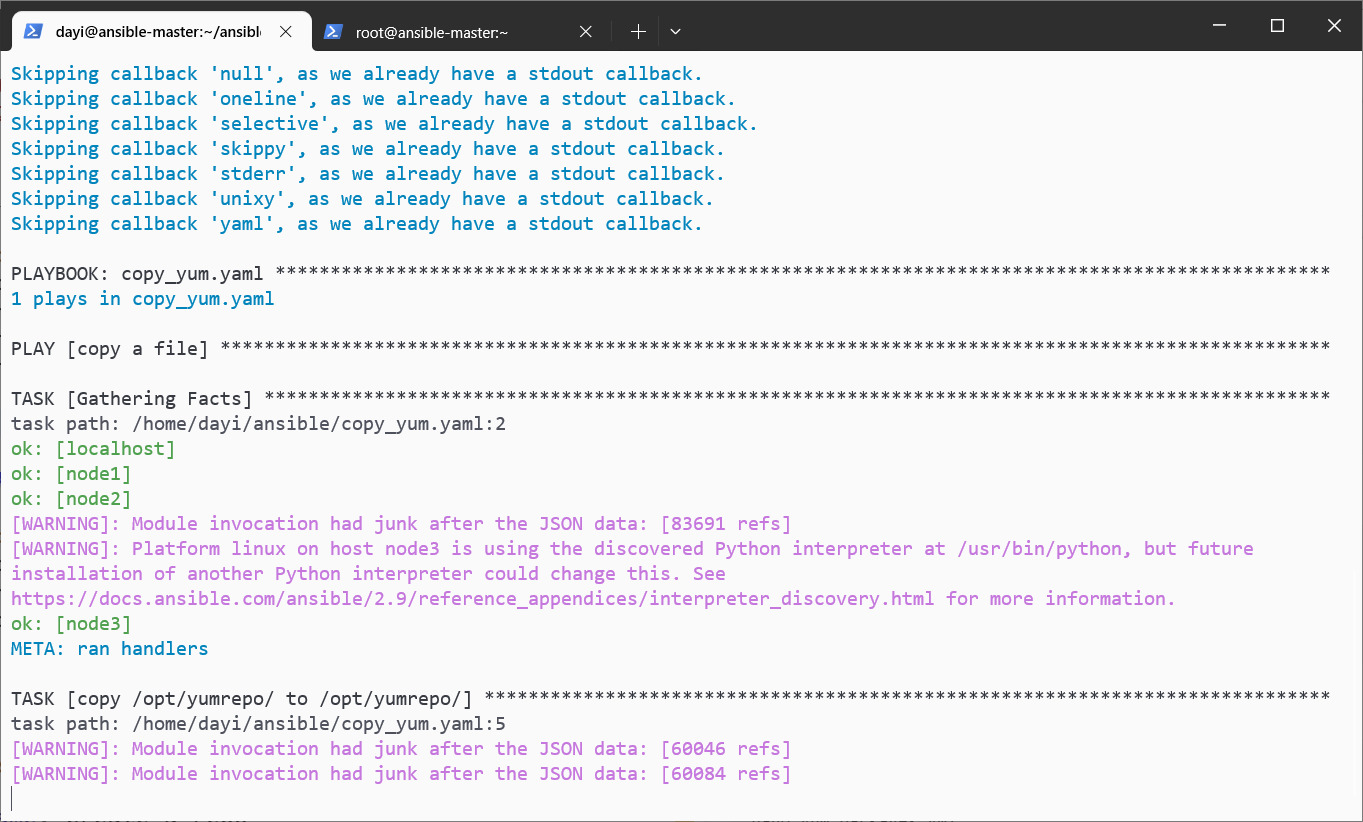
复制文件到结点 PLAYbook
su dayi
cd ~/ansible
nano copy_yum.yaml
文件内容:
---
- name: copy a file
  hosts: all
  tasks:
    - name: copy /opt/yumrepo/ to /opt/yumrepo/
      copy:
        src: /opt/yumrepo/
        dest: /opt/yumrepo/
执行命令:
#执行
ansible-playbook copy_yum.yaml -vv
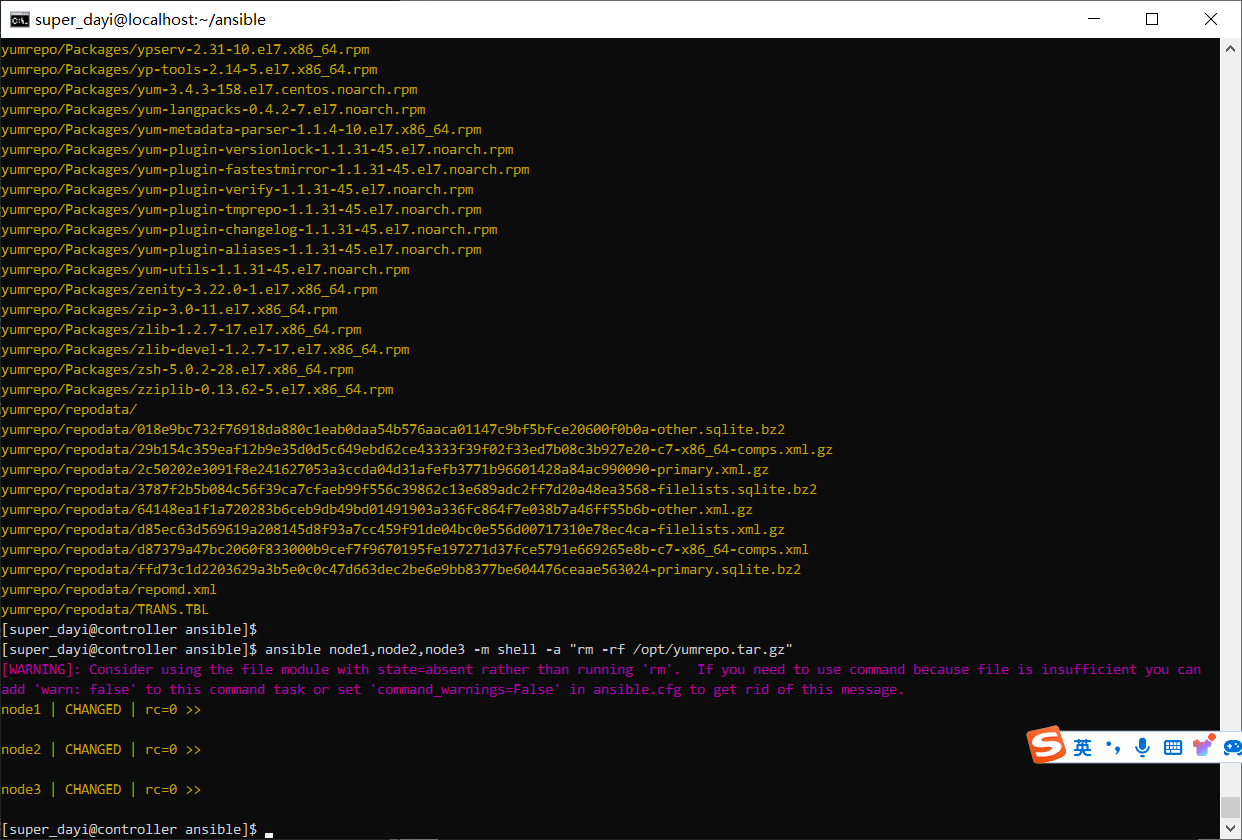
ansible all -m shell -a "ls -alh /opt/"挺慢的,等就可以咧

第二个命令执行结果:
该步骤过慢可以看下面的章节【周三】->【配仓库】->【小修】->【加速文件分发】
周三
配仓库
小修
为了让:
ls -alh /opt/yumrepo/opt/yumrepo里要这个样子:
所以这样做:
也就是已经这个样子了,就不用做这个了。
# 小修 ?
su
cd /opt
mkdir -p /mnt/cdrom/
chmod +777 /opt
rm -rf /opt/yumrepo
mkdir -pv /opt/yumrepo

sudo mount -t iso9660 /opt/CentOS-7.5-x86_64-DVD-1804.iso /mnt/cdrom/
sudo cp -a /mnt/cdrom/Packages /opt/yumrepo/
sudo cp -a /mnt/cdrom/repodata /opt/yumrepo/

su
chmod +644 /opt/yumrepo
chmod +644 /opt/yumrepo/Packages
chmod +644 /opt/yumrepo/repodata
su dayi
ls -alh /opt/yumrepo/opt/yumrepo里要这个样子:
然后重新发文件:
su dayi
cd ~/ansible
ansible node1,node2,node3 -m shell -a "rm -rf /opt/yumrepo"
ansible-playbook copy_yum.yaml -vv #超级慢,太慢可以看下面这个[label:ovo]
ansible all -m shell -a "ls -alh /opt/yumrepo"
我这里差不多要发50分钟多没发完一个(
加速文件分发
# 加速文件分发 这几行相当于:[label:ovo]
su
cd /opt
tar zcvf yumrepo.tar.gz yumrepo
chmod +644 /opt/yumrepo.tar.gz
su dayi
cd ~/ansible
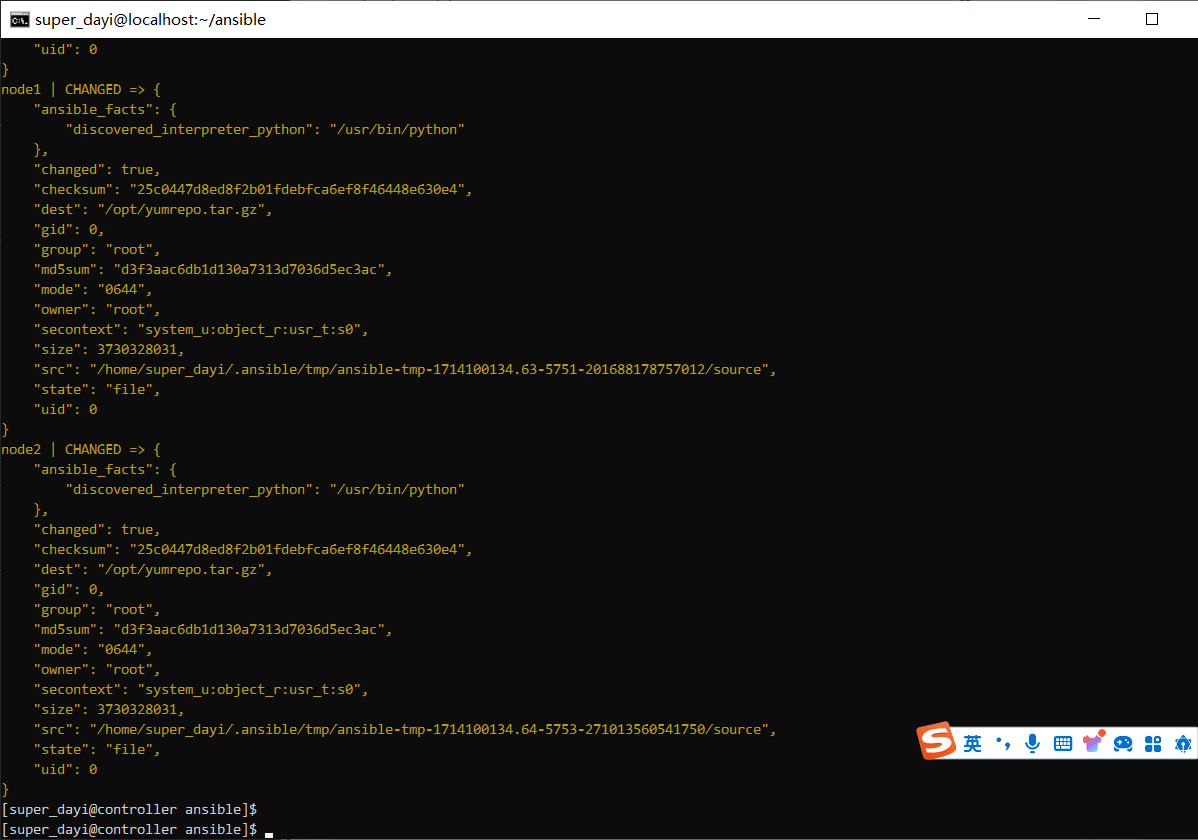
ansible node1,node2,node3 -m copy -a "src=/opt/yumrepo.tar.gz dest=/opt/" -v
ansible node1,node2,node3 -m shell -a "cd /opt && tar -zxvf yumrepo.tar.gz"
rm -rf /opt/yumrepo.tar.gz
ansible node1,node2,node3 -m shell -a "rm -rf /opt/yumrepo.tar.gz"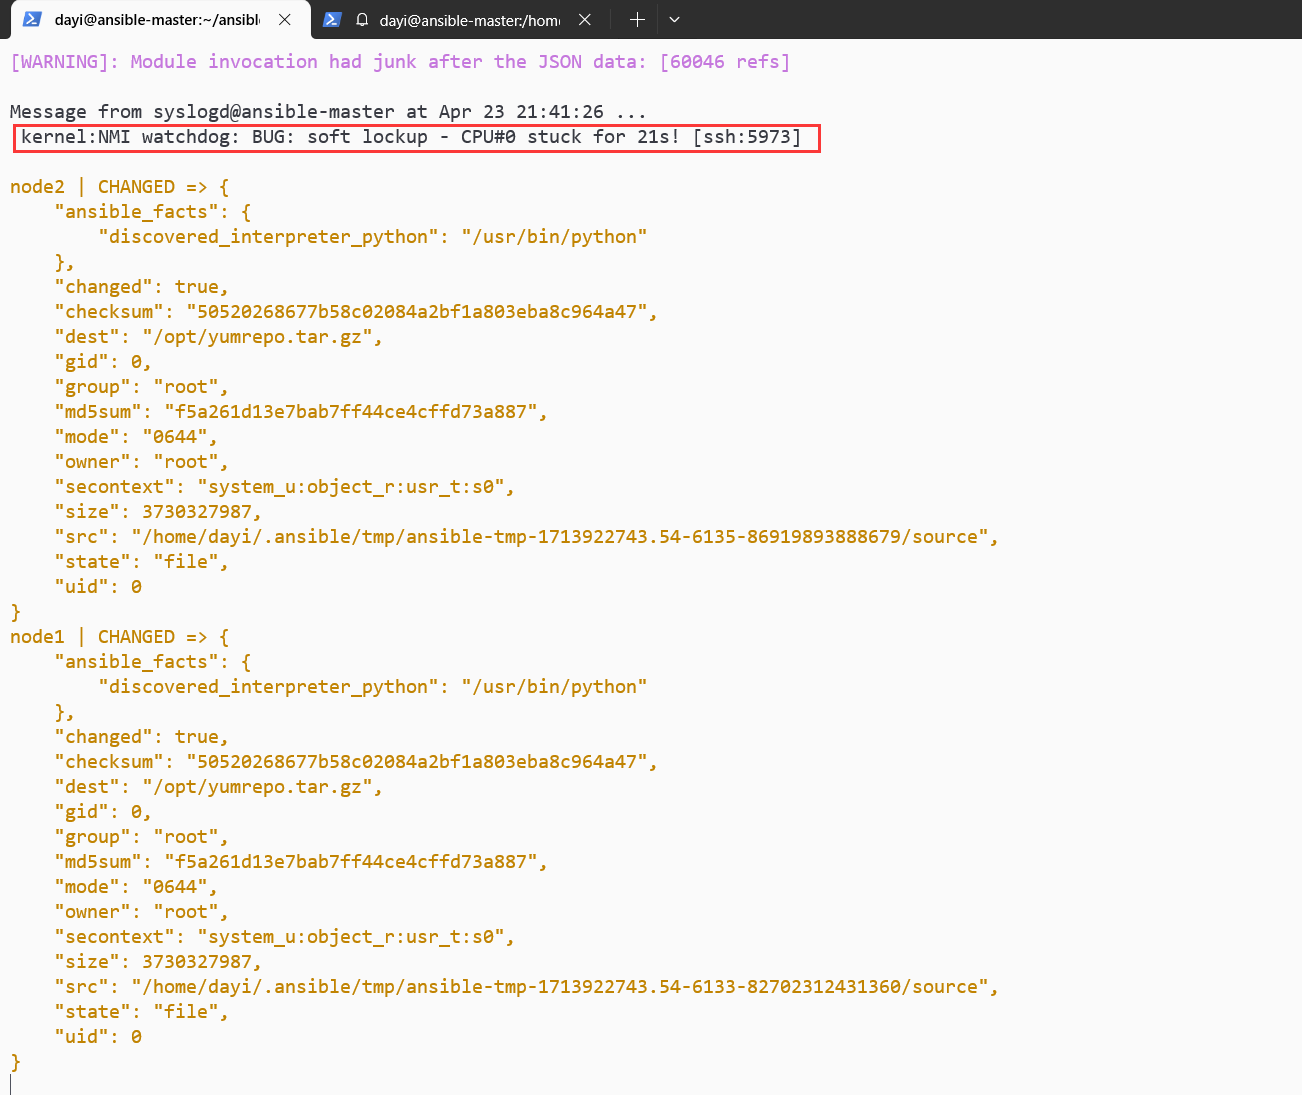
CPU都给我卡死了。
不容易: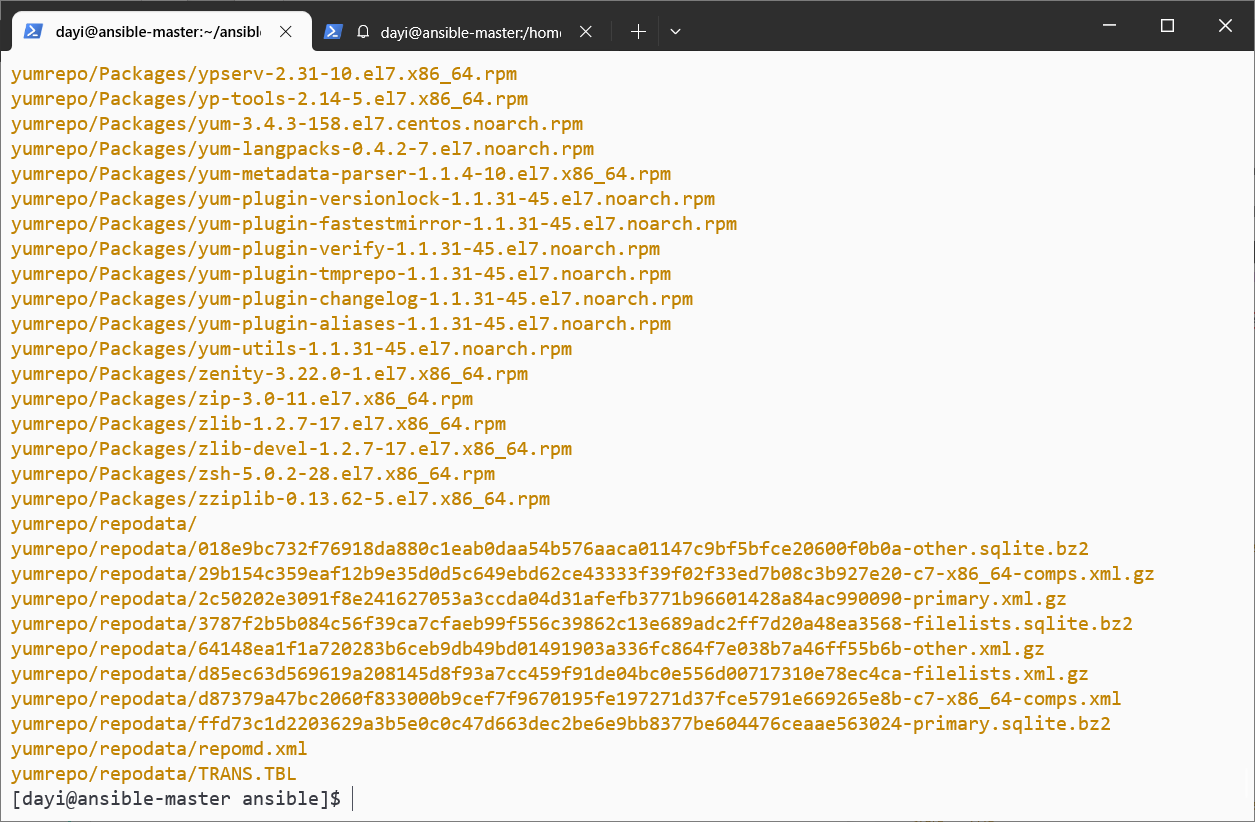
【可选】删除从节点全部yum仓库
这个我没做
你可以玩玩这个PLAYBOOK(建议先打个快照)
---
- hosts:
    - node1
    - node2
    - node3
  become: yes

  tasks:
    - name: Remove yum repo directories
      file:
        path: "{{ item }}"
        state: absent
      loop:
        - /etc/yum.repos.d
        - /opt/yumrepo
        - /var/cache/yum
        - /var/lib/rpm

    - name: Clean yum cache
      command: yum clean all
      args:
        warn: false

    - name: Remove rpm database
      command: rm -f /var/lib/rpm/__db*
      args:
        warn: false
配置本地 YUM仓库 playbook
su dayi
cd ~/ansible/
nano yum_packages.yml
内容
---
- name: create a repo
  hosts: all
  tasks:

    - name: Add repository
      yum_repository:
        name: epel_local_opt #这里我有改过
        description: EPEL YUM repo
        baseurl: file:///opt/yumrepo/
        enabled: yes
        gpgcheck: no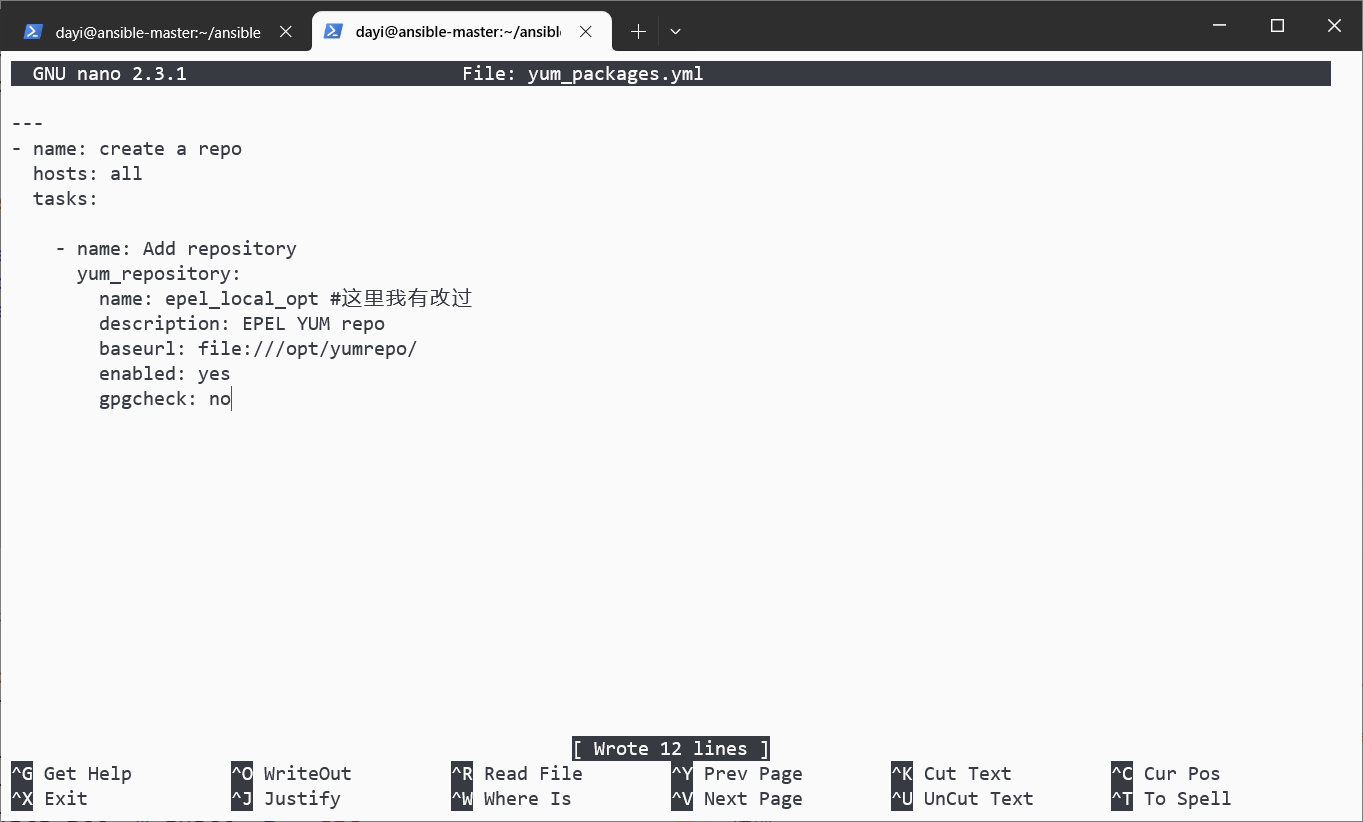
继续执行:
ansible-playbook yum_packages.yml
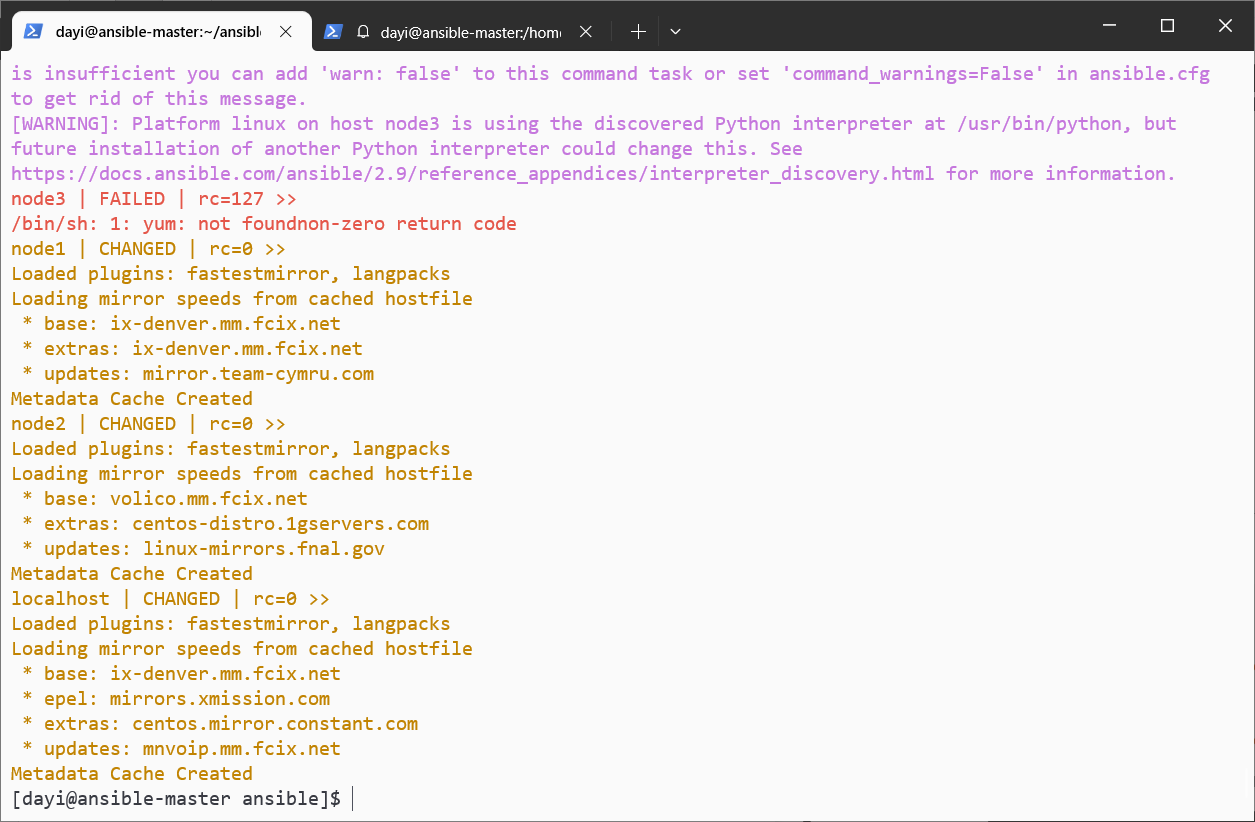
ansible all -m shell -a " yum makecache "
ansible all -m shell -a " ls /etc/yum.repos.d/ "
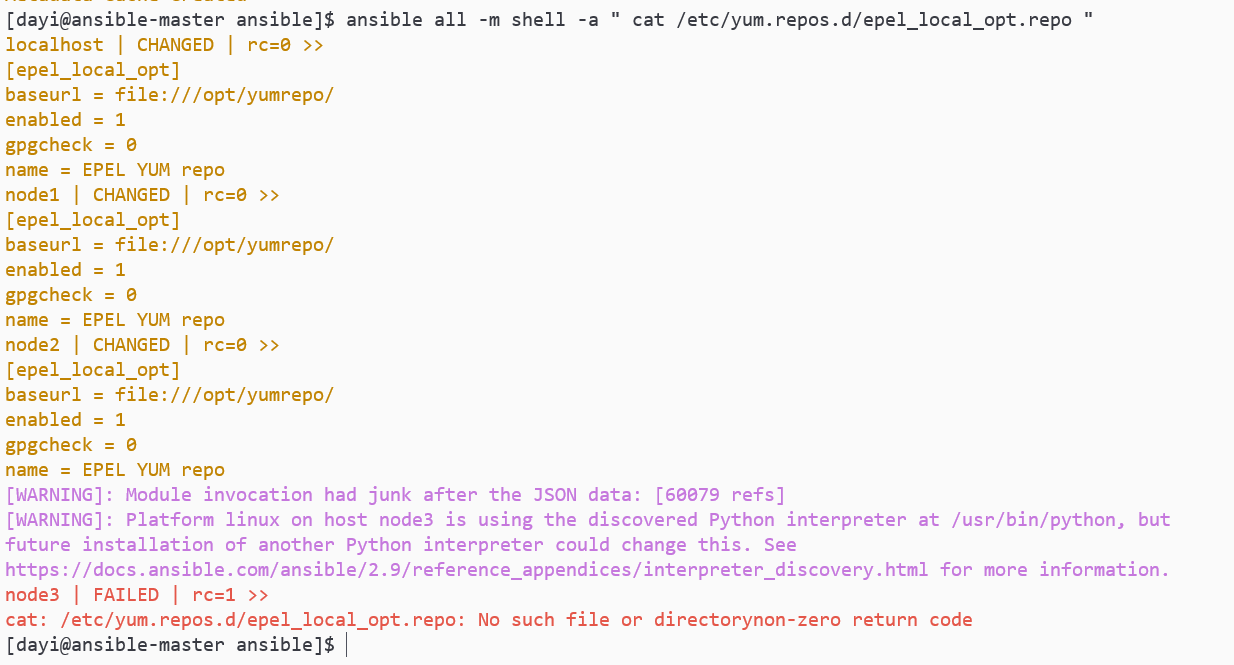
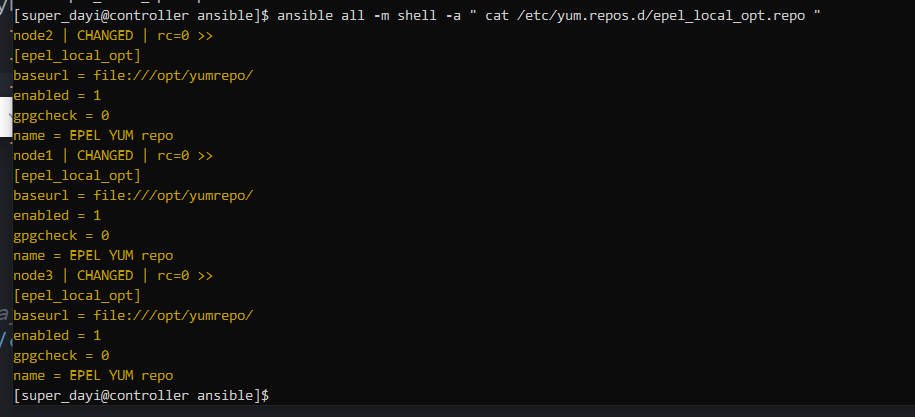
ansible all -m shell -a " cat /etc/yum.repos.d/epel_local_opt.repo "
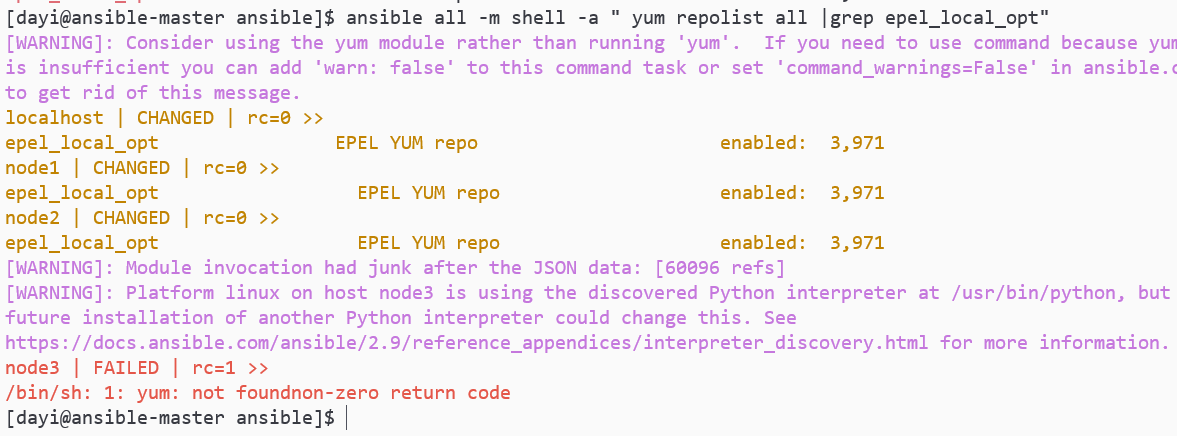
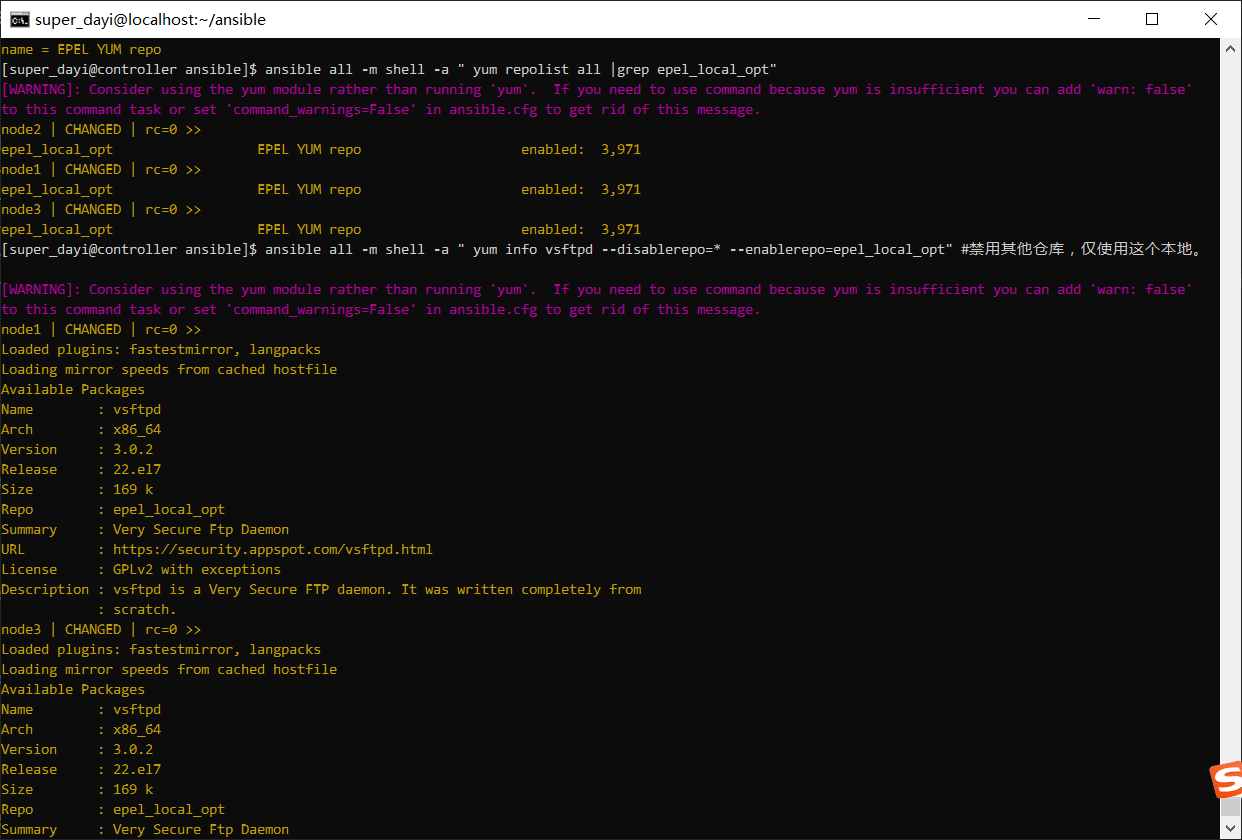
ansible all -m shell -a " yum repolist all |grep epel_local_opt"
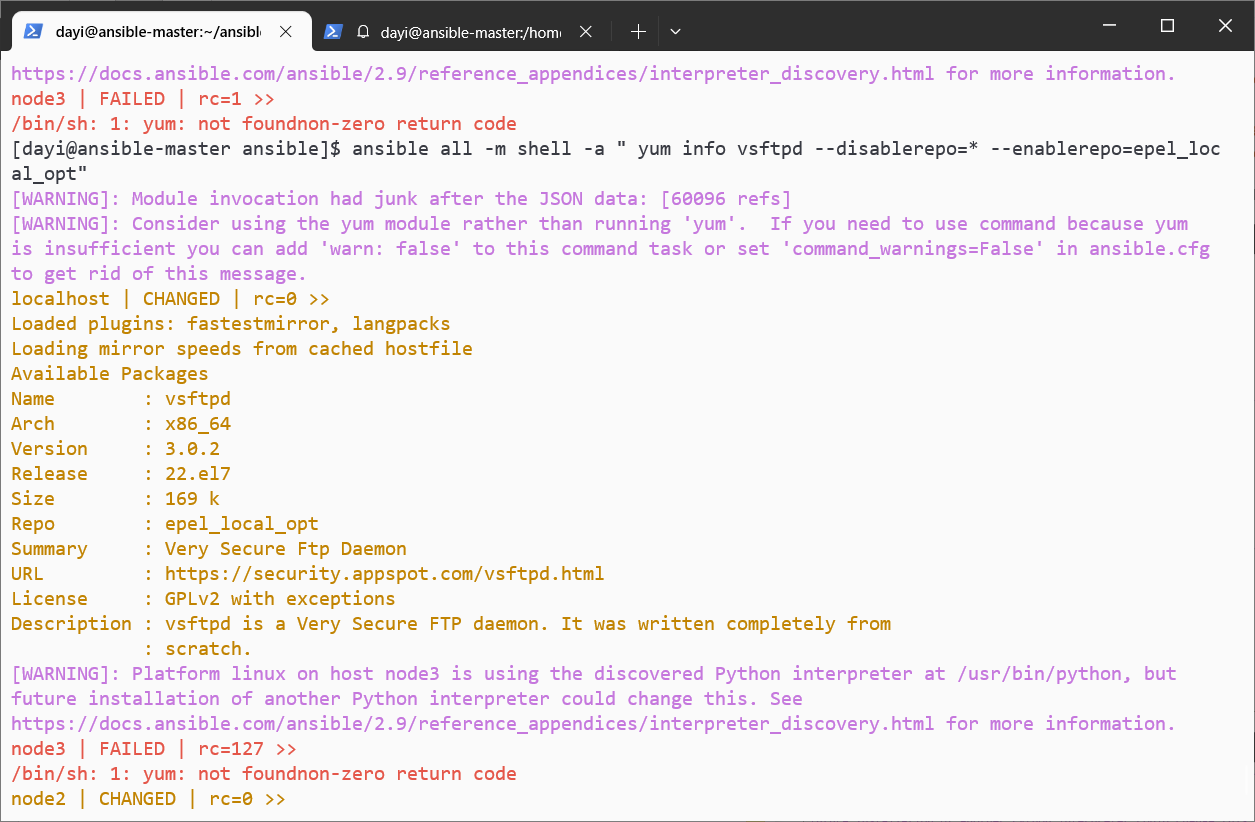
ansible all -m shell -a " yum info vsftpd --disablerepo=* --enablerepo=epel_local_opt" #禁用其他仓库,仅使用这个本地。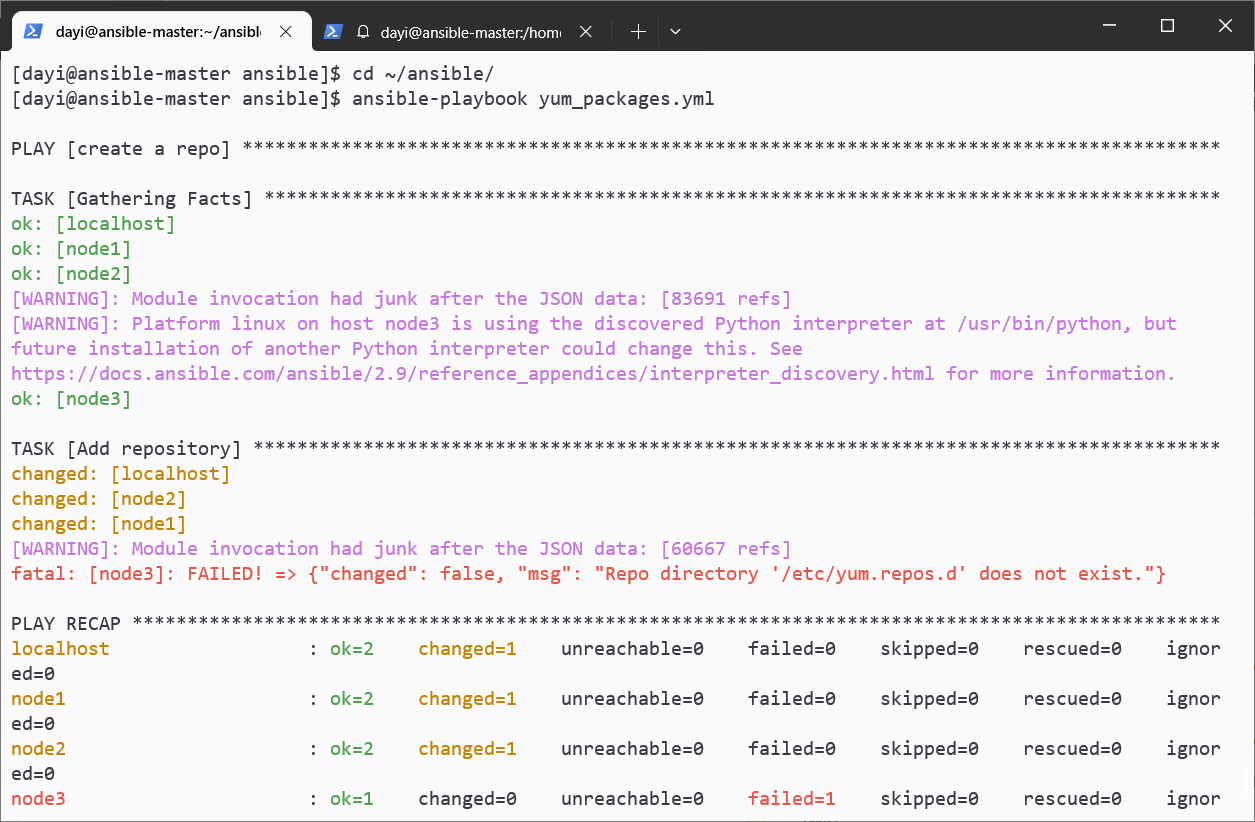
继续
su dayi
cd ~/ansible
vim yum_install_vsftpd.yml
文件内容:
---
- name: install a packages
  hosts: node1
  tasks:
    - name: install vsftpd
      yum:
        name: vsftpd
        state: present
ansible-playbook yum_install_vsftpd.yml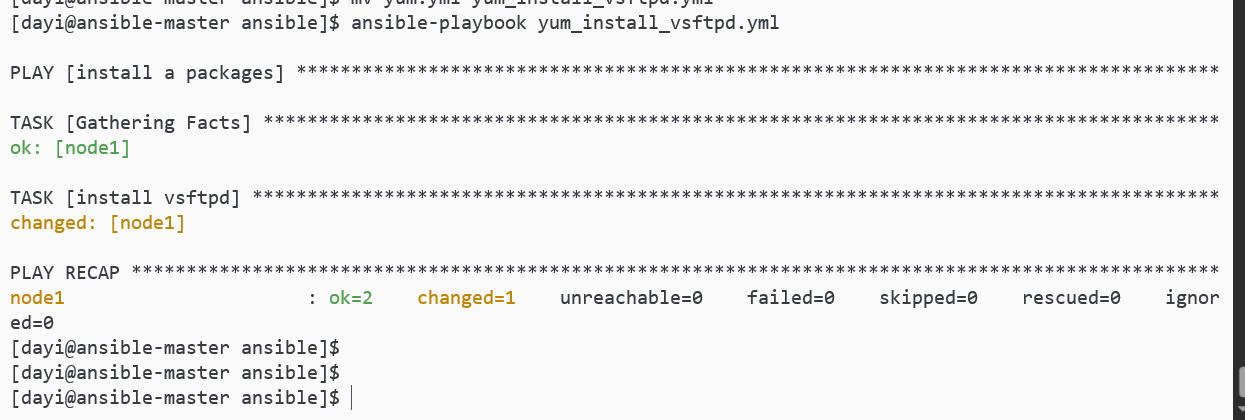
启动vsftpd
su dayi
cd ~/ansible
ansible node1 -m shell -a " systemctl status vsftpd "

vim start_vsftpd_service.yml
文件内容:
---
- name: start a services
  hosts: node1
  tasks:
    - name: start vsftpd
      service:
        name: vsftpd
        state: started
    enabled: yes
继续
ansible-playbook start_vsftpd_service.yml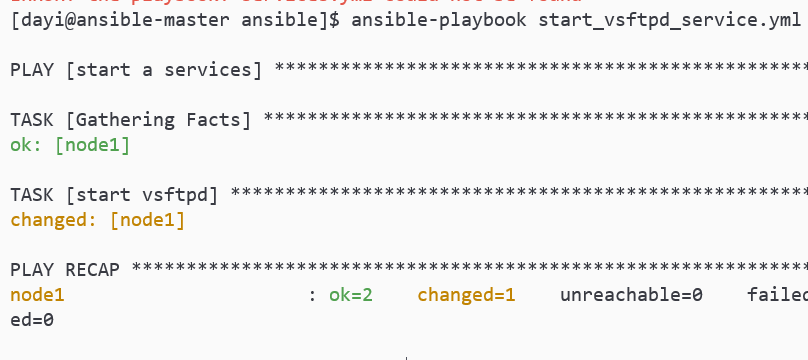
检查
ansible node1 -m shell -a " systemctl status vsftpd "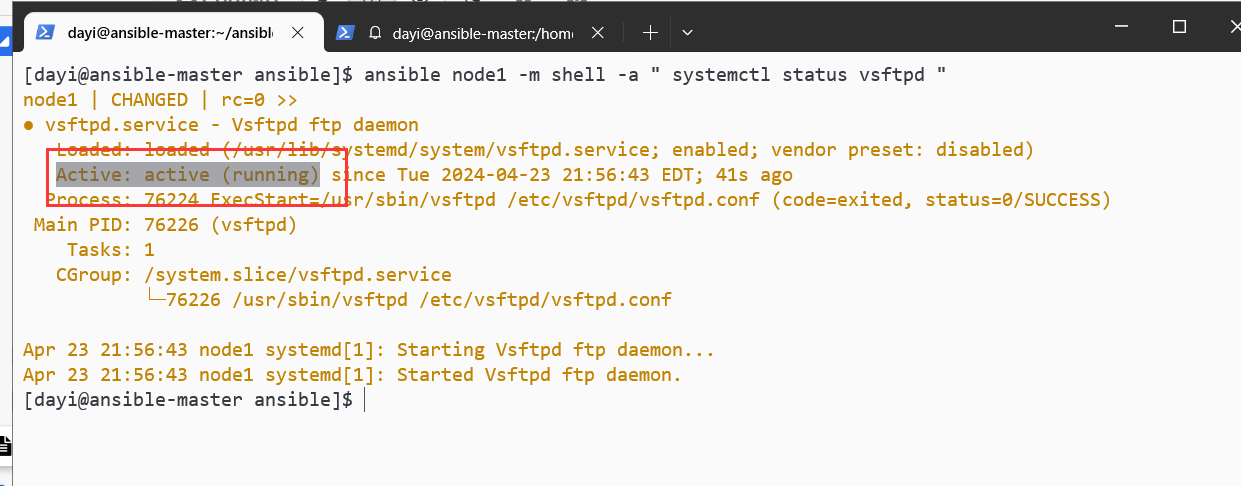
两个play;1个play,多个tasks
su dayi
cd ~/ansible/
nano installstart_1.yml
---
#play1 install packages
- name: install a packages
  hosts: node1
  tasks:

    - name: install vsftpd
      yum:
        name: vsftpd
        state: present
#play2 start
- name: install a packages
  hosts: node1
  tasks:
    - name:  start vsftpd
      service:
        name: vsftpd
        state: started
        enabled: yes
ansible-playbook installstart_1.yml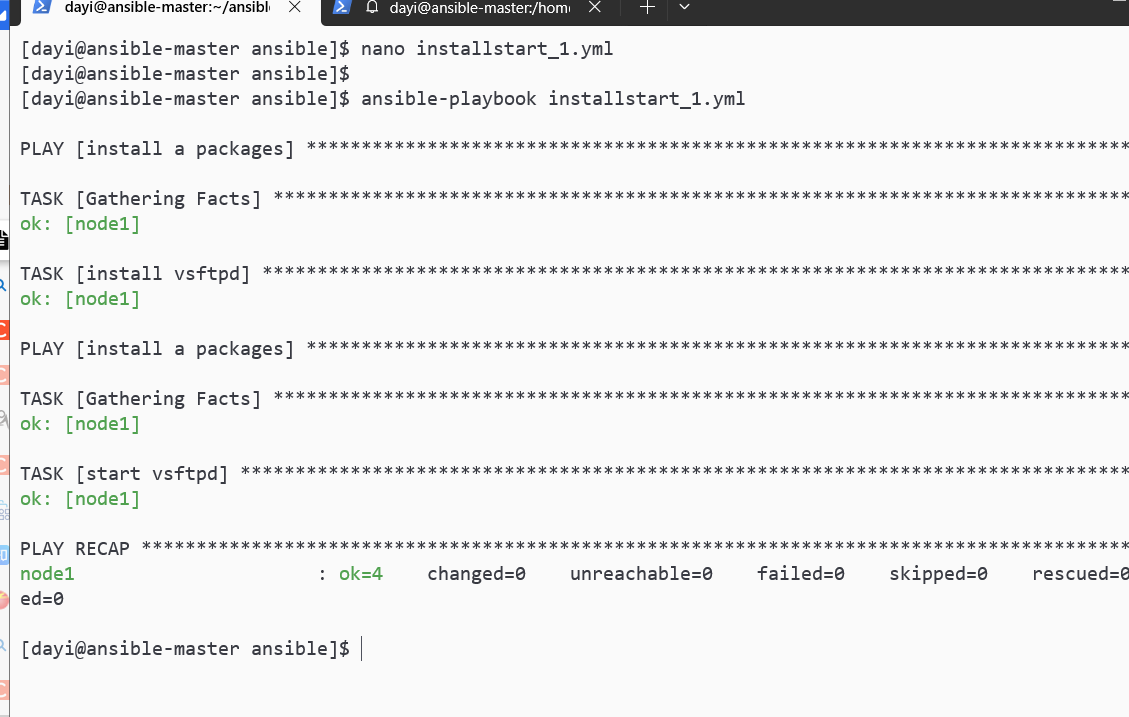
nano installstart_2.yml
---
- name: install a packages
  hosts: node1
  tasks:
#tasks1 install
    - name: task1 install vsftpd
      yum:
        name: vsftpd
        state: present
#tasks2 start
    - name: task2 start vsftpd
      service:
        name: vsftpd
        state: started
        enabled: yes
ansible-playbook installstart_2.yml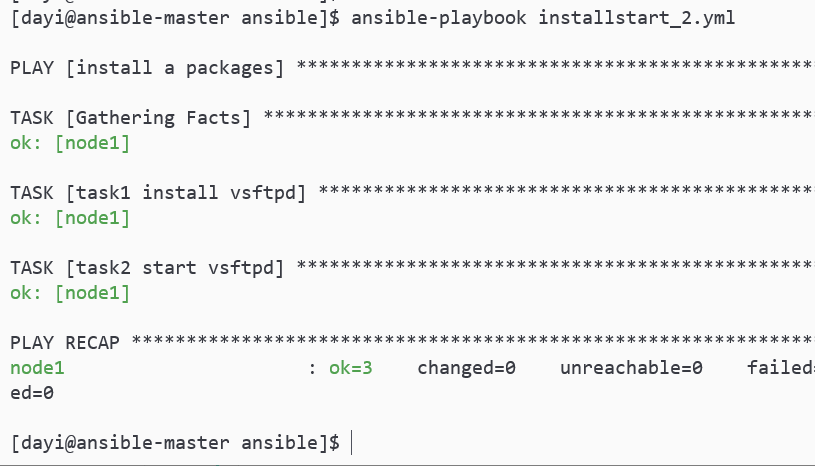
【课上作业2】
使用user模块创建用户:用户名为你个人的姓
指定家目录为/opt/你的名字
shell登录环境为/sbin/nologin
描述为你的名字的全称
su dayi
cd ~/ansible
nano task_2_ovo.yamlnano task_2_ovo.yaml
---
- hosts: all
  become: yes
  tasks:
    - name: 'create user'
      user:
        name: "dayi_ovo" #姓:li
        comment: "dayiiiiiiiiiiiii" # 名:ligoudan
        home: "/opt/dayiiiiiiiiiiiii" # 名:ligoudan
        shell: "/sbin/nologin"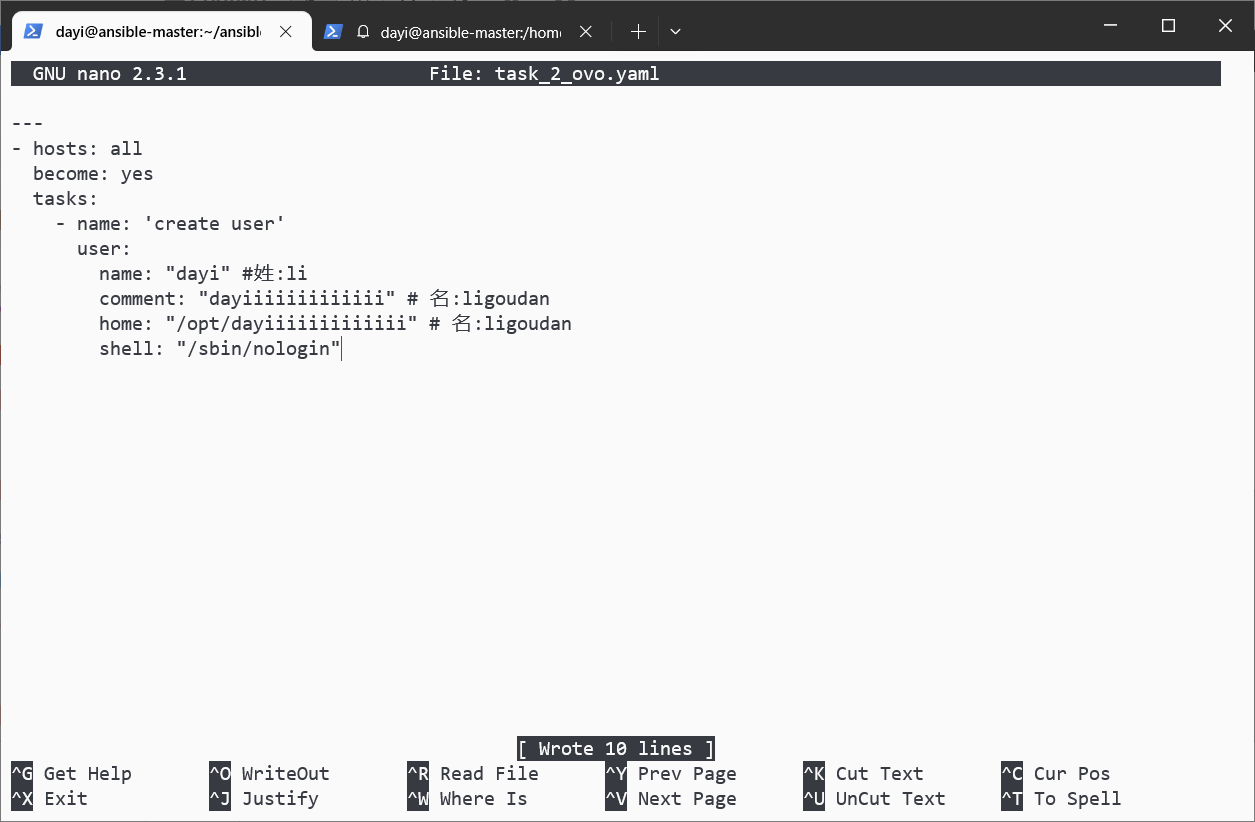
继续执行
ansible-playbook task_2_ovo.yaml -vv
ansible all -m shell -a "cat /etc/passwd|grep dayi_ovo"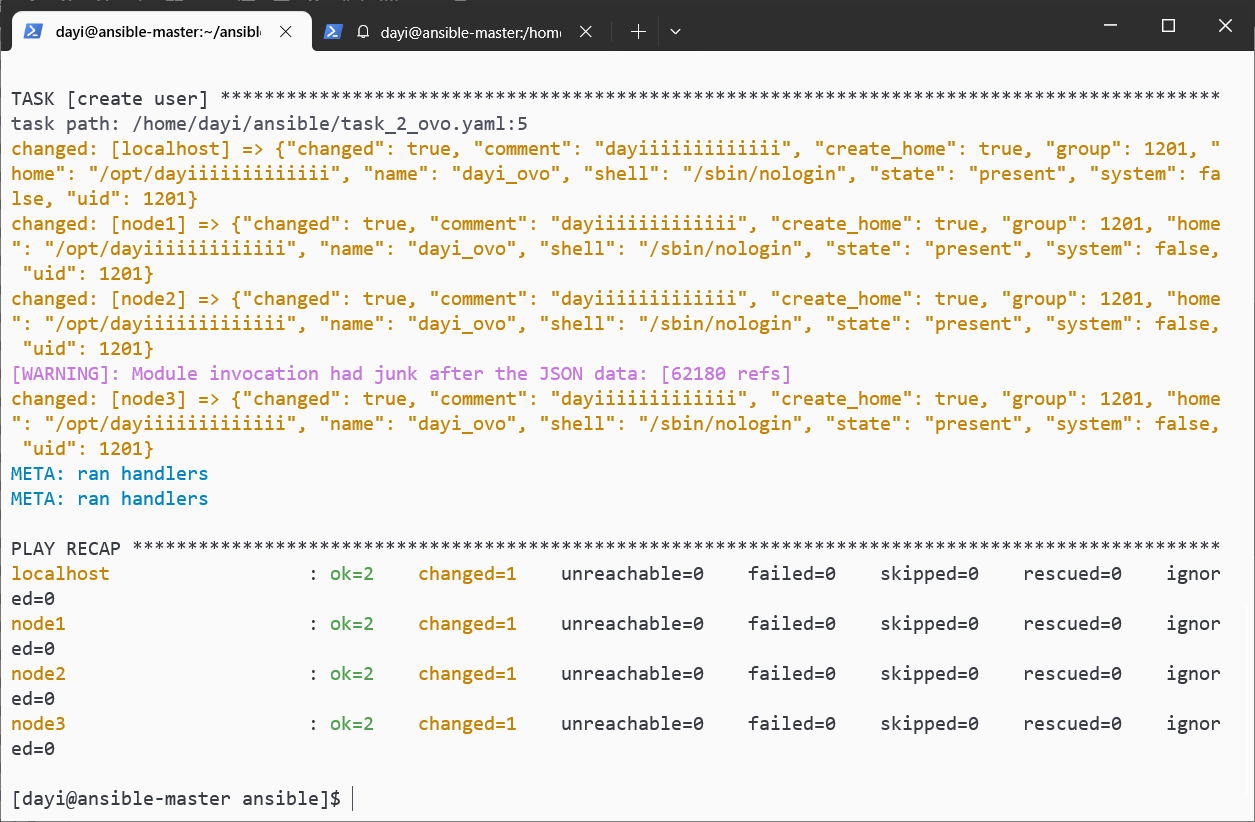
ovo查看:
变量
字母、数字、下划线
su dayi
cd ~/ansible
nano crate_user_var.yaml
ansible-playbook crate_user_var.yaml -vv
ansible all -m shell -a "cat /etc/passwd|grep lisisi"
---
- name: create a user use vars
vars:
username: lisisi
hosts: all
tasks:
- name: create {{ username }}
user:
name: "{{ username }}"
comment: "{{ username }}"
uid: "1405"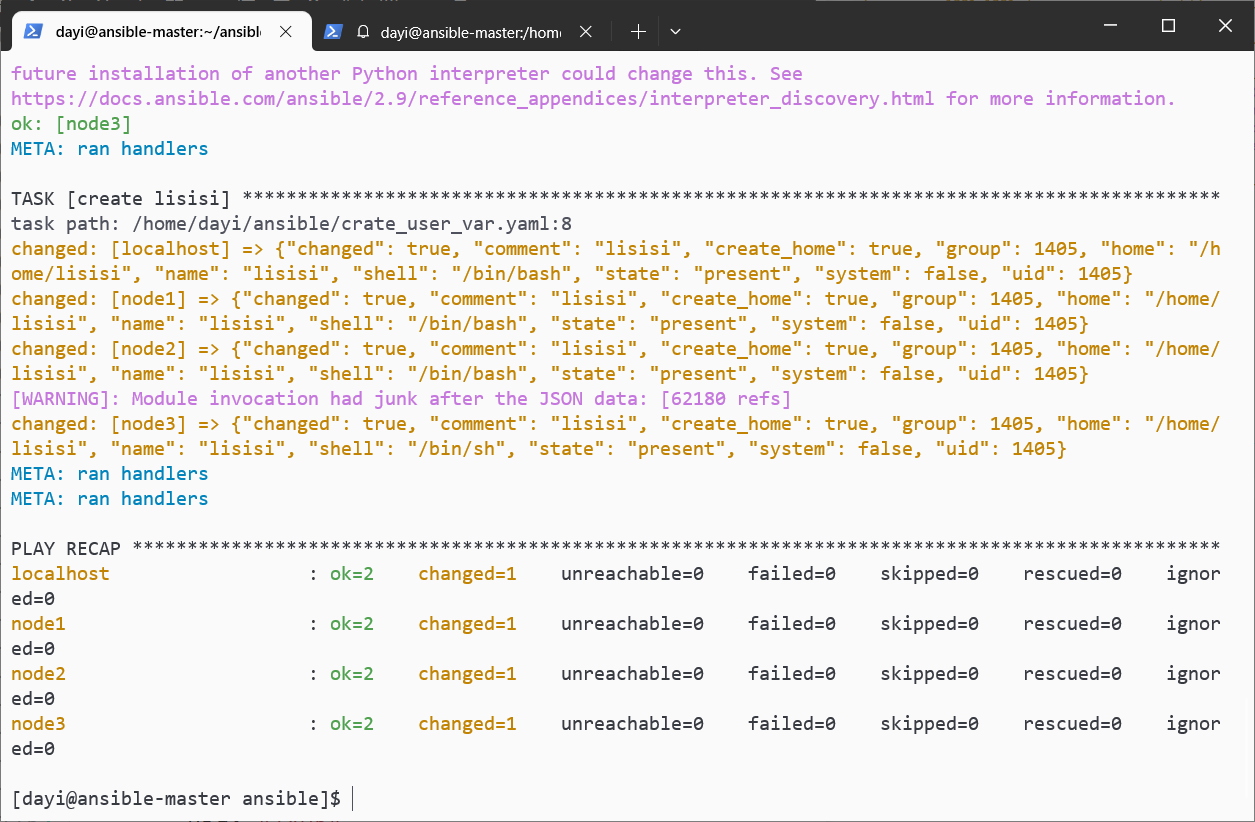

周三下午
要求
如何利用ansible为多台linux服务器同时配置网站服务:
lamp:linux+apache+mysql+php
1.安装
2.启动服务
3.防火墙
4.test page
先分个组
vim ~/ansible/inventory

[prod]
node2
node3
写index.php文件到
su dayi
cd ~/ansible
echo "<?php phpinfo(); ?>" >> index.php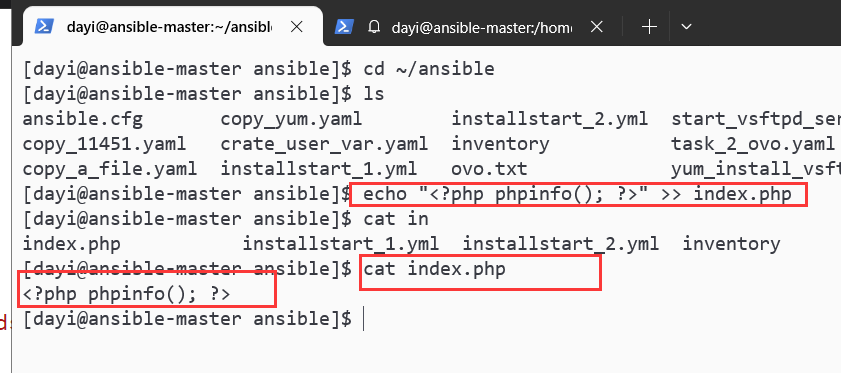
lamp.yaml
su dayi
cd ~/ansible/
nano lamp.yaml
lamp.yaml
---
- name: install lamp
hosts: prod
tasks:
- name: install packages
yum:
name: "{{ packages}}"
vars:
packages:
- httpd
- php
- mariadb
- mariadb-server
state: latest
- name: start services
service:
name: httpd
enabled: yes
state: started
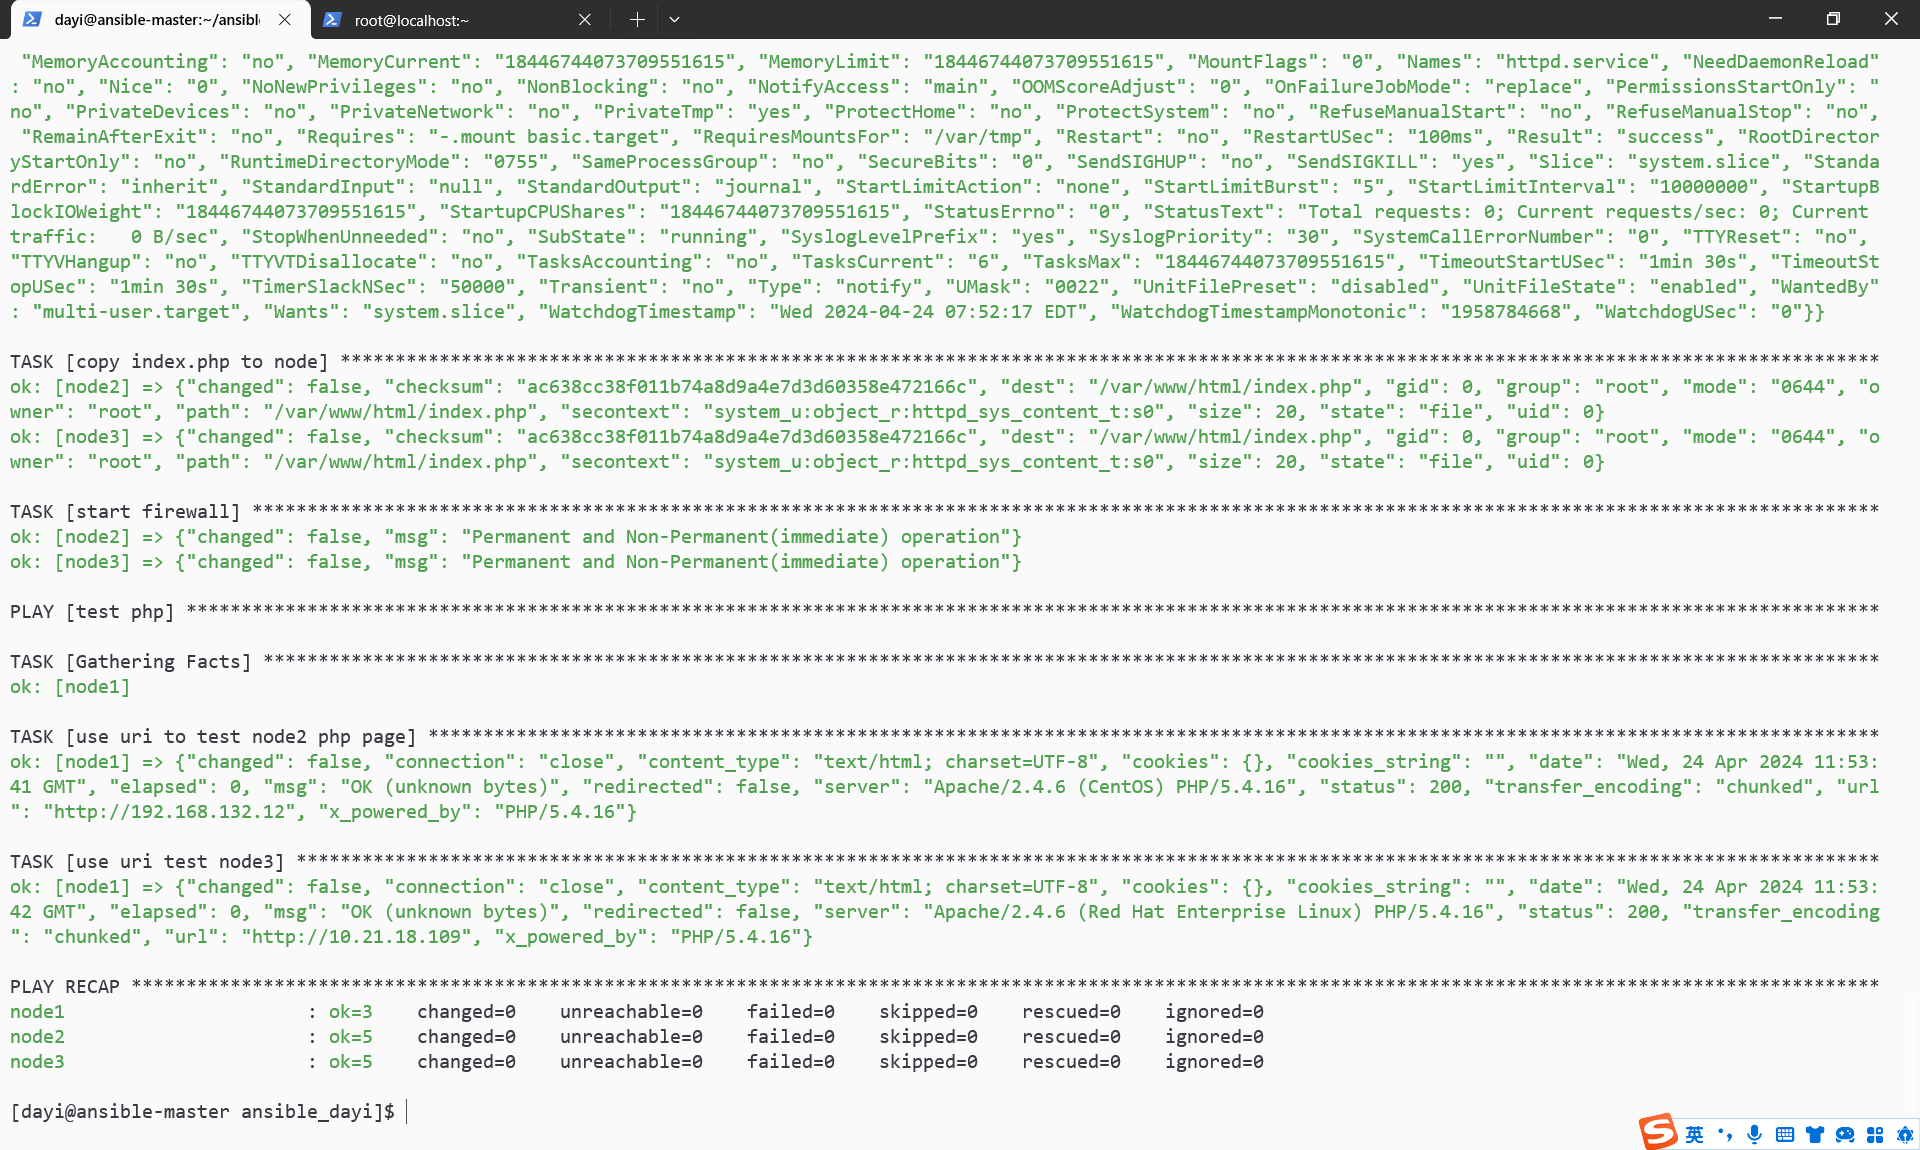
- name: copy index.php to node
copy:
src: ~/ansible/index.php
dest: /var/www/html/index.php
mode: '0644'
#php he mariadb 默认是起来的
- name: start firewall
firewalld:
service: http
permanent: yes
state: enabled
immediate: yes
#test php page
- name: test php
hosts: node1
tasks:
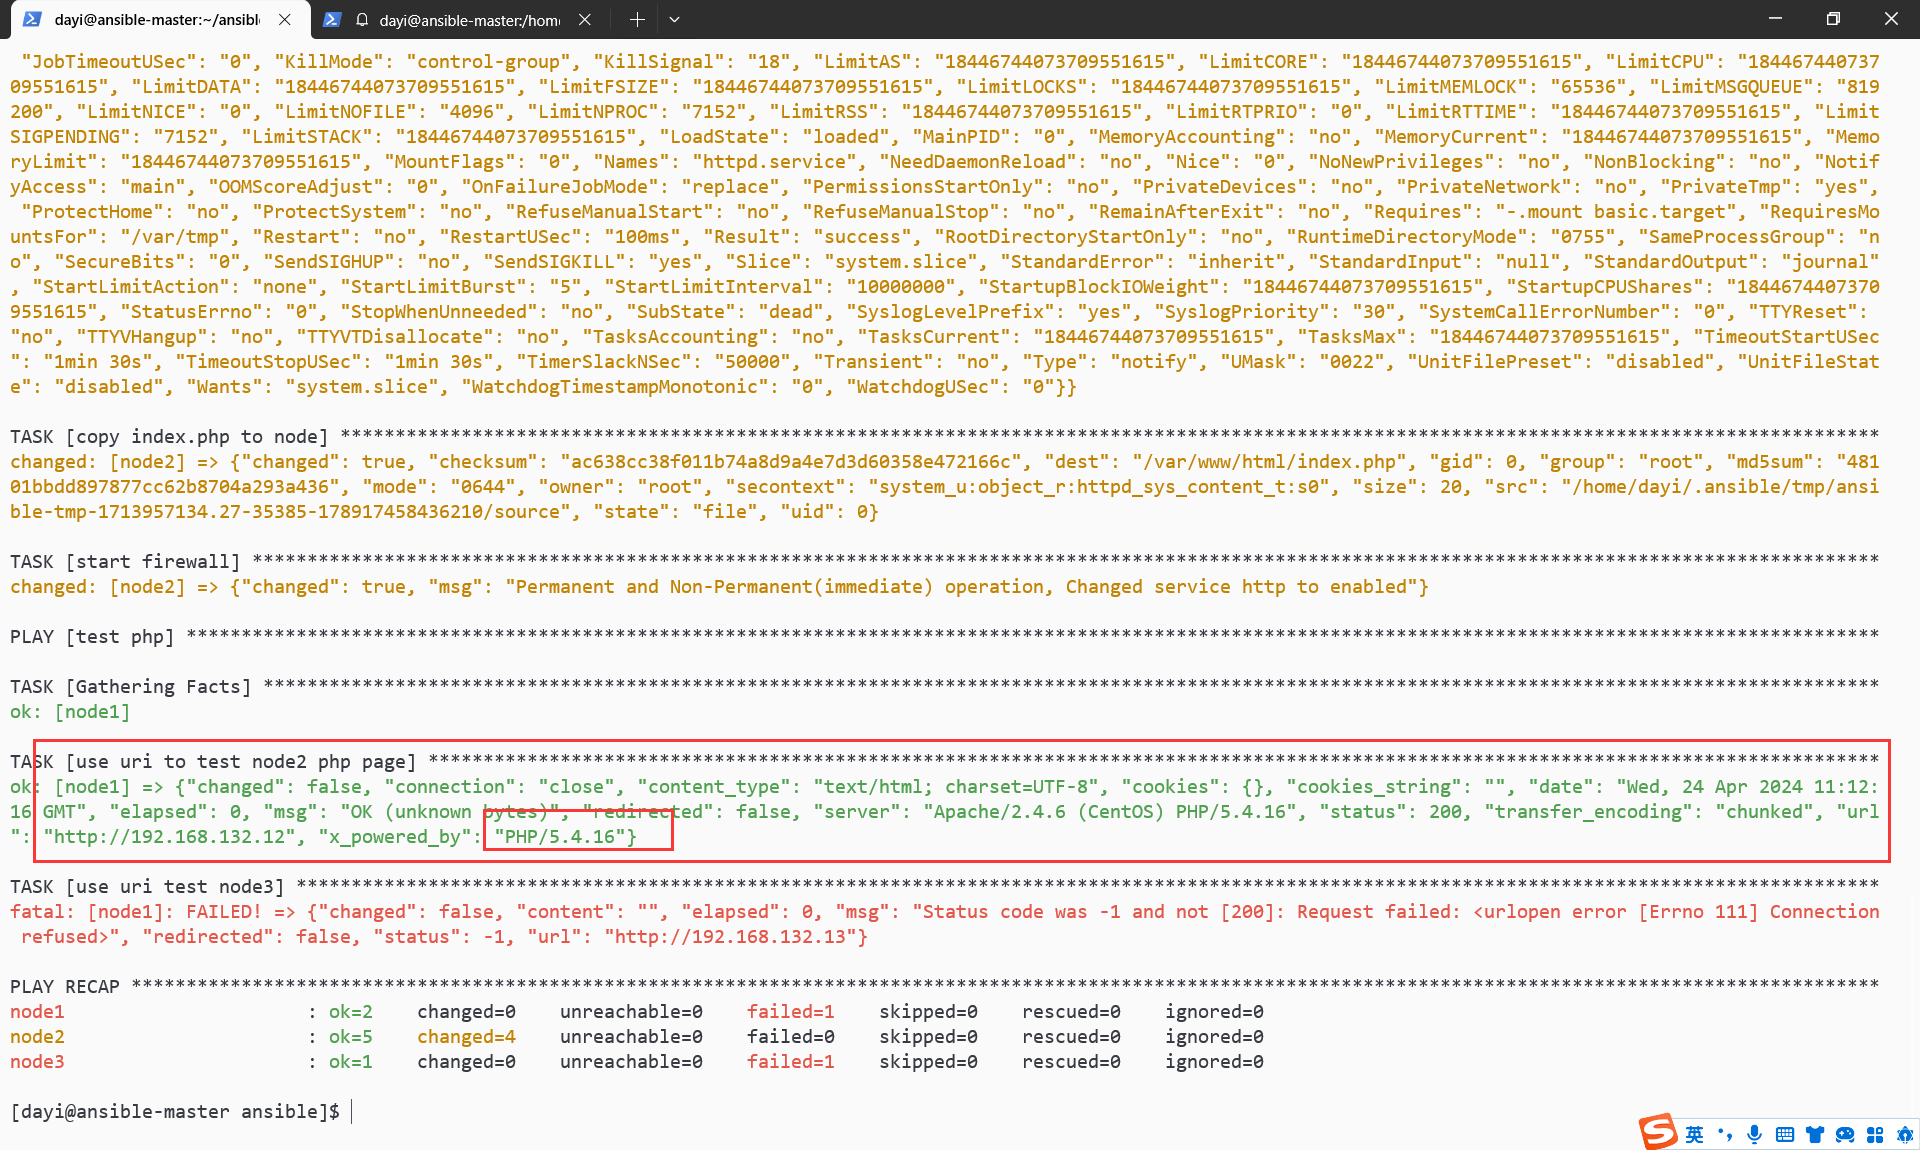
- name: use uri to test node2 php page
uri:
url: http://192.168.132.12
- name: use uri test node3
uri:
url: http://192.168.132.13ovo
ansible-playbook -C lamp.yaml #测试运行
ansible-playbook lamp.yaml -v #实际执行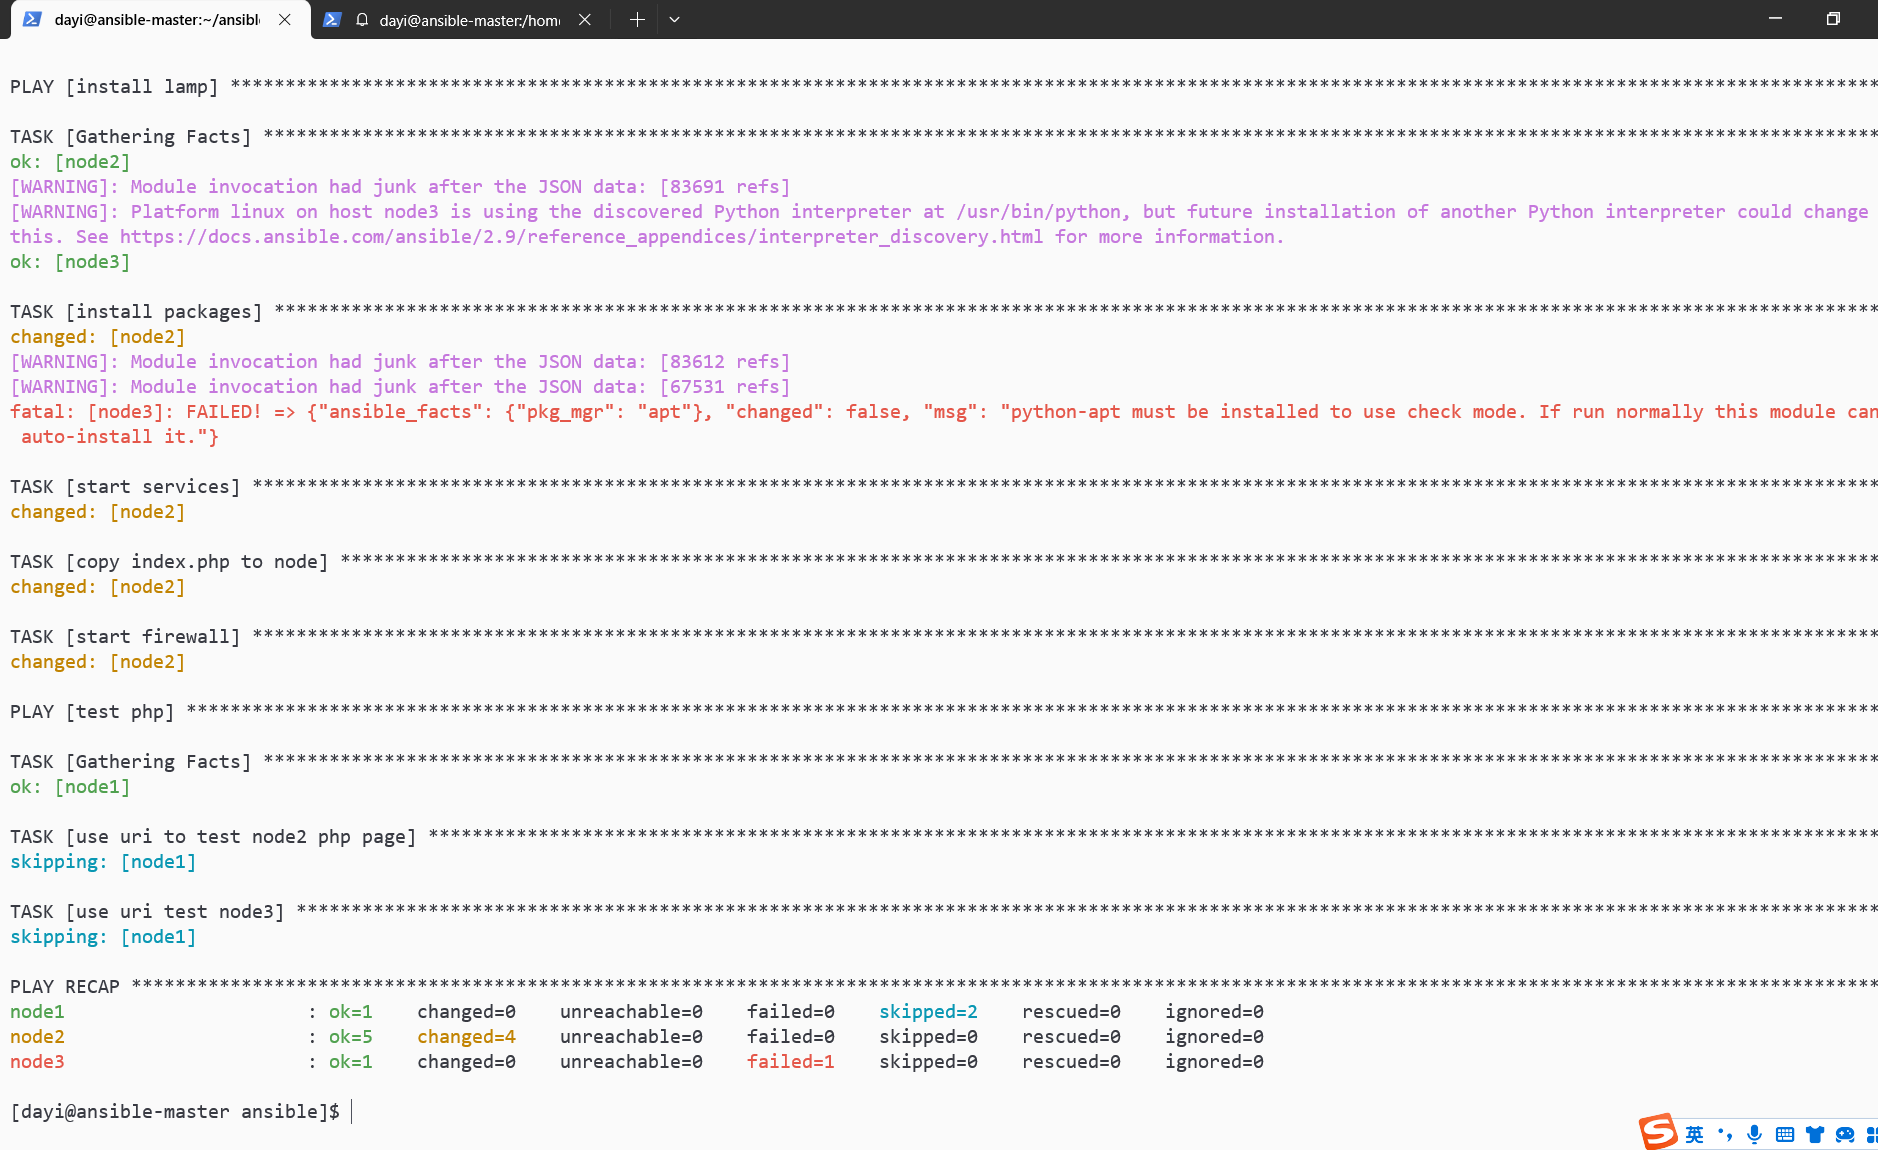
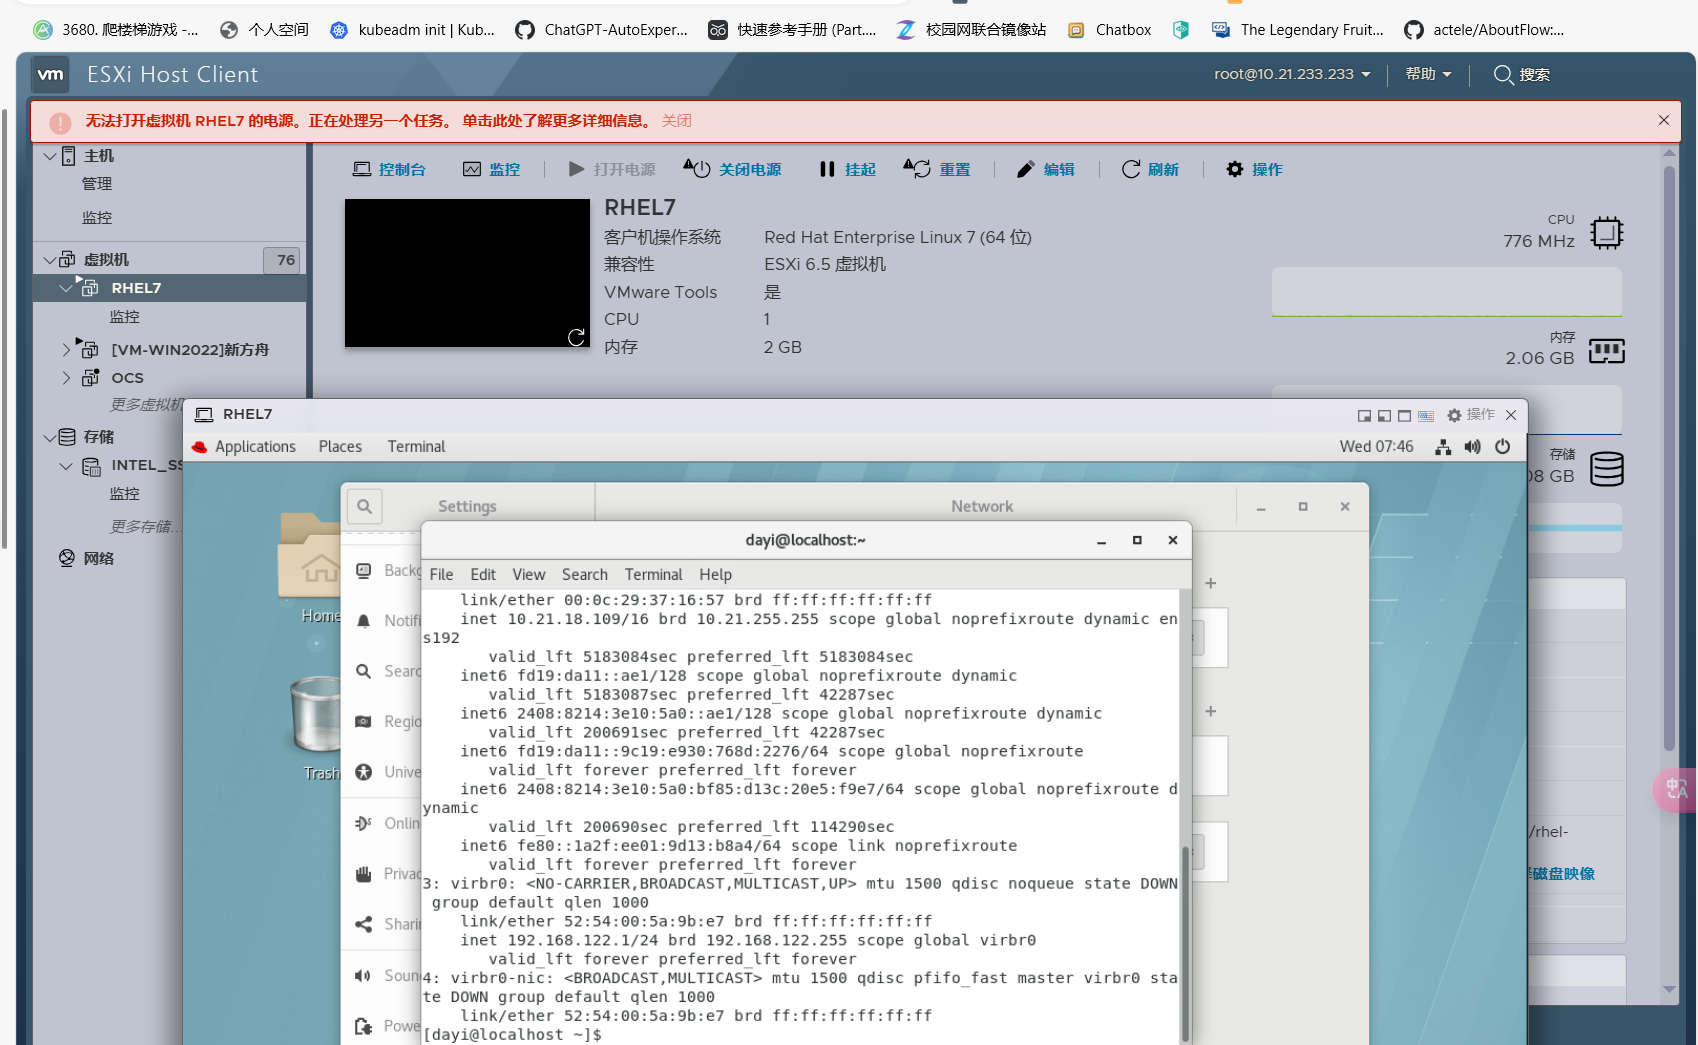
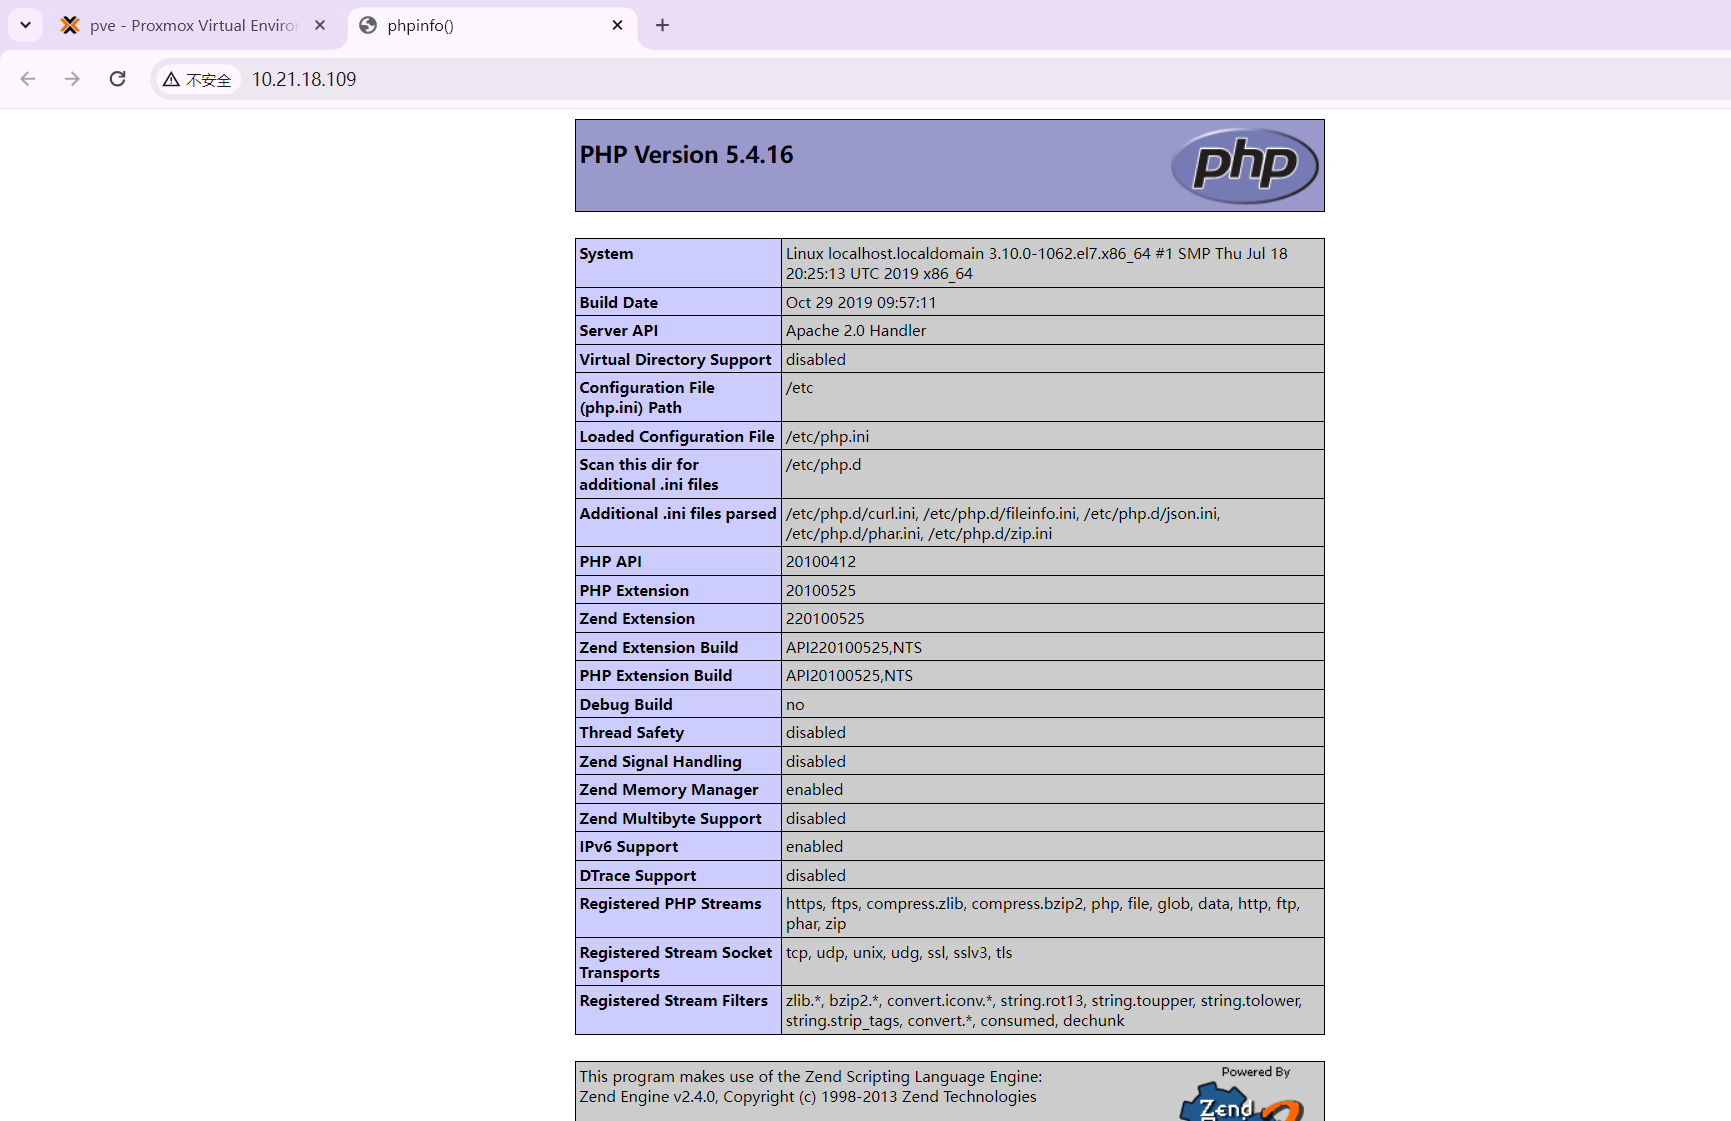
有PHP啦,我这里node3不能用是因为是因为这个系统不是centos。
换一个RHEL7 来看下正常界面
debian图一乐,整个RHEL7
ansible-playbook -C lamp.yaml #测试运行
ansible-playbook lamp.yaml -v #实际执行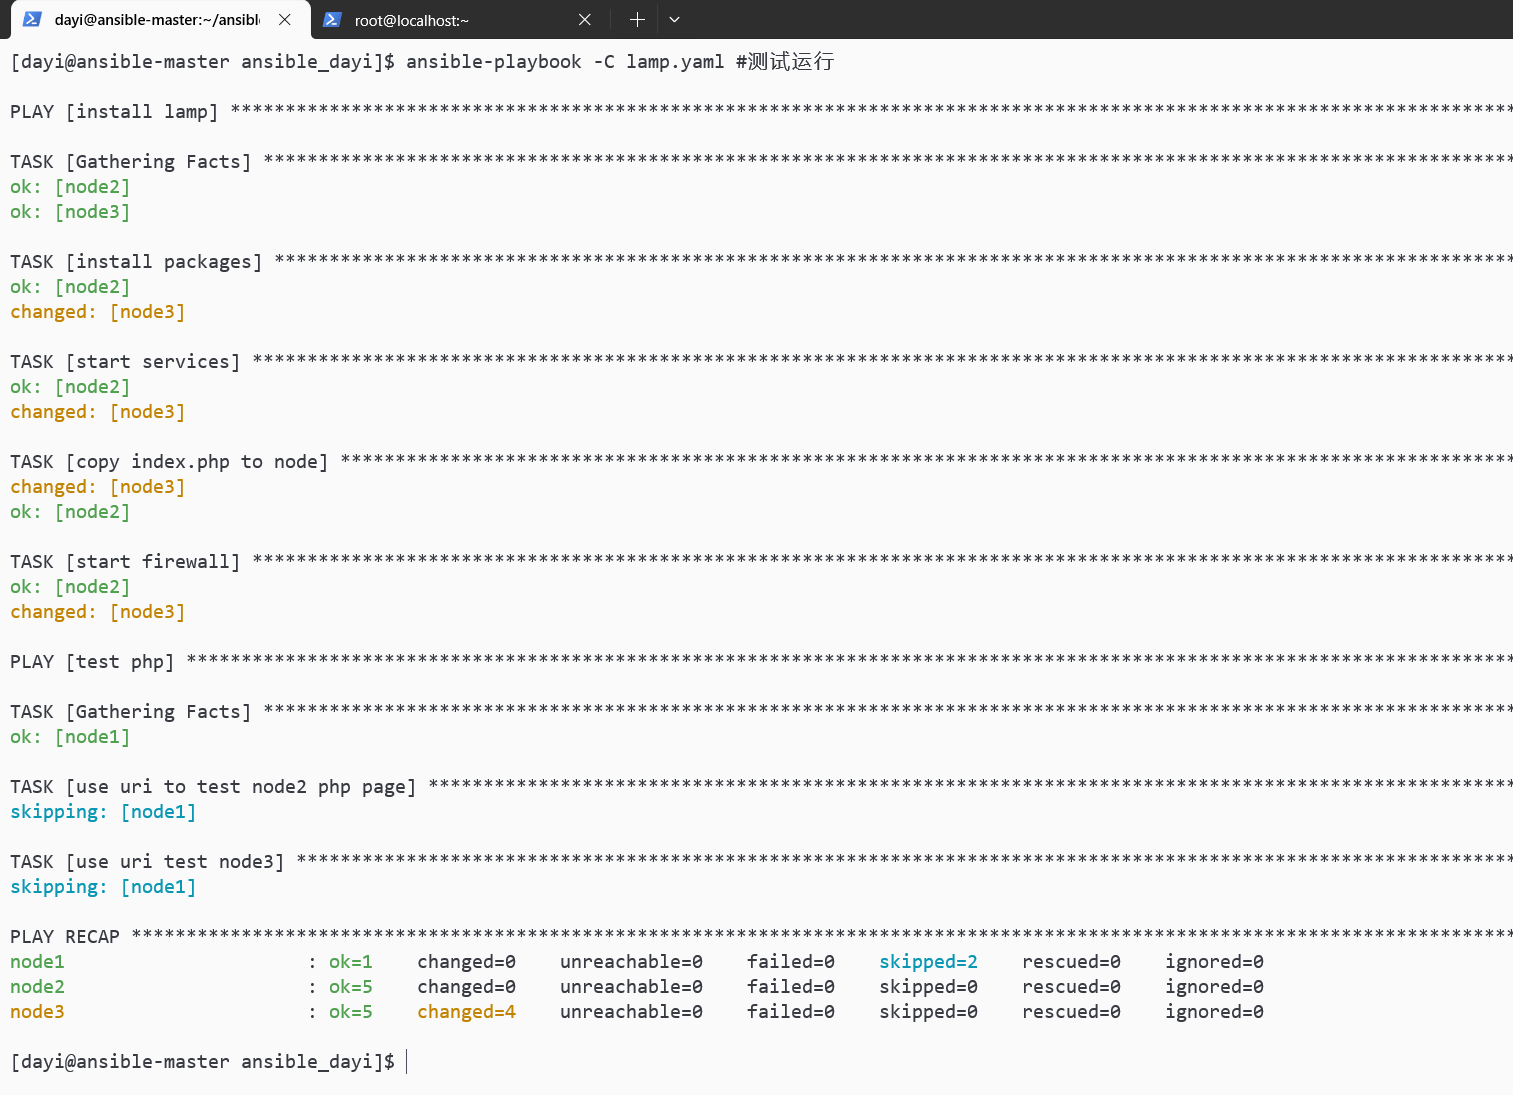
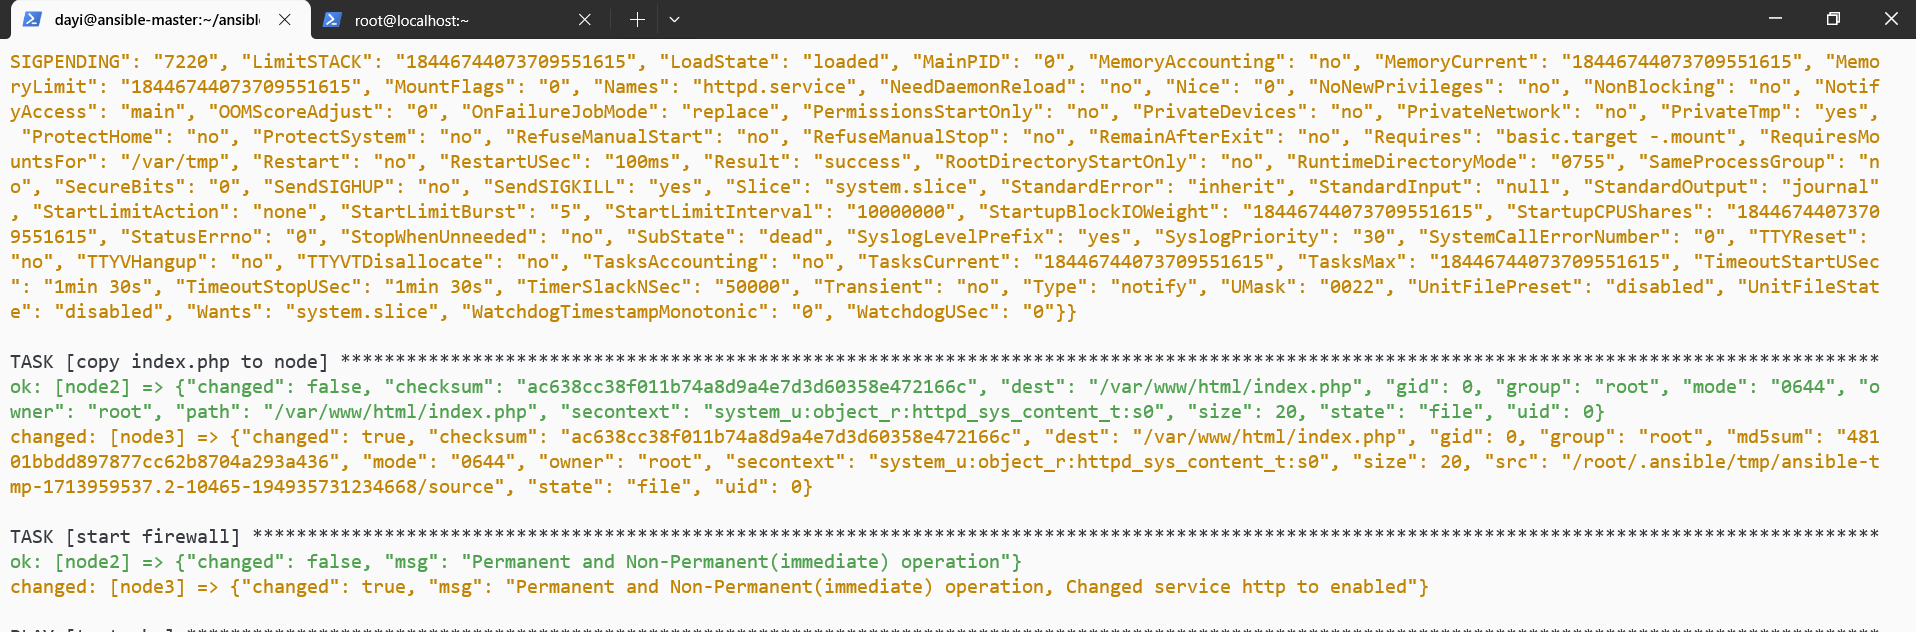
网页也可以打开: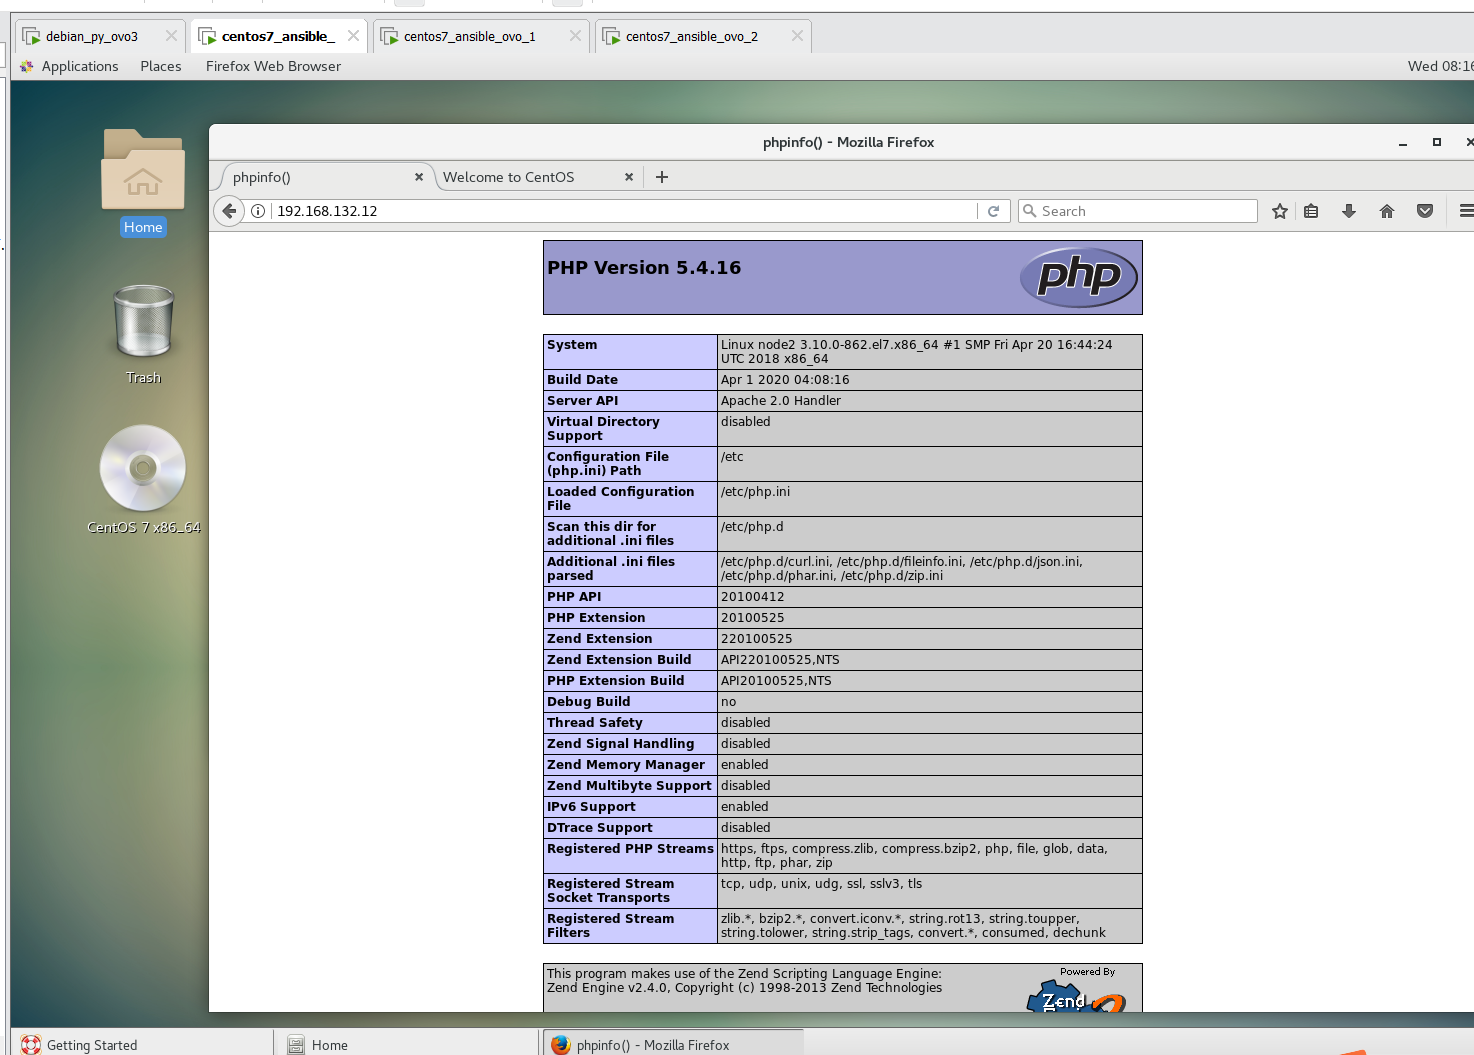
周四
第一节
使用user模块,使用loop参数,利用循环结构创建多个用户
如tom jerry david caobo

第一种方式,通过多个play或者task挨个创建
(以下是通过多个tasks创建)
多个TASK
su dayi
cd ~/ansible
nano useradd_muilt_tasks.yml
ansible-playbook useradd_muilt_tasks.yml
like:
---
- name: create a user
  hosts: all
  tasks:
    - name: create tom
      user:
        name: tom
        state: present
    - name: create jerry
      user:
        name: jerry
        state: present
    - name: create david
      user:
        name: david
        state: present
    - name: create caobo
      user:
        name: caobo
        state: present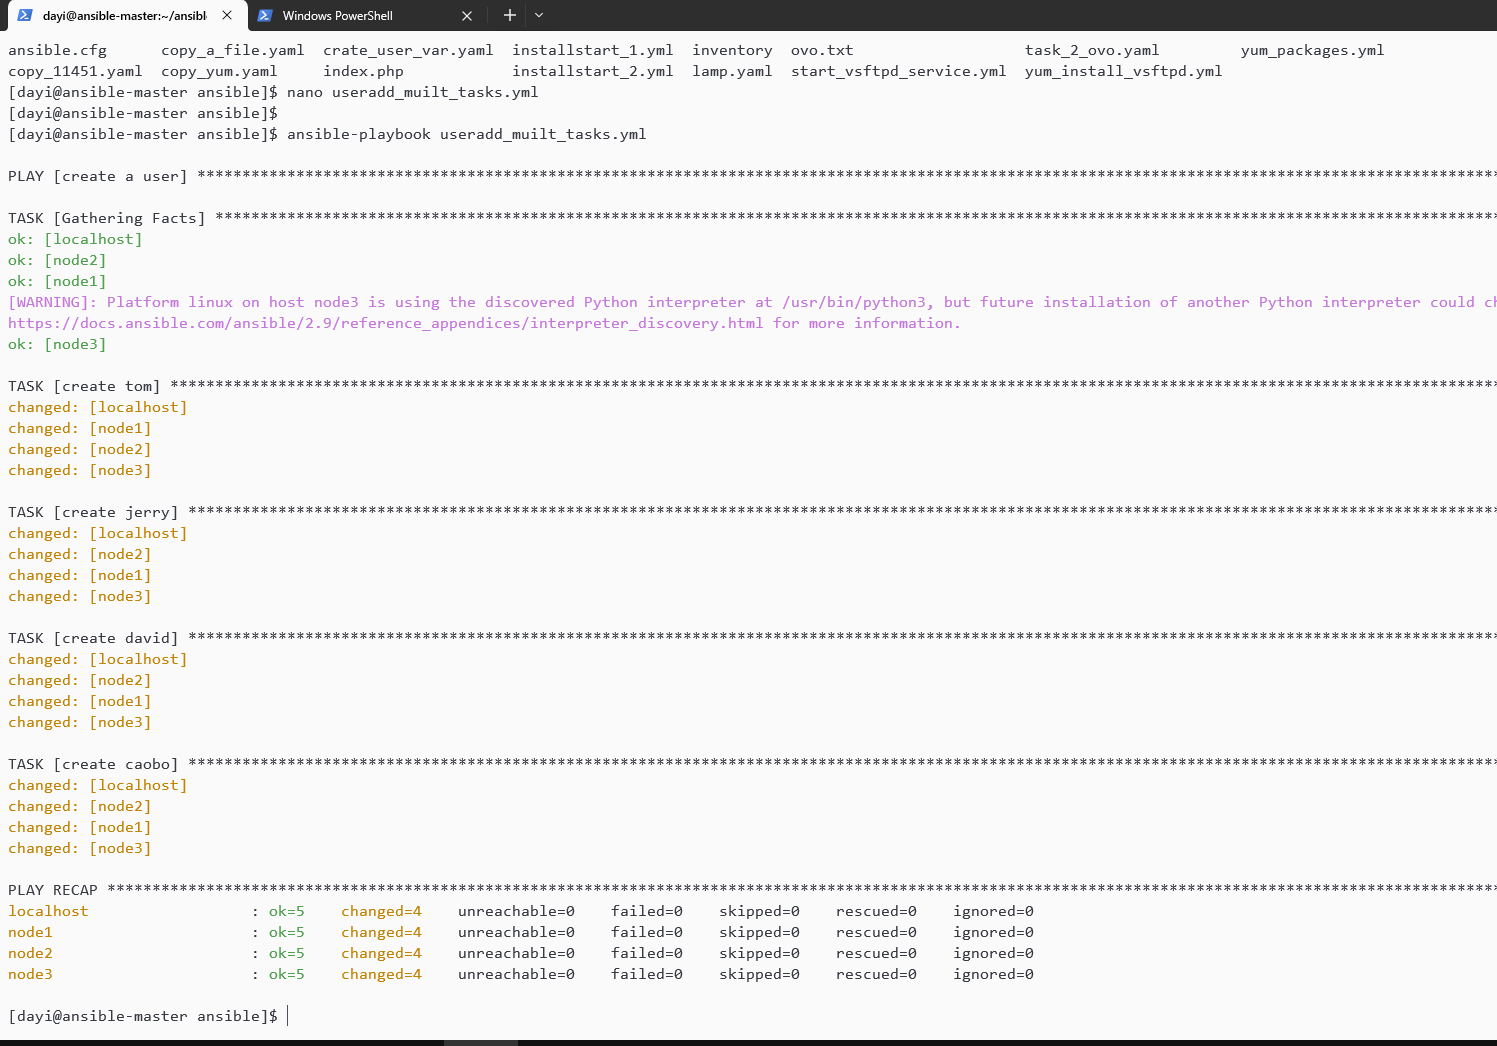
loop创建
su dayi
cd ~/ansible
nano useradd_muilt_tasks_loop.yml
ansible-playbook useradd_muilt_tasks_loop.yml
yaml:
---
- name: create users with loop
  hosts: all
  tasks:
    - name: create tom jerry david caobo
      user:
#使用item变量调用loop循环
        name: "{{item}}"
        state: present


      loop:
        - tom
        - jerry
        - david
        - caobo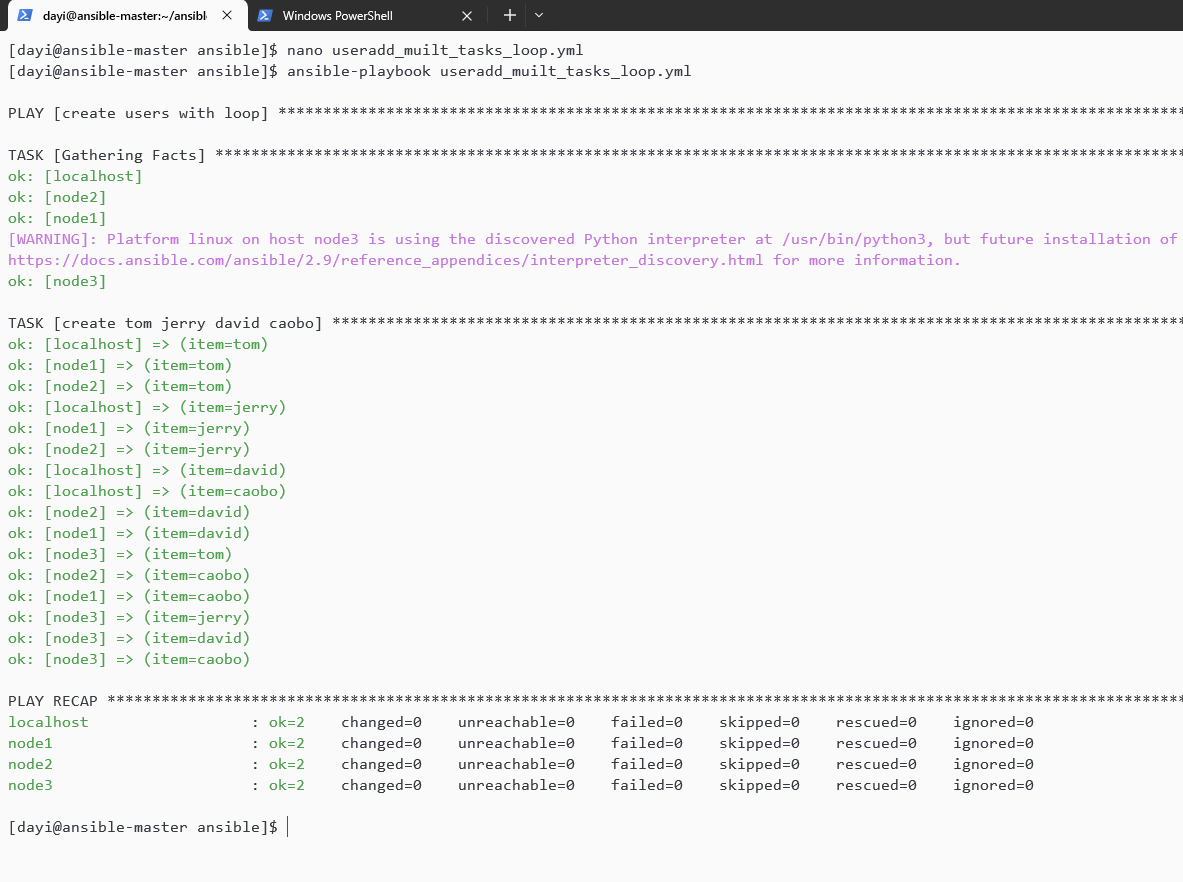
loop删除
su dayi
cd ~/ansible
nano userdel_muilt_tasks_loop.yml
ansible-playbook userdel_muilt_tasks_loop.yml
yaml:
---
- name: create users with loop
  hosts: all
  tasks:
    - name: create tom jerry david caobo
      user:
#使用item变量调用loop循环
        name: "{{item}}"
        state: absent
        remove: yes

      loop:
        - tom
        - jerry
        - david
        - caobo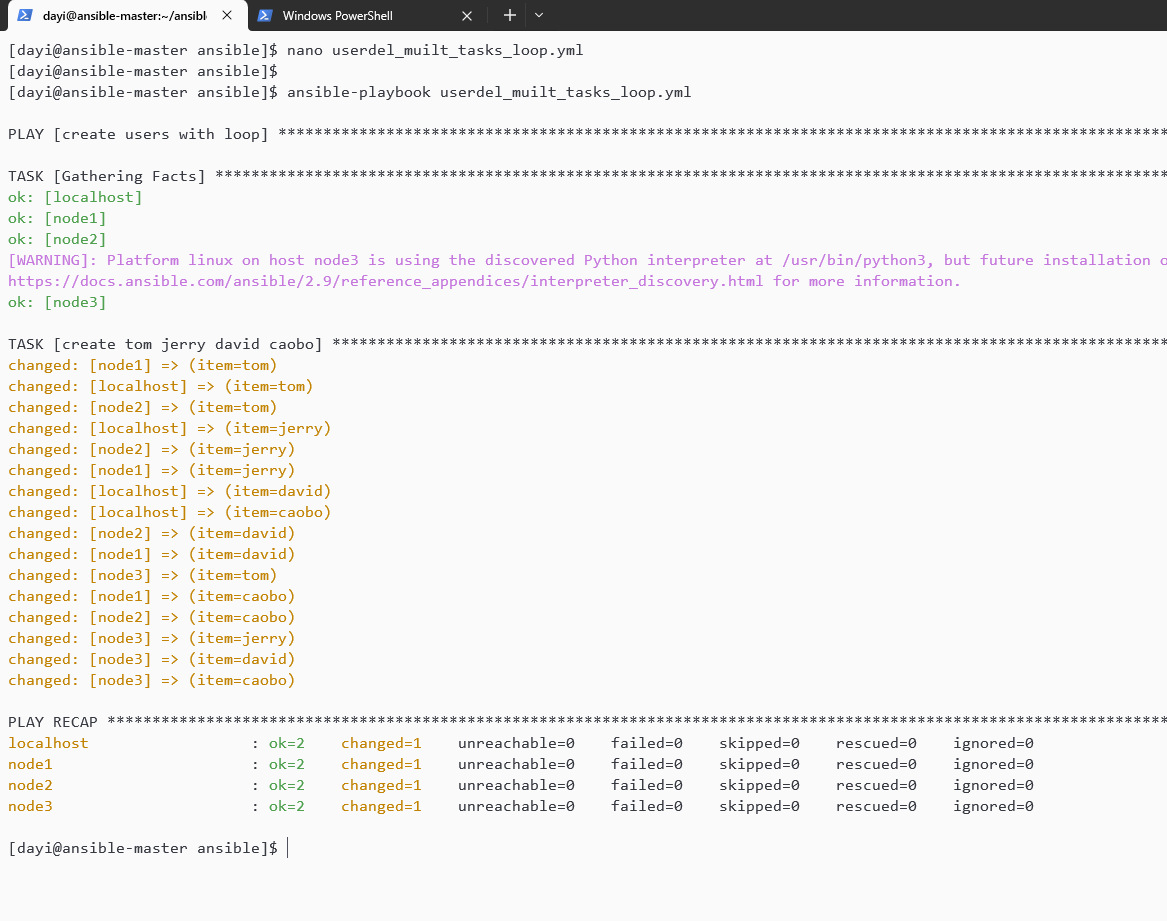
handler.yml
su dayi
cd ~/ansible
nano handler.yml

sudo yum install httpd
ansible-playbook handler.yml  -vv
---
- name: hanmler examples
hosts: prod
tasks:
- name: copy config file to node
copy:
src: /etc/httpd/conf/httpd.conf
dest: /etc/httpd/conf/httpd.conf
notify: restart apache service
handlers:
- name: restart apache service
service:
name: httpd
state: restarted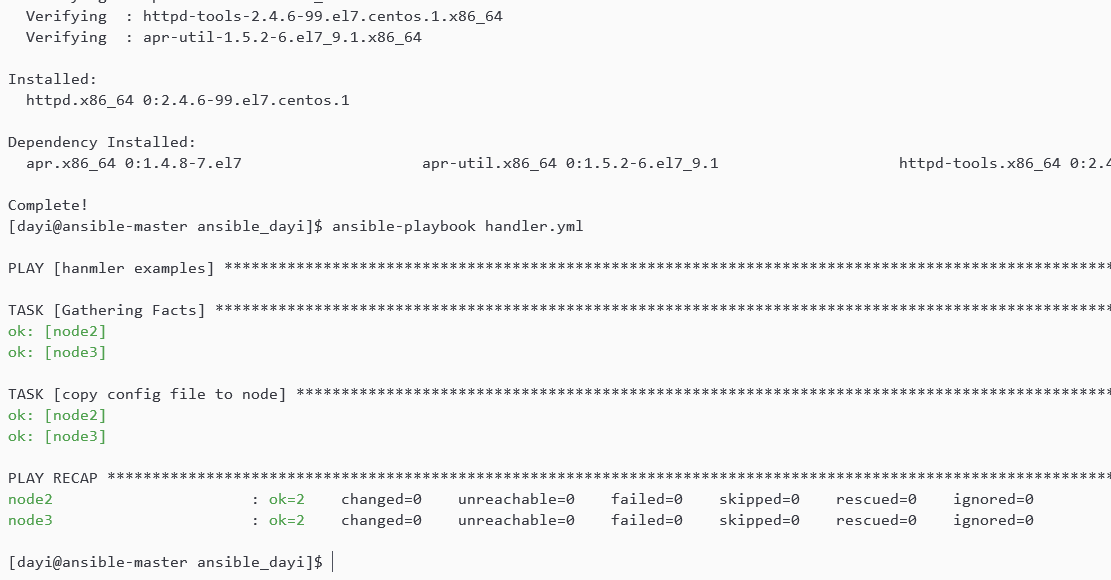
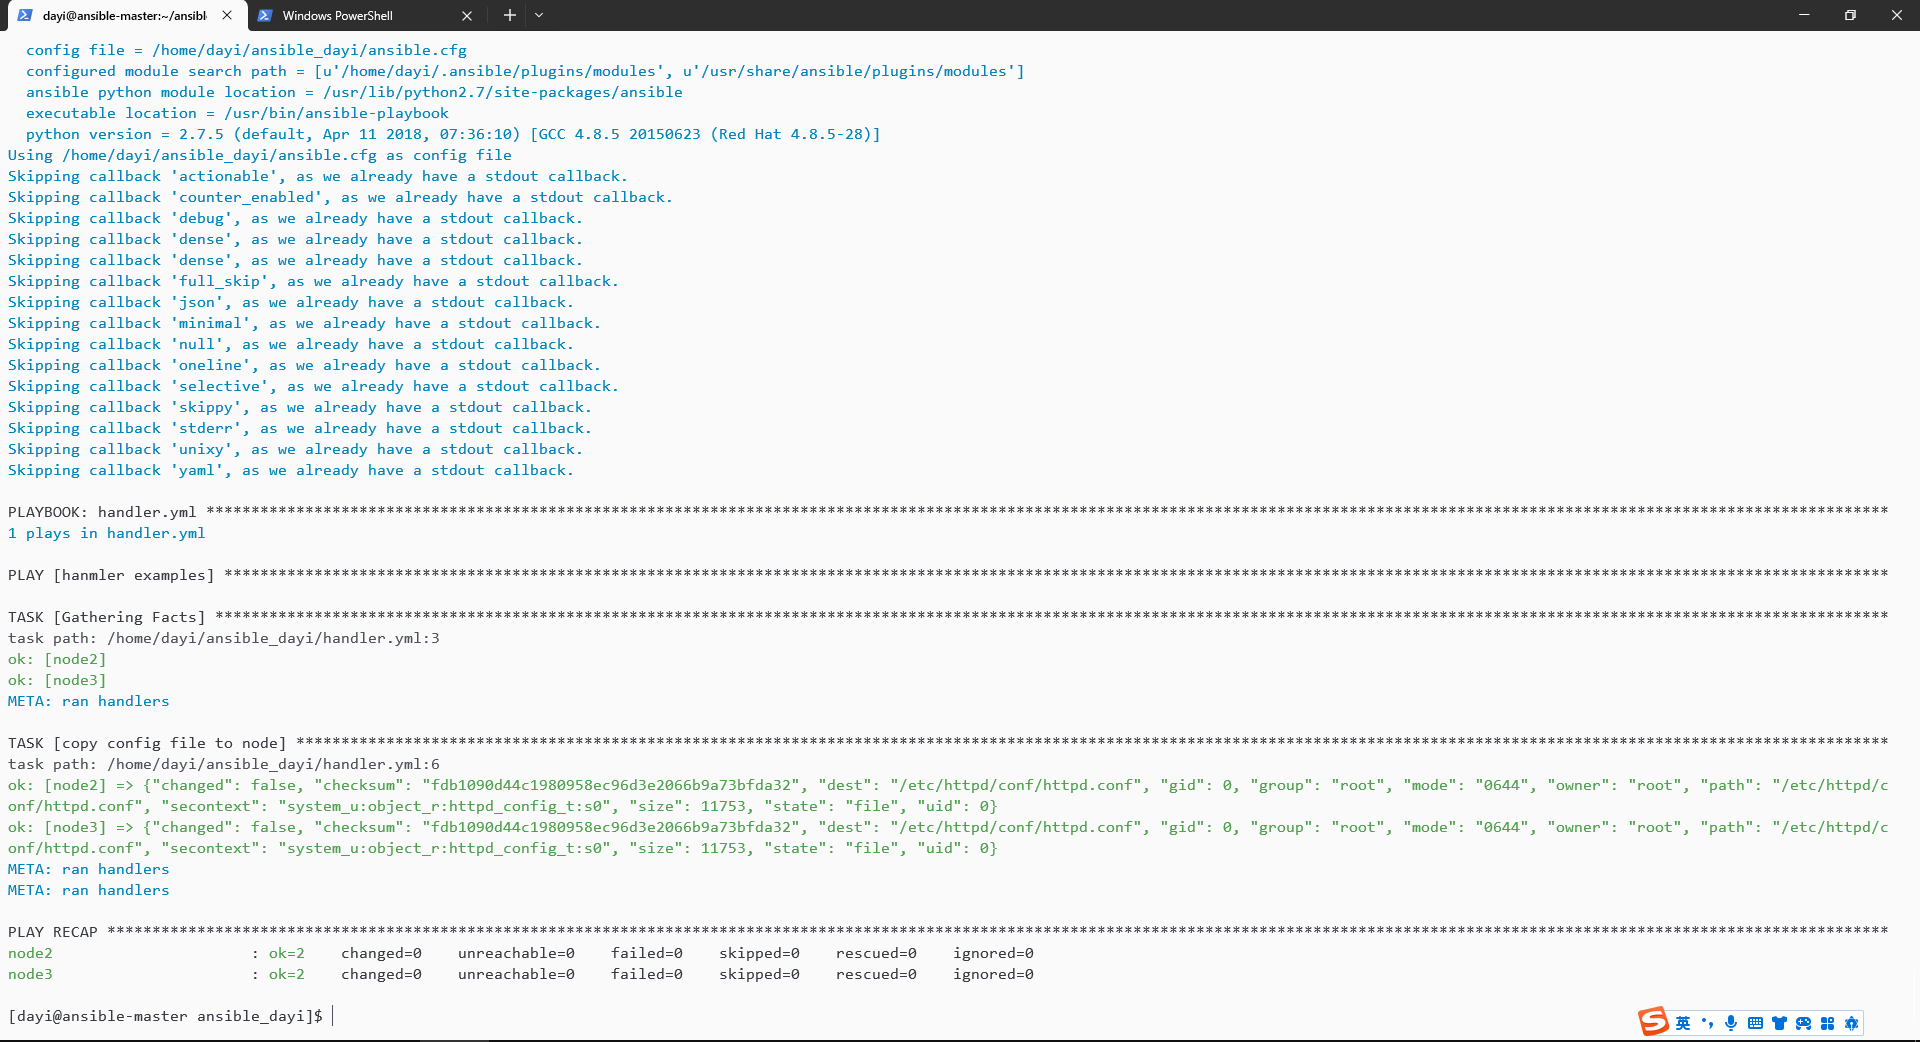
没装httpd的话会没配置文件:
周四下午
多个notify和多个handlers如何运行?
su dayi
cd ~/ansible
vim exampleshandler.yml
ansible-playbook exampleshandler.yml -vv
exampleshandler.yml
---
- name: hanmler examples
  hosts: prod
  tasks:
    - name: copy config file to node
      shell: echo bbbb
      notify: restart apache service1


    - name: use shell
      shell: echo aaaaa
      notify: restart apache service2


  handlers:
    - name: restart apache service1
      service:
        name: httpd
        state: restarted

    - name: restart apache service2
      service:
        name: httpd
        state: restarted
执行顺序还是按照你的playbook的顺序去执行,从上往下 #如果其中某一个task出现错误。我们使用ignore_errors去忽略该错误
vim exampleshandler2.yml
ansible-playbook exampleshandler2.yml -v

---
- name: hanmler examples
  hosts: prod
  tasks:
    - name: copy config file to node
      shell: /bin/dkkddkdd(这个地方是错误的)
      notify: restart apache service1
      ignore_errors: true

    - name: use shell
      shell: echo aaaaa
      notify: restart apache service2


  handlers:
    - name: restart apache service1
      service:
        name: httpd
        state: restarted

    - name: restart apache service2
      service:
        name: httpd
        state: restarted
导入EPEL-GPG key
cd /etc/pki/rpm-gpg
wget https://archive.fedoraproject.org/pub/epel/RPM-GPG-KEY-EPEL-7
周五实训报告
实训要求
1、搭建ansible的实验环境;搭建四台centos7.5版本的虚拟机,其中一台的hostname为controller,另外三台分别为node1-node3;
2、完善ansible的环境。使用普通用户(你名字的全称,如zhangsan),做以下操作:针对普通用户(如zhangsan)做sudo的提权免密;针对普通用户做ssh的免密登录;完成ansible的controller的yum仓库的配置(yum -y install epel)
3、配置ansible.cfg文件以及主机清单文件hosts,其中,node1和node2为test组中主机,node3为prod组中主机。通过ansible的临时命令去查看主机连通性,是否可以实现基本的联通;
4、配置node1-node3的本地yum仓库(利用光盘当中的仓库内容)
4、使用ansible的临时命令命令在node1-node3上 复制/etc/hosts文件到用户家目录下;
5、使用ansible的临时命令命令在node1-node3上创建用户zhangsan;
6、编写一个playbook,hosts为node1和node2,复制/etc/passwd文件,属主为upwen,属组为upwen,权限为0600;并验证结果(ansible-playbook all -a ' ls -l /home/upwen/passwd )
7、编写一个playbook,在node1-node3上执行play1,创建用户lisi,并指定其uid为1999;在node3上执行play2,删除用户lisi;(playbook执行后的结果输出,以及通过临时命令查看/etc/passwd文件当中的用户信息)
8、编写一个playbook,利用loop循环结构,在node1-node3上分别创建三个用户,tom,jerry,cat;(执行完成之后查看并验证结果)
9、利用handlers通知信息,完成一下内容;该task1的内容为将/etc/hosts文件复制到所有node节点的/home/upwen(你的普通用户的家目录)下,通知信息为restart service1,task2的内容为输出“Welcome to this Ansible training session”,通知信息为restart service2,两个通知信息要做的事情都是从其httpd服务,完成该内容。
其实上文已经做啦,说实在,我不是很想重新做一遍)
我拿新机子重新来一遍。有一些细节可能就不截图了,因为上文已经有啦。
1、搭建ansible的实验环境;搭建四台centos7.5版本的虚拟机,其中一台的hostname为controller,另外三台分别为node1-node3;
具体的安装可以看周一的章节的内容,这里细节就不再弄一次了。
注意磁盘大小:150GB!
改IP地址可以看第一天的末尾(应该是【修改IP地址】)
安装4个虚拟机
都是用Centos 7.5的那个镜像。
- 用英文(不建议用中文语言系统)
- 虚拟网络编辑器的NAT记得修改!不修改虚拟机没法联网。(这个在哪?开始里直接搜)
- IP可以直接在安装的时候就修改。记得打开自动连接。(General里有个Auto 连接)
- 安装选SERVER WITH GUI,方便你后面改IP
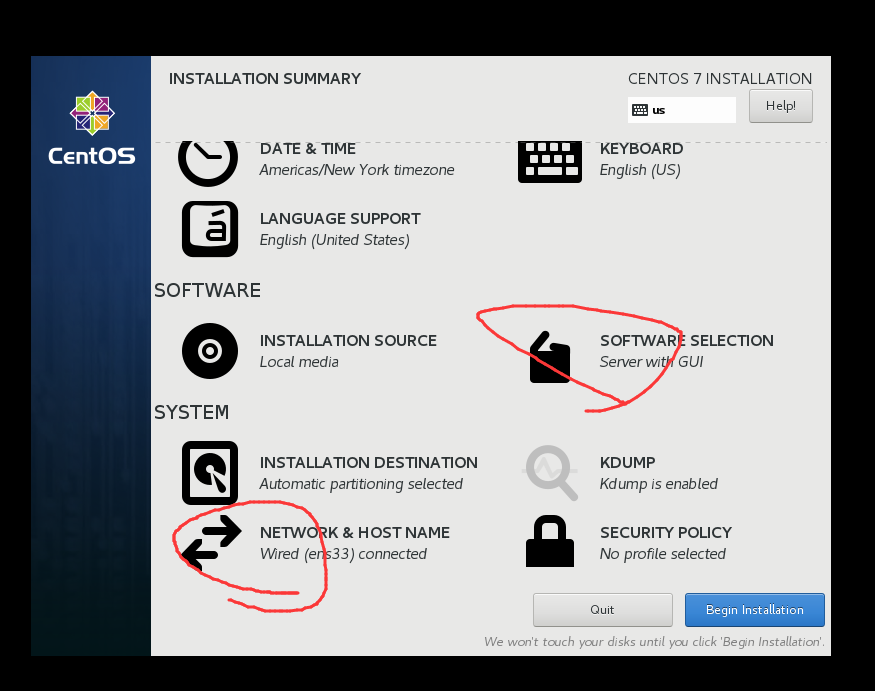
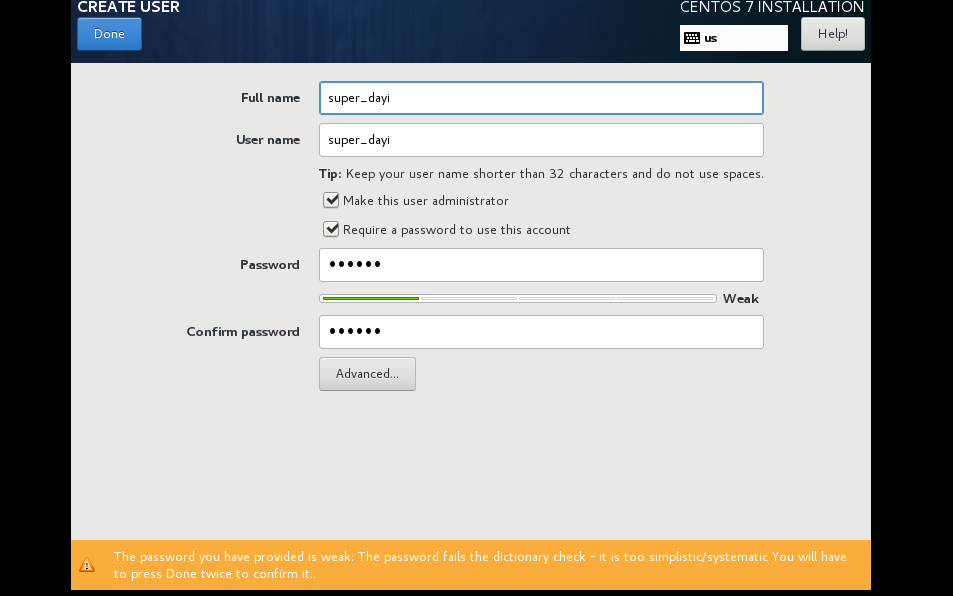
- 用户名用自己的姓名全拼,这里我用
super_dayi,为了区分前后文内容。
克隆机子或者干脆直接再装3个。
安装好之后分配IP地址
具体怎么改可以参考前文的【修改IP地址】https://cmd.dayi.ink/sUPF6_zfR-imTz3D2O7PeQ#%E4%BF%AE%E6%94%B9IP%E5%9C%B0%E5%9D%80
IP地址分配:
controller 192.168.132.10
node1 192.168.132.11
node2 192.168.132.12
node3 192.168.132.13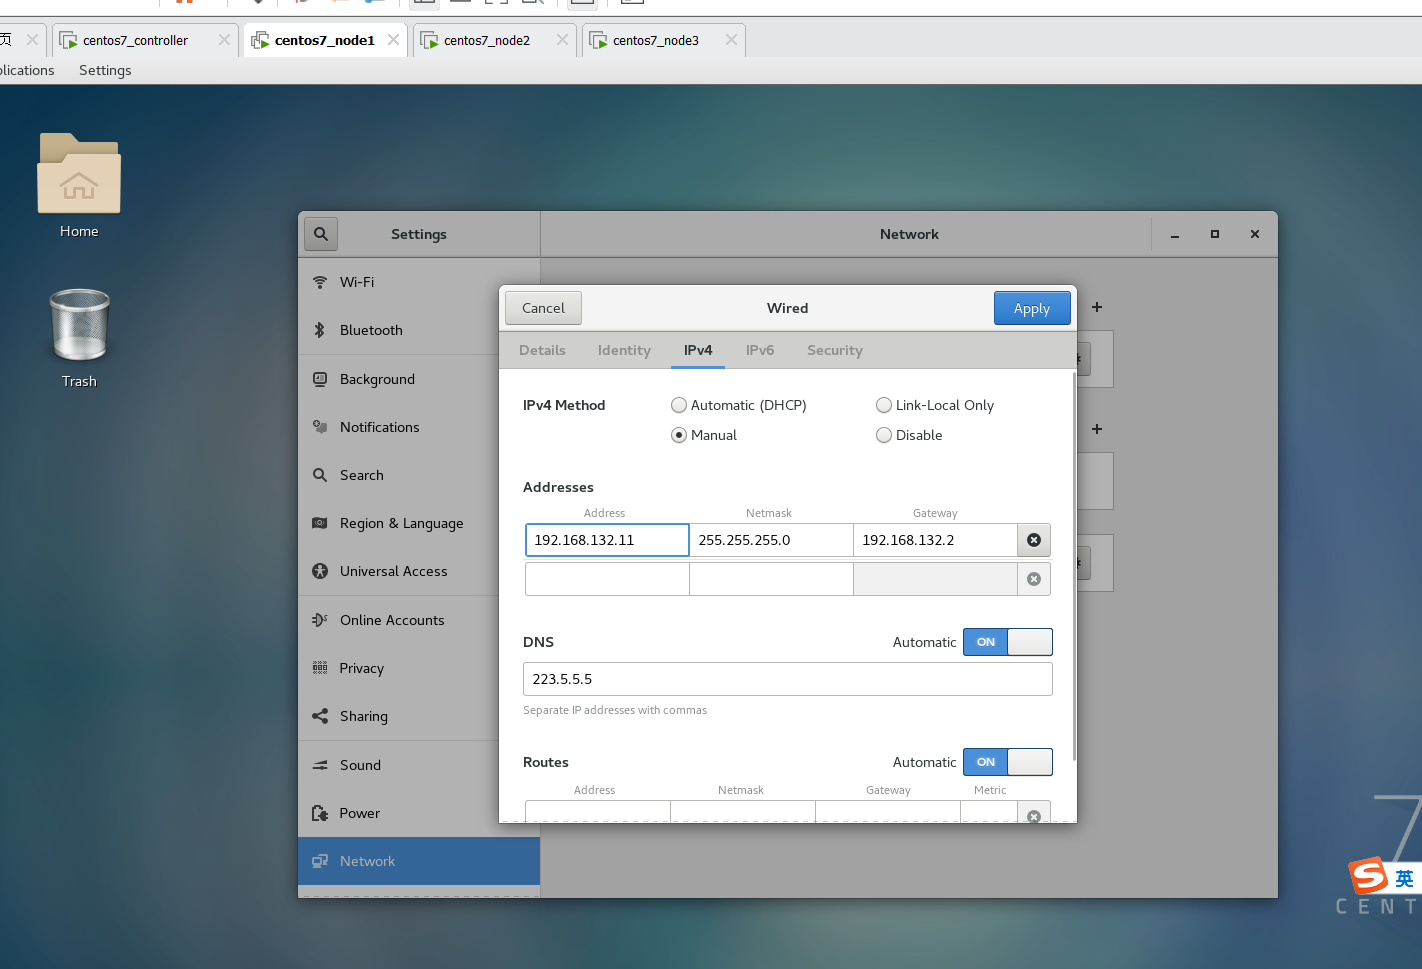
改完把那个开关开一下再关一下。
试试能不能ping通:
xshell之类的工具连接到ssh上。
在192.168.132.10上ping其他几个机子
ping 192.168.132.11
ping 192.168.132.12
ping 192.168.132.13
我这里都通了
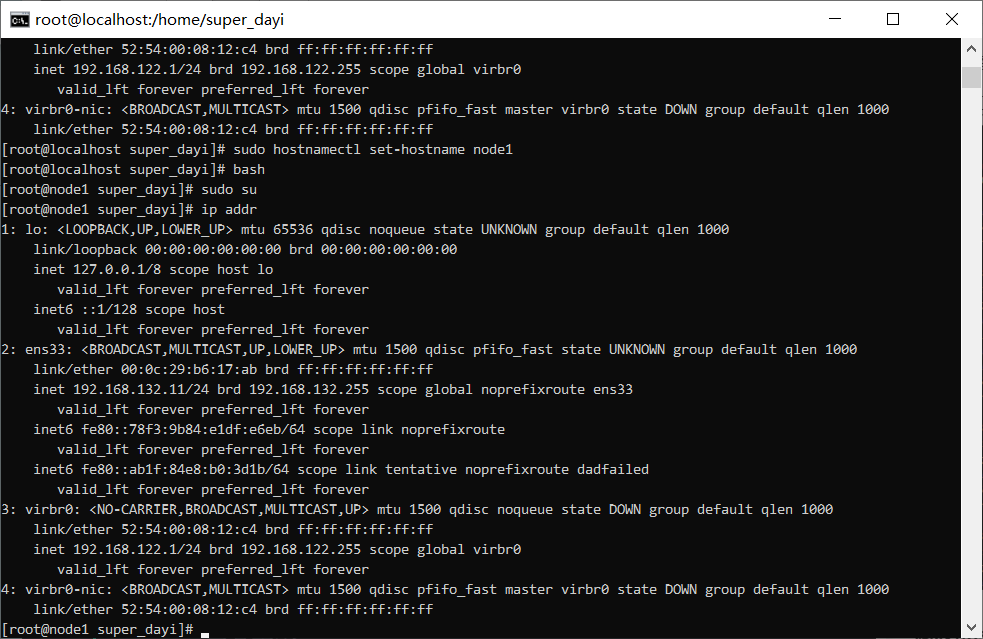
修改hostname
这里你不同机子进终端自己修改一下就好。
su
sudo hostnamectl set-hostname controller #修改为controller
sudo hostnamectl set-hostname node1 #修改为node1
sudo hostnamectl set-hostname node2 #修改为node2

bash #查看生效
2、完善ansible的环境。使用普通用户(你名字的全称,如zhangsan),做以下操作:针对普通用户(如zhangsan)做sudo的提权免密;针对普通用户做ssh的免密登录;完成ansible的controller的yum仓库的配置(yum -y install epel)
在周一到周四的基础上进行新建用户:
我知道你想要
这里dayi是之前的用户 rabbit是要改的用户,如果你已经有了,可以建一个rabbit_作为新的用户名
ssh root@192.168.132.10 #root登录到主机上
useradd rabbit #创建新用户
cp -ra /home/dayi/ansible /home/rabbit/
ls /home/rabbit #查看是否复制成功

rm /home/dayi/.ssh/known_hosts #删除之前的连接信息(如果你换了虚拟机,需要这一步。删完记得手动ssh 都连一下,把yes打上)

[root@ansible-master rabbit]# ls /home/rabbit
ansible

passwd rabbit #修改新用户的密码

sudo su
sudo echo 'rabbit ALL=(ALL) NOPASSWD: ALL' >>/etc/sudoers

su dayi #老用户
cd ~/ansible
# 需要之前可以ping通,这几行跑不动的用下面的【123】 【456】
ansible node1,node2,node3 -m user -a "name=rabbit comment=ovo shell=/bin/bash" #【123】
ansible node1,node2,node3 -m shell -a "echo 'rabbit ALL=(ALL) NOPASSWD: ALL' >>/etc/sudoers" #【456】

#【123】相同的命令
# 从节点每个都做
sudo adduser rabbit

# 【456】相同的命令
# 从节点每个都做
sudo su #必须
sudo echo "rabbit ALL=(ALL) NOPASSWD: ALL" >>/etc/sudoers


#从节点每个都做
sudo passwd rabbit #改密码
su rabbit#顺便测试一下是否可以免密提权
sudo su #顺便测试一下是否可以免密提权


# 切换到新用户
#主节点
su rabbit
cd ~/ansible

#生成秘钥
ssh-keygen -t rsa #一路回车
ssh-copy-id rabbit@192.168.132.11
ssh-copy-id rabbit@192.168.132.12
ssh-copy-id rabbit@192.168.132.13

sudo chown -R  rabbit /home/rabbit/ansible
sudo chmod +w ansible.cfg
#然后ansible.cfg里有一行需要改: remote_user = rabbit


ansible all -m ping
这样就可以啦:
重新做:设置免密登录
四个机子都要做
设置提权可以看周一的。
su
#这一行尽量复制注意空格,(记得用户名改成你自己的)
echo "super_dayi ALL=(ALL) NOPASSWD: ALL">>/etc/sudoers
su super_dayi #切换到你的用户
sudo su #试试有没有权限
这样不提示需要输入密码就可以啦。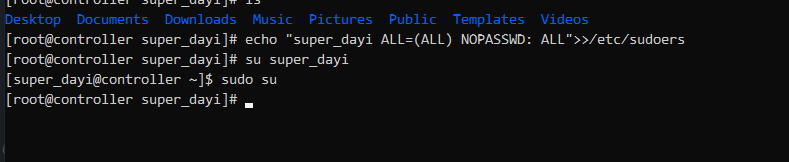
几个节点都试一下:
针对普通用户做ssh的免密登录
在controller上发送rsa公钥
su super_dayi
ssh-keygen -t rsa #一路回车
ssh-copy-id super_dayi@192.168.132.11
ssh-copy-id super_dayi@192.168.132.12
ssh-copy-id super_dayi@192.168.132.13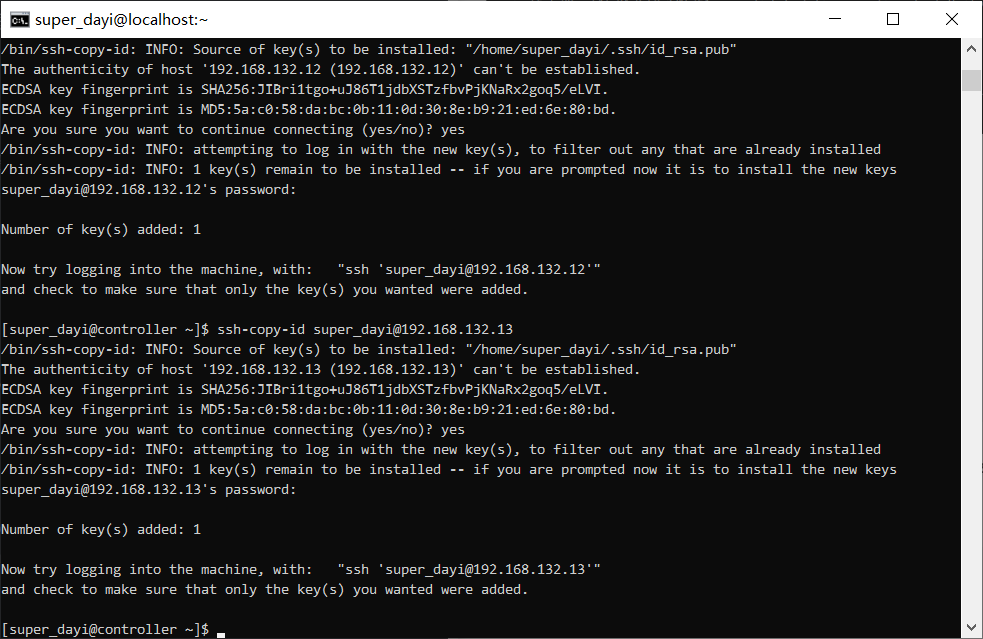
你看这个,咱忘了一个PVP,确实得测试一下啦。
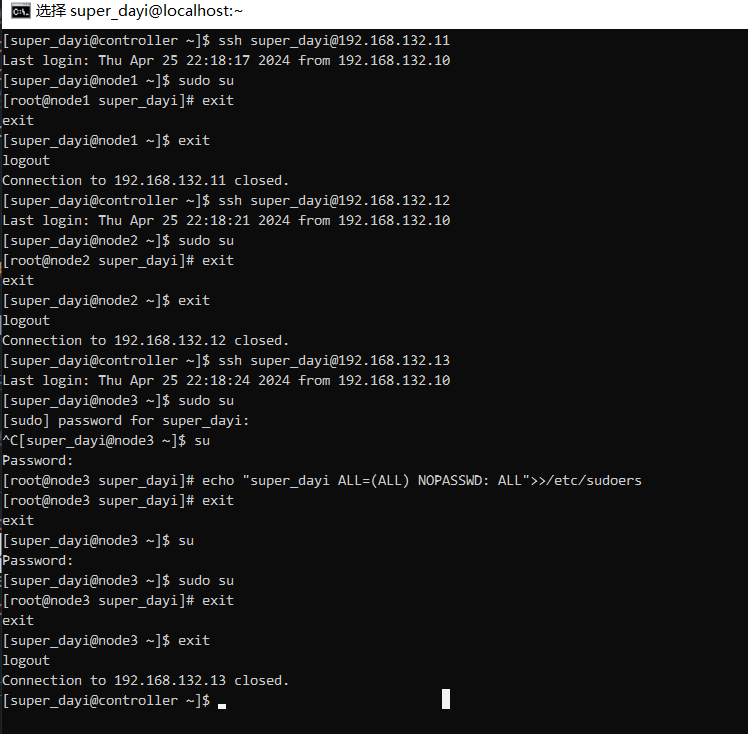
测试一下:
[super_dayi@controller ~]$ ssh super_dayi@192.168.132.11
Last login: Thu Apr 25 22:18:17 2024 from 192.168.132.10
[super_dayi@node1 ~]$ sudo su
[root@node1 super_dayi]# exit
exit
[super_dayi@node1 ~]$ exit
logout
Connection to 192.168.132.11 closed.

[super_dayi@controller ~]$ ssh super_dayi@192.168.132.12
Last login: Thu Apr 25 22:18:21 2024 from 192.168.132.10
[super_dayi@node2 ~]$ sudo su
[root@node2 super_dayi]# exit
exit
[super_dayi@node2 ~]$ exit
logout
Connection to 192.168.132.12 closed.
[super_dayi@controller ~]$

[super_dayi@controller ~]$ ssh super_dayi@192.168.132.13
Last login: Thu Apr 25 22:18:24 2024 from 192.168.132.10
[super_dayi@node3 ~]$ sudo su
[sudo] password for super_dayi:
^C[super_dayi@node3 ~]$ su
Password:
[root@node3 super_dayi]# echo "super_dayi ALL=(ALL) NOPASSWD: ALL">>/etc/sudoers
[root@node3 super_dayi]# exit
exit
[super_dayi@node3 ~]$ su
Password:
[super_dayi@node3 ~]$ sudo su
[root@node3 super_dayi]# exit
exit
[super_dayi@node3 ~]$ exit
logout
Connection to 192.168.132.13 closed.
[super_dayi@controller ~]$
完成ansible的controller的yum仓库的配置(yum -y install epel)
在controller上
ping 223.5.5.5 #测试网络
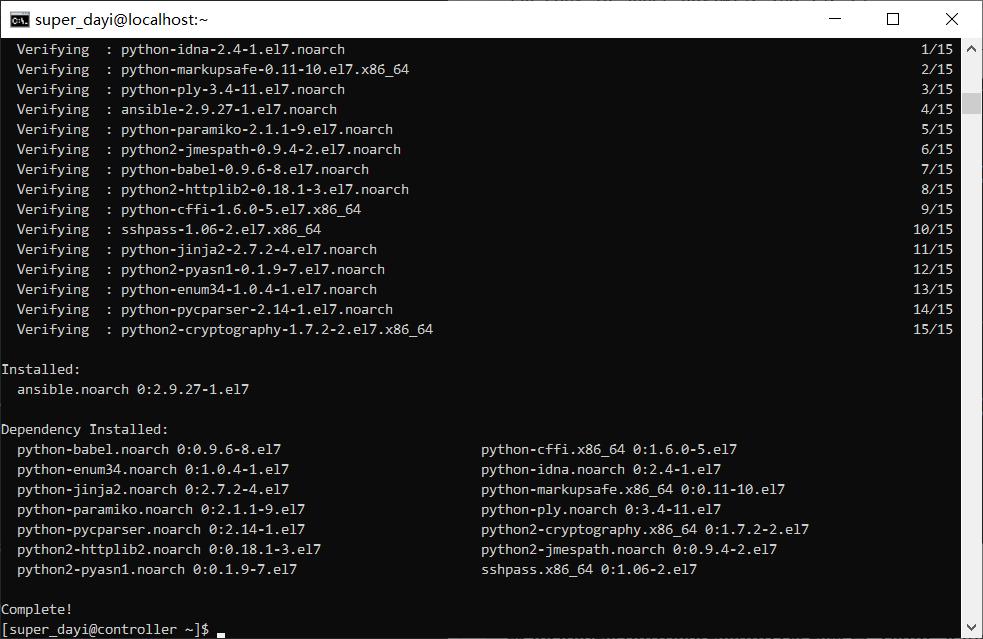
sudo yum install epel-release -y #安装EPEL源
sudo yum install ansible -y #安装ansible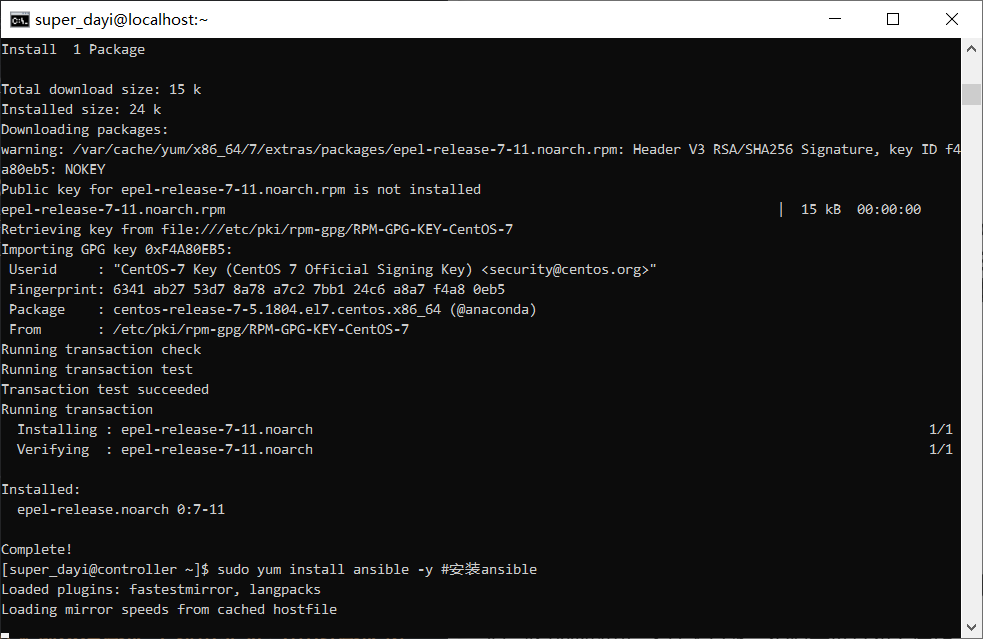
3、配置ansible.cfg文件以及主机清单文件hosts,其中,node1和node2为test组中主机,node3为prod组中主机。通过ansible的临时命令去查看主机连通性,是否可以实现基本的联通;
只需要
这里的清单文件用hosts文件名
mkdir -pv ~/ansible
cd ~/ansible
cp -a /etc/ansible/ansible.cfg ~/ansible
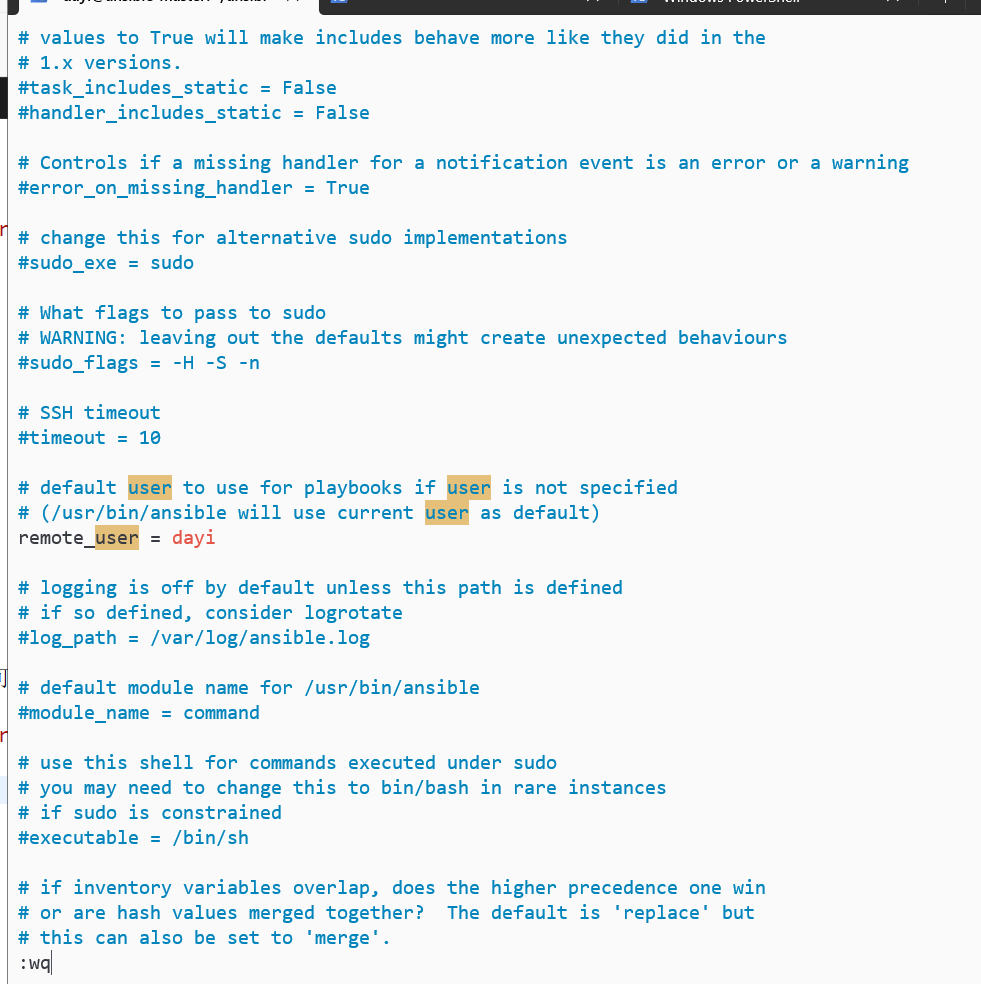
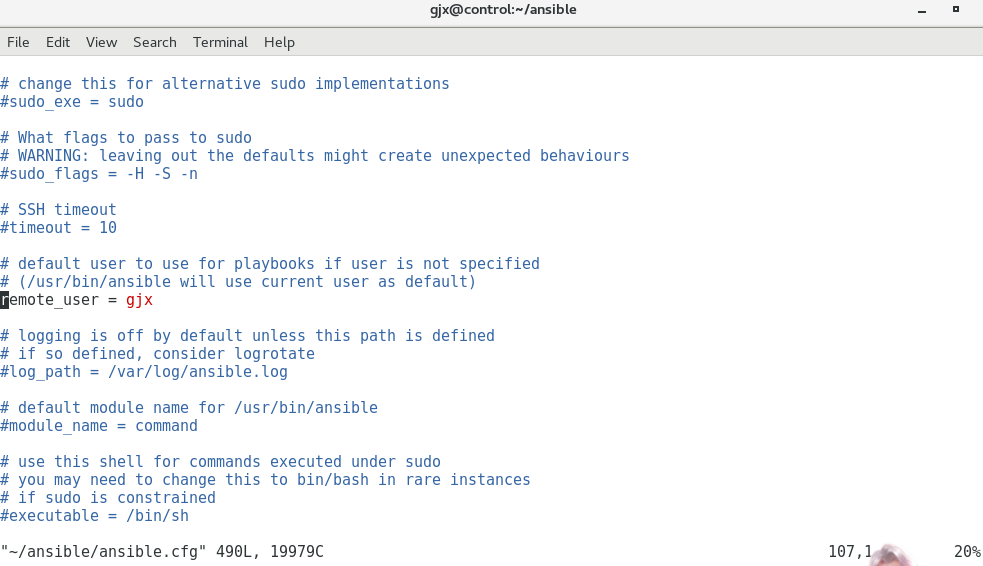
vim ~/ansible/ansible.cfg修改:
位置1: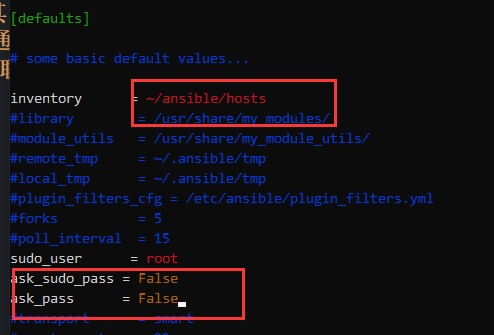
位置2:(但这里是可选)
位置3:
继续:
vim ~/ansible/hosts 内容:
node1 ansible_host=192.168.132.11
node2 ansible_host=192.168.132.12
node3 ansible_host=192.168.132.13

[test]
node1
node2

[prod]
node3
ansible的临时命令去查看主机连通性
ansible all -m ping
ansible all -m shell -a "whoami" #这里都是ROOT就可以啦,提权成功!
4、配置node1-node3的本地yum仓库(利用光盘当中的仓库内容)
该过程很慢
把CentOS-7.5-x86_64-DVD-1804.iso 放到你的用户文件夹目录,然后再进行如下操作:
注意!这里推荐用xshell之类的工具,防止复制不完:避免出现这种ISO就7M的情况

这个方法请多次检查镜像是否正确:
挂载镜像、复制仓库:
sudo su
chmod +777 /opt

sudo super_dayi
cd ~
mv CentOS-7.5-x86_64-DVD-1804.iso /opt #复制iso到/opt,这一步不应该秒复制完。

sudo su
cd /opt
mkdir -p /mnt/cdrom/
chmod +777 /opt
rm -rf /opt/yumrepo
mkdir -pv /opt/yumrepo
sudo mount -t iso9660 /opt/CentOS-7.5-x86_64-DVD-1804.iso /mnt/cdrom/


sudo cp -a /mnt/cdrom/Packages /opt/yumrepo/ #这行跟后面重复了,注意。同时这个执行不应该直接执行完毕。
如果遇到这种IO错误是镜像文件没复制好,重新来一遍就行。
继续:
sudo cp -a /mnt/cdrom/Packages /opt/yumrepo/ #这行跟上面重复了,注意。
sudo cp -a /mnt/cdrom/repodata /opt/yumrepo/
sudo chmod +644 /opt/yumrepo
sudo chmod +644 /opt/yumrepo/Packages
sudo chmod +644 /opt/yumrepo/repodata

su super_dayi
ls -alh /opt/yumrepo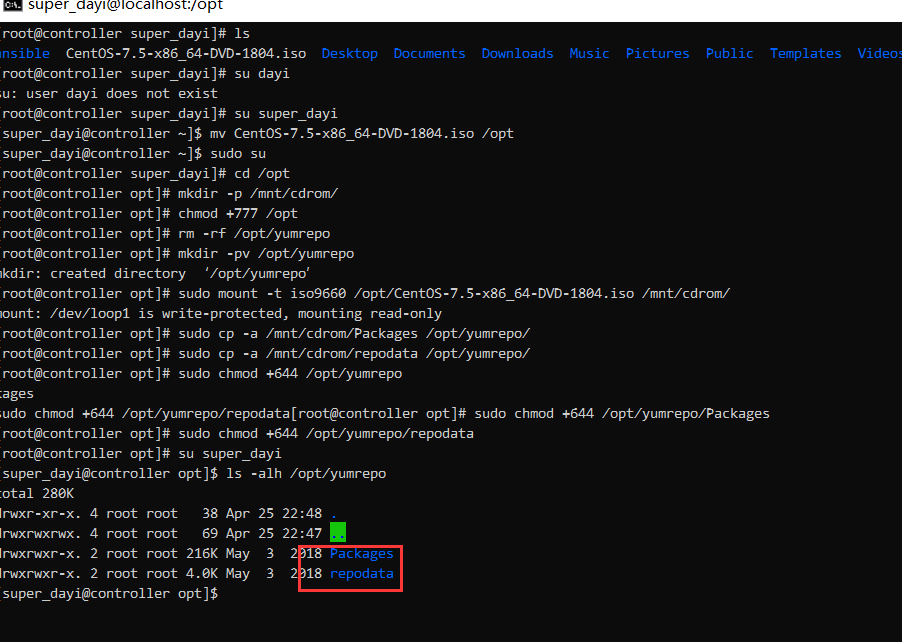
分发文件:
# 在普通用户下
cd ~/ansible
ansible node1,node2,node3 -m shell -a "rm -rf /opt/yumrepo"
ansible-playbook copy_yum.yaml -vv #超级慢,太慢可以看下面这个[label:ovo]
ansible all -m shell -a "ls -alh /opt/yumrepo"

# 加速文件分发 这几行相当于:[label:ovo]
sudo su
cd /opt
tar zcvf yumrepo.tar.gz yumrepo
chmod +644 /opt/yumrepo.tar.gz
su super_dayi
cd ~/ansible
ansible node1,node2,node3 -m copy -a "src=/opt/yumrepo.tar.gz dest=/opt/" -v
ansible node1,node2,node3 -m shell -a "cd /opt && tar -zxvf yumrepo.tar.gz"
rm -rf /opt/yumrepo.tar.gz
ansible node1,node2,node3 -m shell -a "rm -rf /opt/yumrepo.tar.gz"

ansible all -m shell -a "ls -alh /opt/yumrepo"
图,缓慢的三步:
这样就对啦: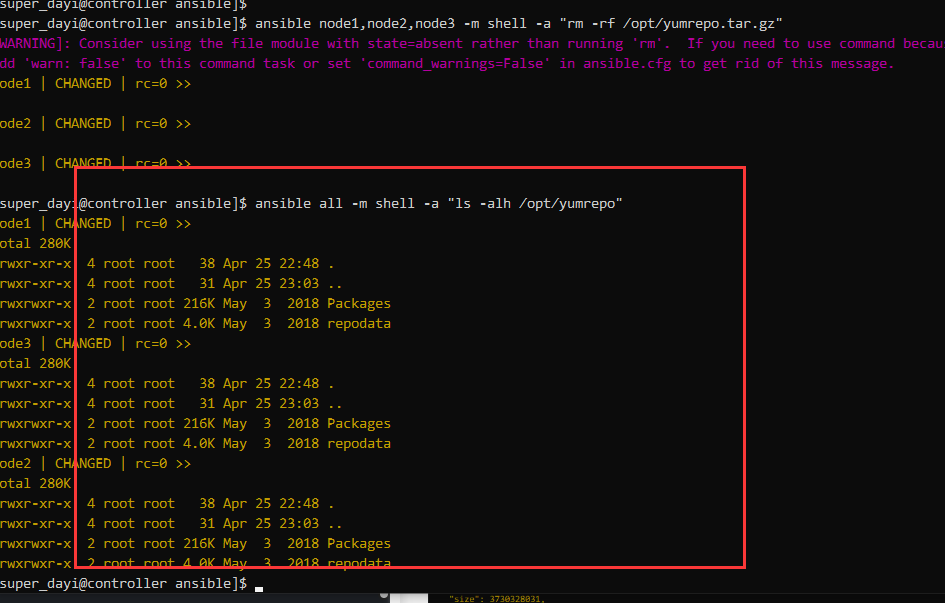
附文件:
这些是上面步骤可能用到的文件
copy_yum.yaml文件内容:
nano copy_yum.yaml
---
- name: copy a file
  hosts: all
  tasks:
    - name: copy /opt/yumrepo/ to /opt/yumrepo/
      copy:
        src: /opt/yumrepo/
dest: /opt/yumrepo/快速分发的代码的playbook:(相当于加速文件分发那几行 )
sudo su
cd /opt
tar zcvf yumrepo.tar.gz yumrepo
chmod +644 /opt/yumrepo.tar.gz
su dayi
cd ~/ansible
然后跑这个:
---
- name: Deploy yumrepo to nodes
  hosts: node1,node2,node3
  become: true
  tasks:
    - name: Copy tar.gz to target nodes
      copy:
        src: /opt/yumrepo.tar.gz
        dest: /opt/yumrepo.tar.gz

    - name: Extract tar.gz on target nodes
      shell: tar -zxvf /opt/yumrepo.tar.gz -C /opt
      args:
        chdir: /opt

    - name: Remove tar.gz from target nodes
      file:
        path: /opt/yumrepo.tar.gz
        state: absent

    - name: Clean up local tar.gz
      file:
        path: /opt/yumrepo.tar.gz
        state: absent
      become_user: root
继续配置:
对的,这就一半。
配置本地 YUM仓库 playbook
su super_dayi
cd ~/ansible/
nano yum_packages.yml
内容
---
- name: create a repo
  hosts: all
  tasks:

    - name: Add repository
      yum_repository:
        name: epel_local_opt #这里我有改过
        description: EPEL YUM repo
        baseurl: file:///opt/yumrepo/
        enabled: yes
        gpgcheck: no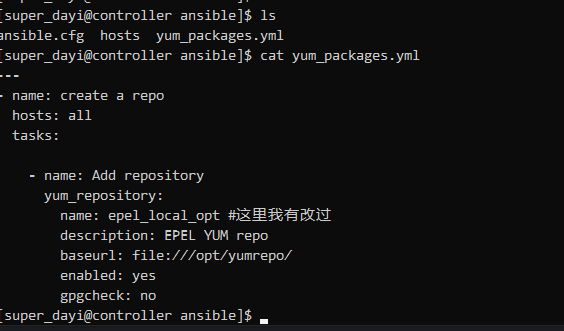
继续执行:
ansible-playbook yum_packages.yml -v
ansible all -m shell -a " yum makecache " #比较慢
ansible all -m shell -a " ls /etc/yum.repos.d/ "
ansible all -m shell -a " cat /etc/yum.repos.d/epel_local_opt.repo "
ansible all -m shell -a " yum repolist all |grep epel_local_opt"
ansible all -m shell -a " yum info vsftpd --disablerepo=* --enablerepo=epel_local_opt" #禁用其他仓库,仅使用这个本地。
图:
ansible-playbook yum_packages.yml -v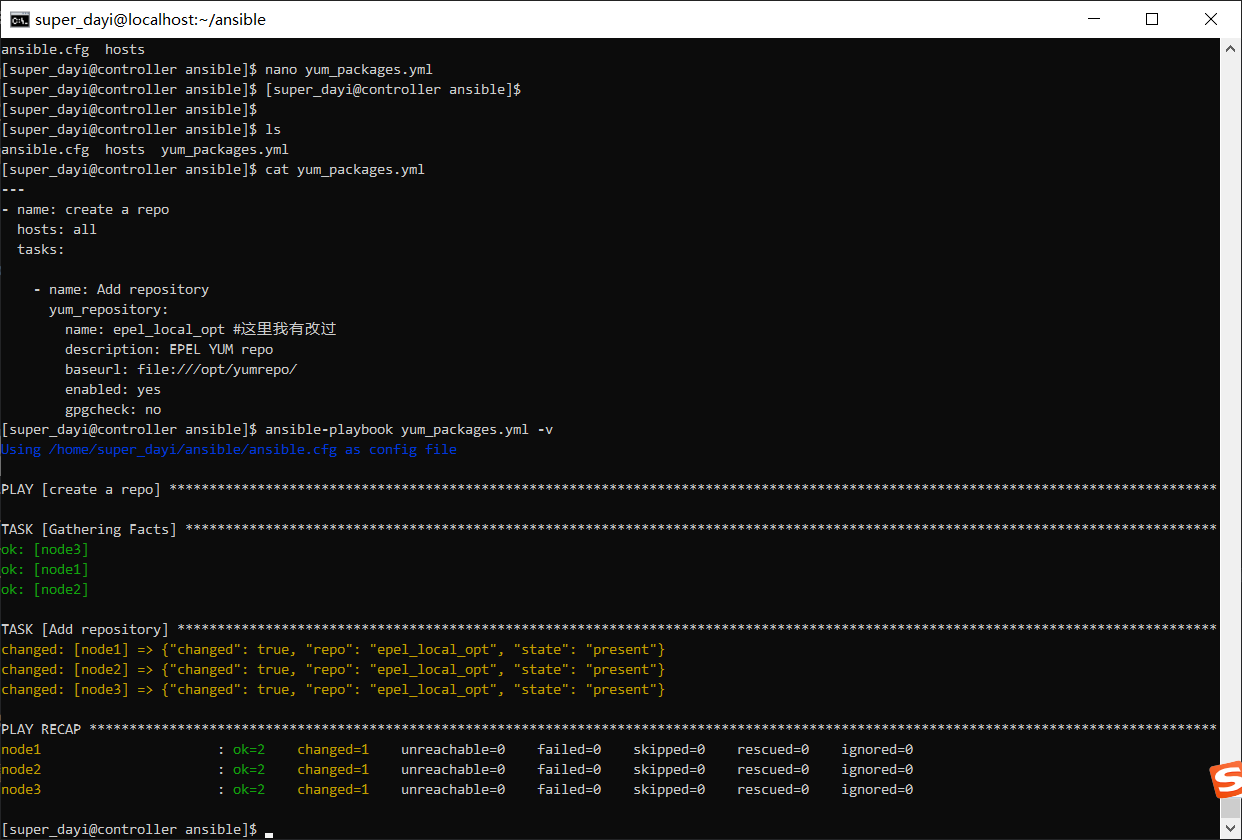
剩下的几步:
这样就可以啦
4、使用ansible的临时命令命令在node1-node3上 复制/etc/hosts文件到用户家目录下;
只做符合题目要求的:
ansible all -m copy -a "src=/etc/hosts dest=/home/super_dayi/hosts mode=644"
ansible all -m shell -a "cat /home/super_dayi/hosts" 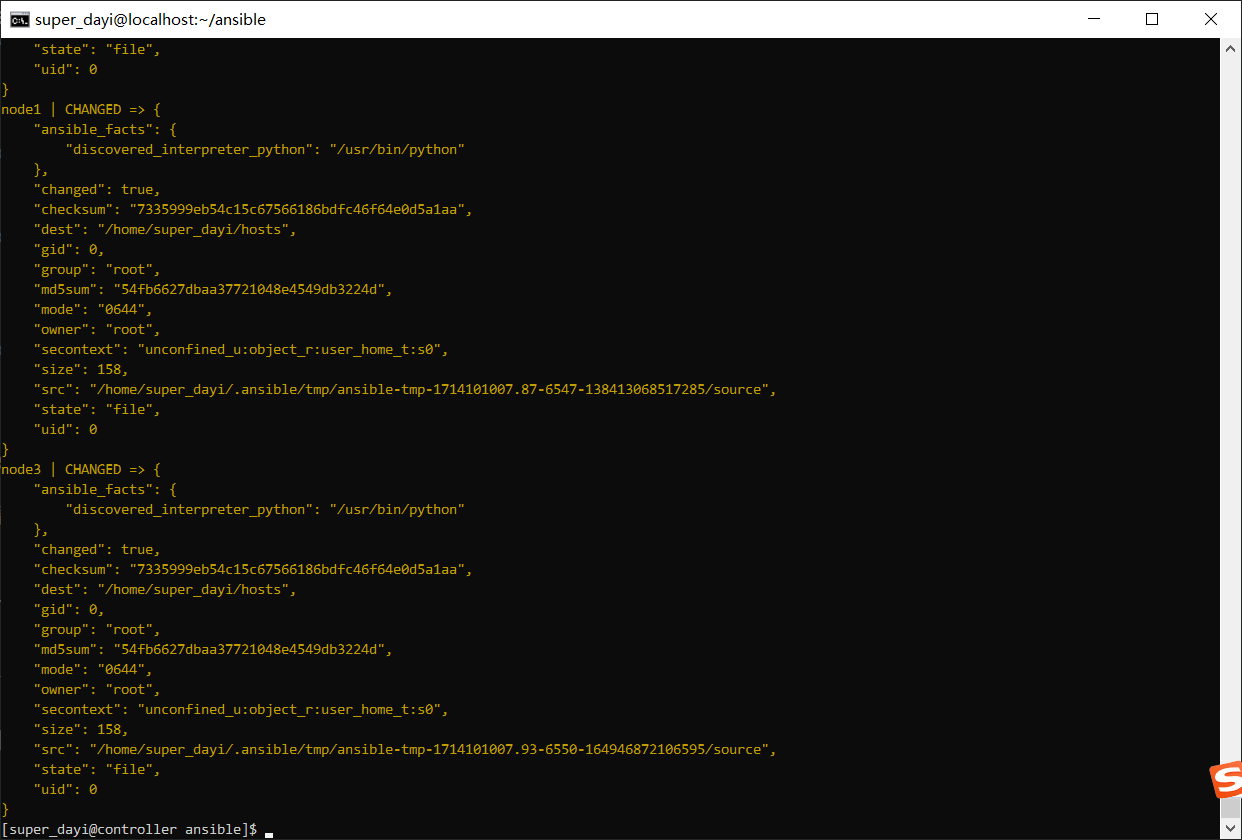
推荐做一下:同步hosts
这里推荐一起执行了
sudo su
vim /etc/hosts添加输入这个(i输入,:wq!保存)
192.168.132.10 controller
192.168.132.11 node1
192.168.132.12 node2
192.168.132.13 node3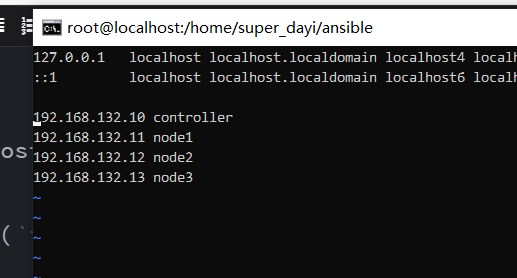
然后复制文件
su super_dayi
cd ~/ansible/
ansible all -m copy -a "src=/etc/hosts dest=/etc/hosts mode=644"

ansible all -m shell -a "cat /etc/hosts" 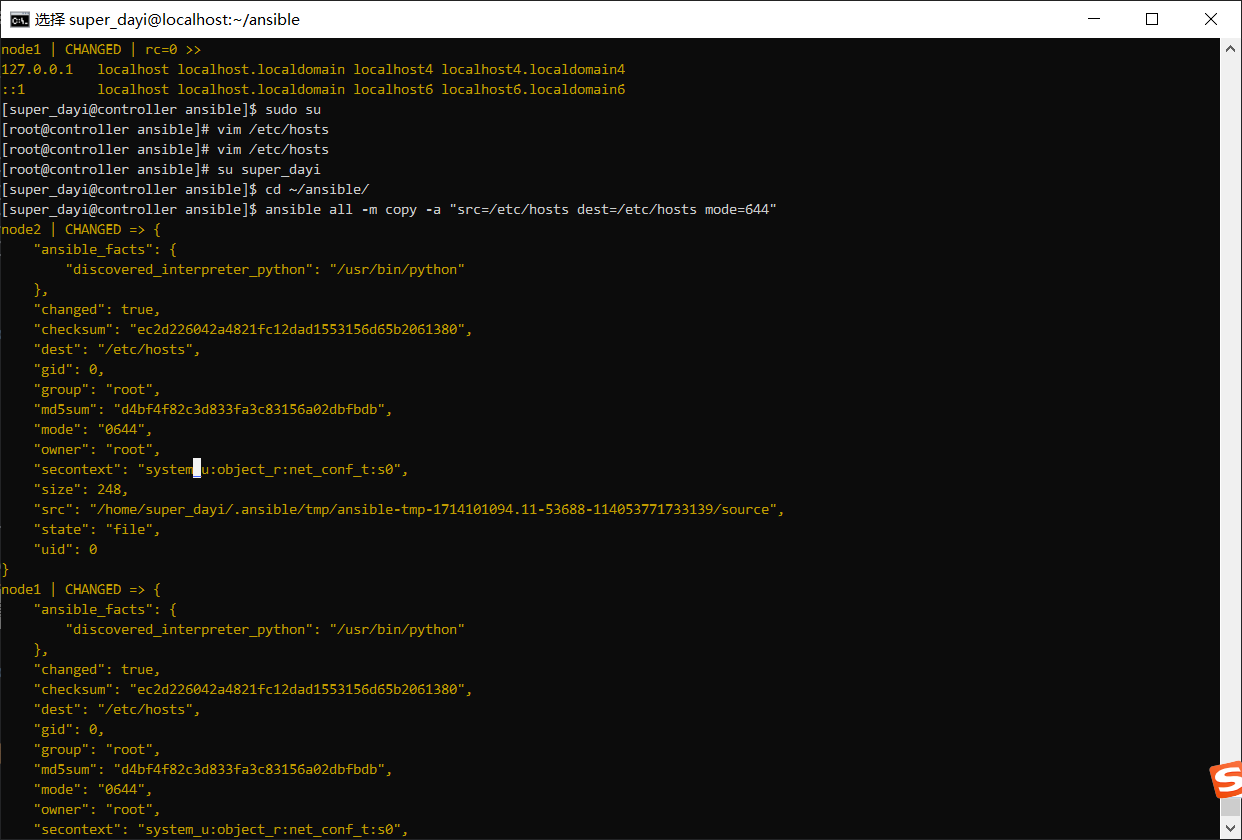
示例:复制一个普通文件
su super_dayi
echo "ovo" >> ~/ovo.txt
ansible all -m copy -a "src=/home/super_dayi/ovo.txt dest=/home/super_dayi/ovo.txt owner=super_dayi mode=644"

ansible all -m shell -a "cat /home/super_dayi/ovo.txt"
从机上有了: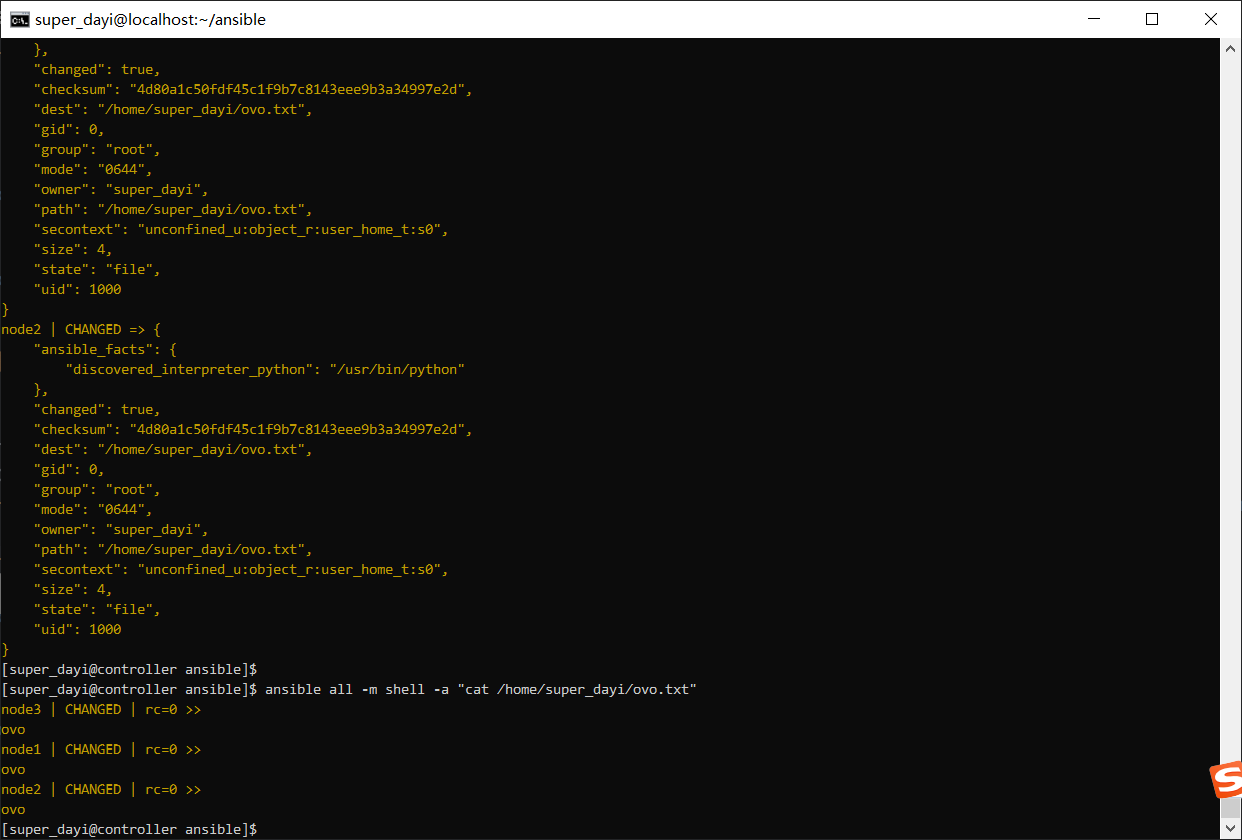
5、使用ansible的临时命令命令在node1-node3上创建用户zhangsan;
建用户
dayi_nologin 是另外的用户,不要跟现有的重复了
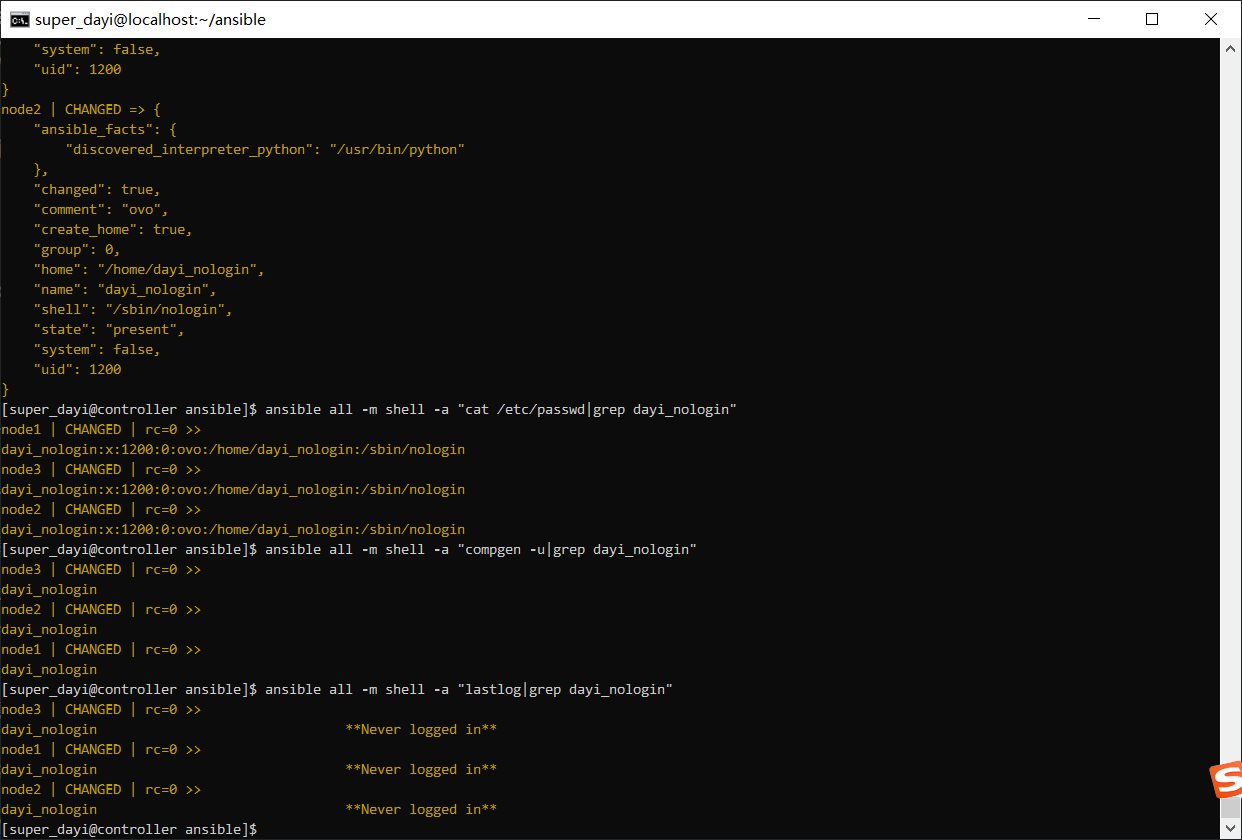
ansible all -m user -a "name=dayi_nologin comment=ovo uid=1200 group=root shell=/sbin/nologin"
查看当前用户们
ansible all -m shell -a "cat /etc/passwd|grep dayi_nologin"
ansible all -m shell -a "compgen -u|grep dayi_nologin"

ansible all -m shell -a "lastlog|grep dayi_nologin"
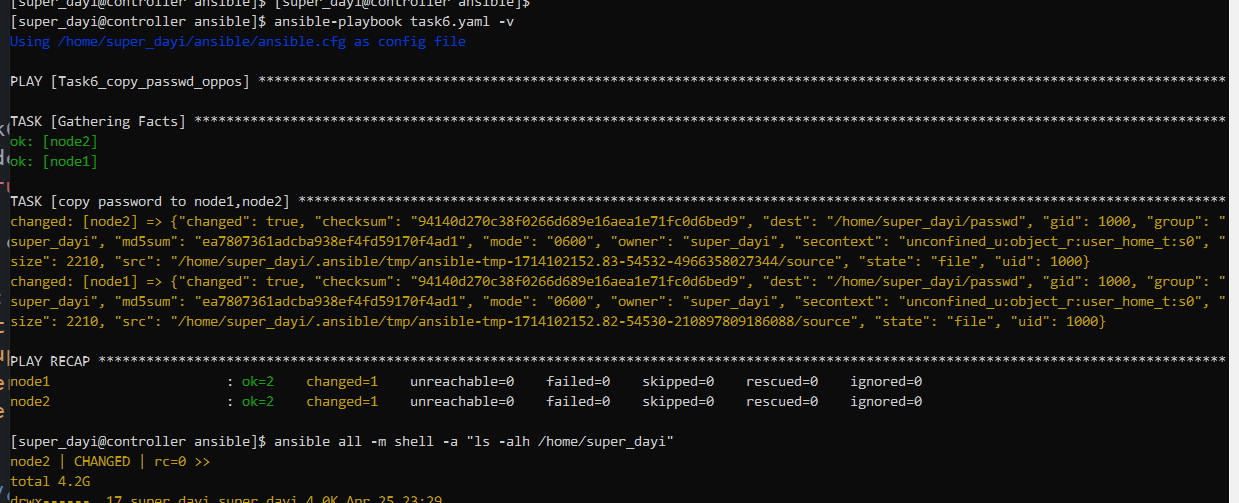
6、编写一个playbook,hosts为node1和node2,复制/etc/passwd文件,属主为upwen,属组为upwen,权限为0600;并验证结果(ansible-playbook all -a ' ls -l /home/upwen/passwd )
su super_dayi
cd ~/ansible
nano task6.yaml

ansible-playbook task6.yaml -v

ansible all -m shell -a "ls -alh /home/super_dayi |grep passwd"
task6.yaml
---
- name: Task6_copy_passwd_oppos
  hosts: node1,node2
  become: true
  tasks:
    - name: copy password to node1,node2
      copy:
        src: /etc/passwd
        dest: /home/super_dayi/passwd
        group: super_dayi
        owner: super_dayi
        mode: "0600"
这样就可以啦

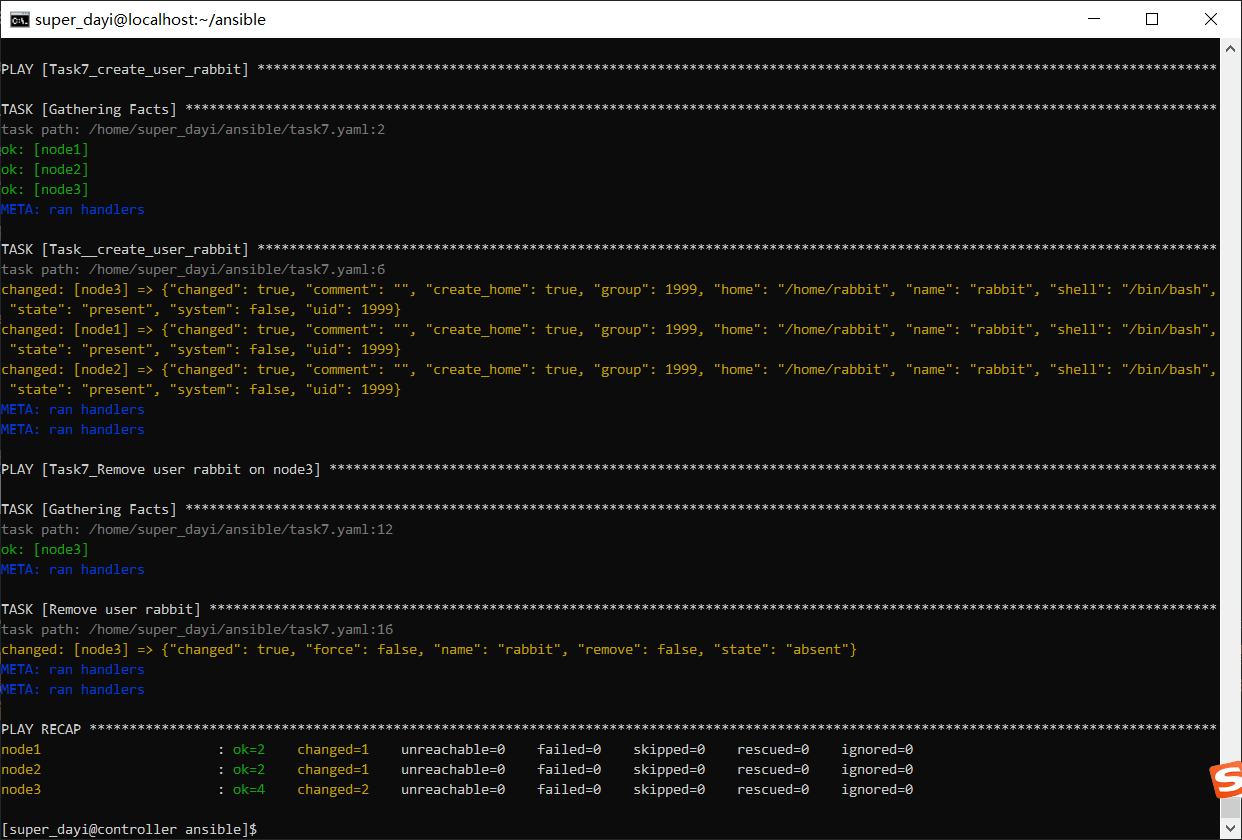
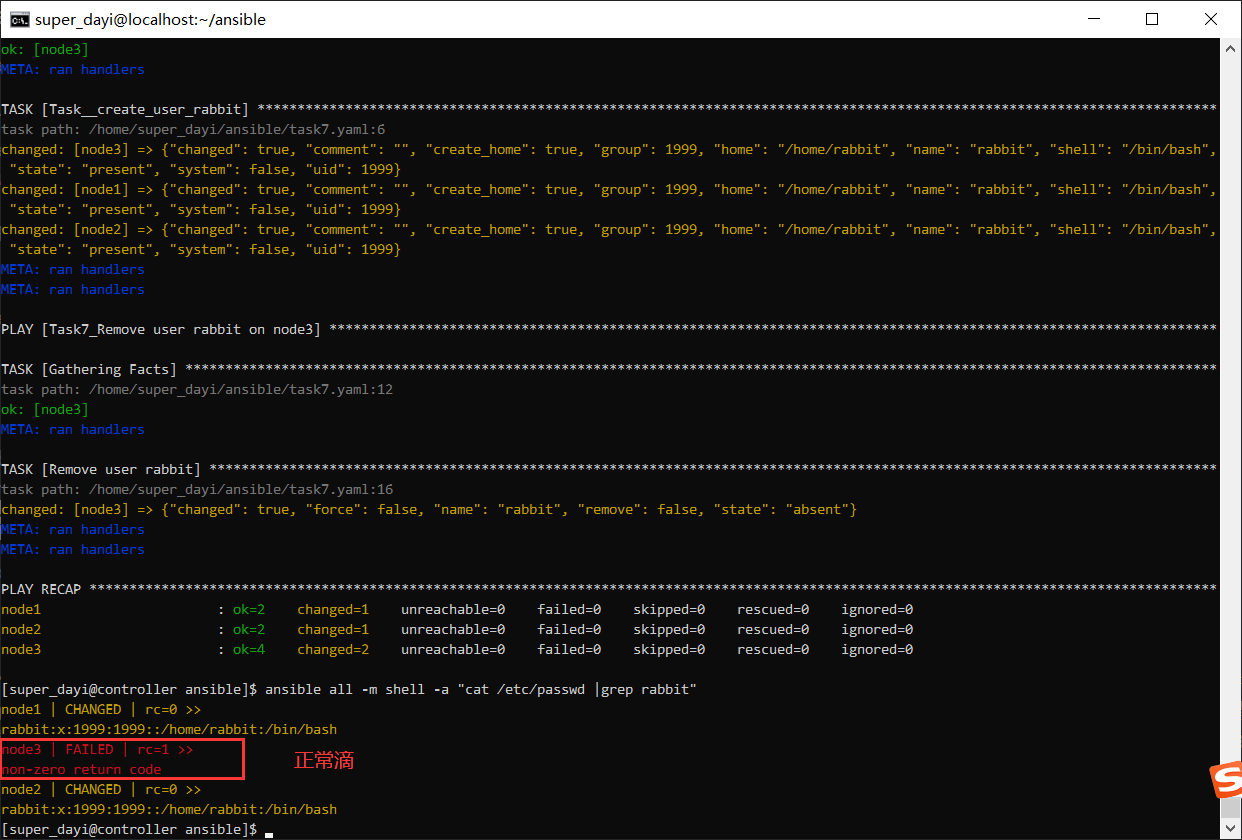
7、编写一个playbook,在node1-node3上执行play1,创建用户lisi,并指定其uid为1999;在node3上执行play2,删除用户lisi;(playbook执行后的结果输出,以及通过临时命令查看/etc/passwd文件当中的用户信息)
我这里用的rabbit用户
su super_dayi
cd ~/ansible
nano task7.yaml
task7.yaml
---
- name: Task7_create_user_rabbit
  hosts: node1,node2,node3
  become: true
  tasks:
    - name: Task__create_user_rabbit
      user:
        name: rabbit
        uid: 1999
        state: present

- name: Task7_Remove user rabbit on node3
  hosts: node3
  become: true
  tasks:
    - name: Remove user rabbit
      user:
        name: rabbit
        state: absent
执行:
ansible-playbook task7.yaml -vv
ansible all -m shell -a "cat /etc/passwd |grep rabbit"
8、编写一个playbook,利用loop循环结构,在node1-node3上分别创建三个用户,tom,jerry,cat;(执行完成之后查看并验证结果)
loop创建
su super_dayi
cd ~/ansible
nano task8_useradd_muilt_tasks_loop.yml
ansible-playbook task8_useradd_muilt_tasks_loop.yml -v
yaml:
---
- name: task8_create users with loop
  hosts: all
  tasks:
    - name: task8_create tom jerry david caobo
      user:
        name: "{{item}}"
        state: present

      loop:
        - tom
        - jerry
        - cat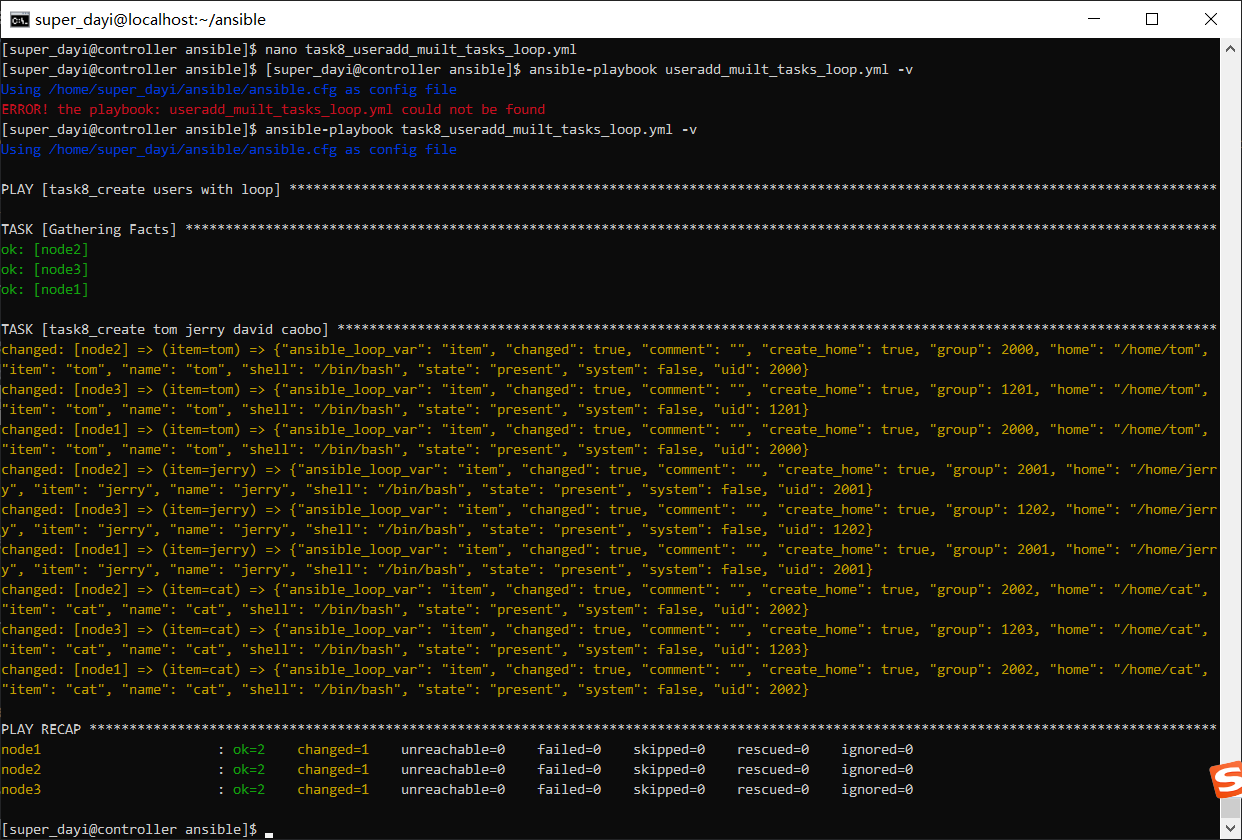
9、利用handlers通知信息,完成一下内容;该task1的内容为将/etc/hosts文件复制到所有node节点的/home/upwen(你的普通用户的家目录)下,通知信息为restart service1,task2的内容为输出“Welcome to this Ansible training session”,通知信息为restart service2,两个通知信息要做的事情都是从其httpd服务,完成该内容。
安装lamp一起装了
su super_dayi
cd ~/ansible
echo "<h1>hiiii OVO</h1><?php phpinfo(); ?>" >> index.php
nano task9_1_install_httpd.yaml
ansible-playbook task9_1_install_httpd.yaml -v
task9_1_install_httpd.yaml
---
- name: install lamp
  hosts: node1,node2,node3
  tasks:
    - name: install packages
      yum:
        name: "{{ packages}}"
      vars:
        packages:
        - httpd
        - php
        - mariadb
        - mariadb-server
        state: latest

    - name: start services
      service:
        name: httpd
        enabled: yes
        state: started

    - name: copy index.php to node
      copy:
        src: ~/ansible/index.php
        dest: /var/www/html/index.php
        mode: '0644'

    - name: start firewall
      firewalld:
        service: http
        permanent: yes
        state: enabled
        immediate: yes

#test php page
- name: test php
  hosts: node1
  tasks:
    - name: use uri to test node2 php page
      uri:
        url: http://192.168.132.12

    - name: use uri test node3
      uri:
        url: http://192.168.132.13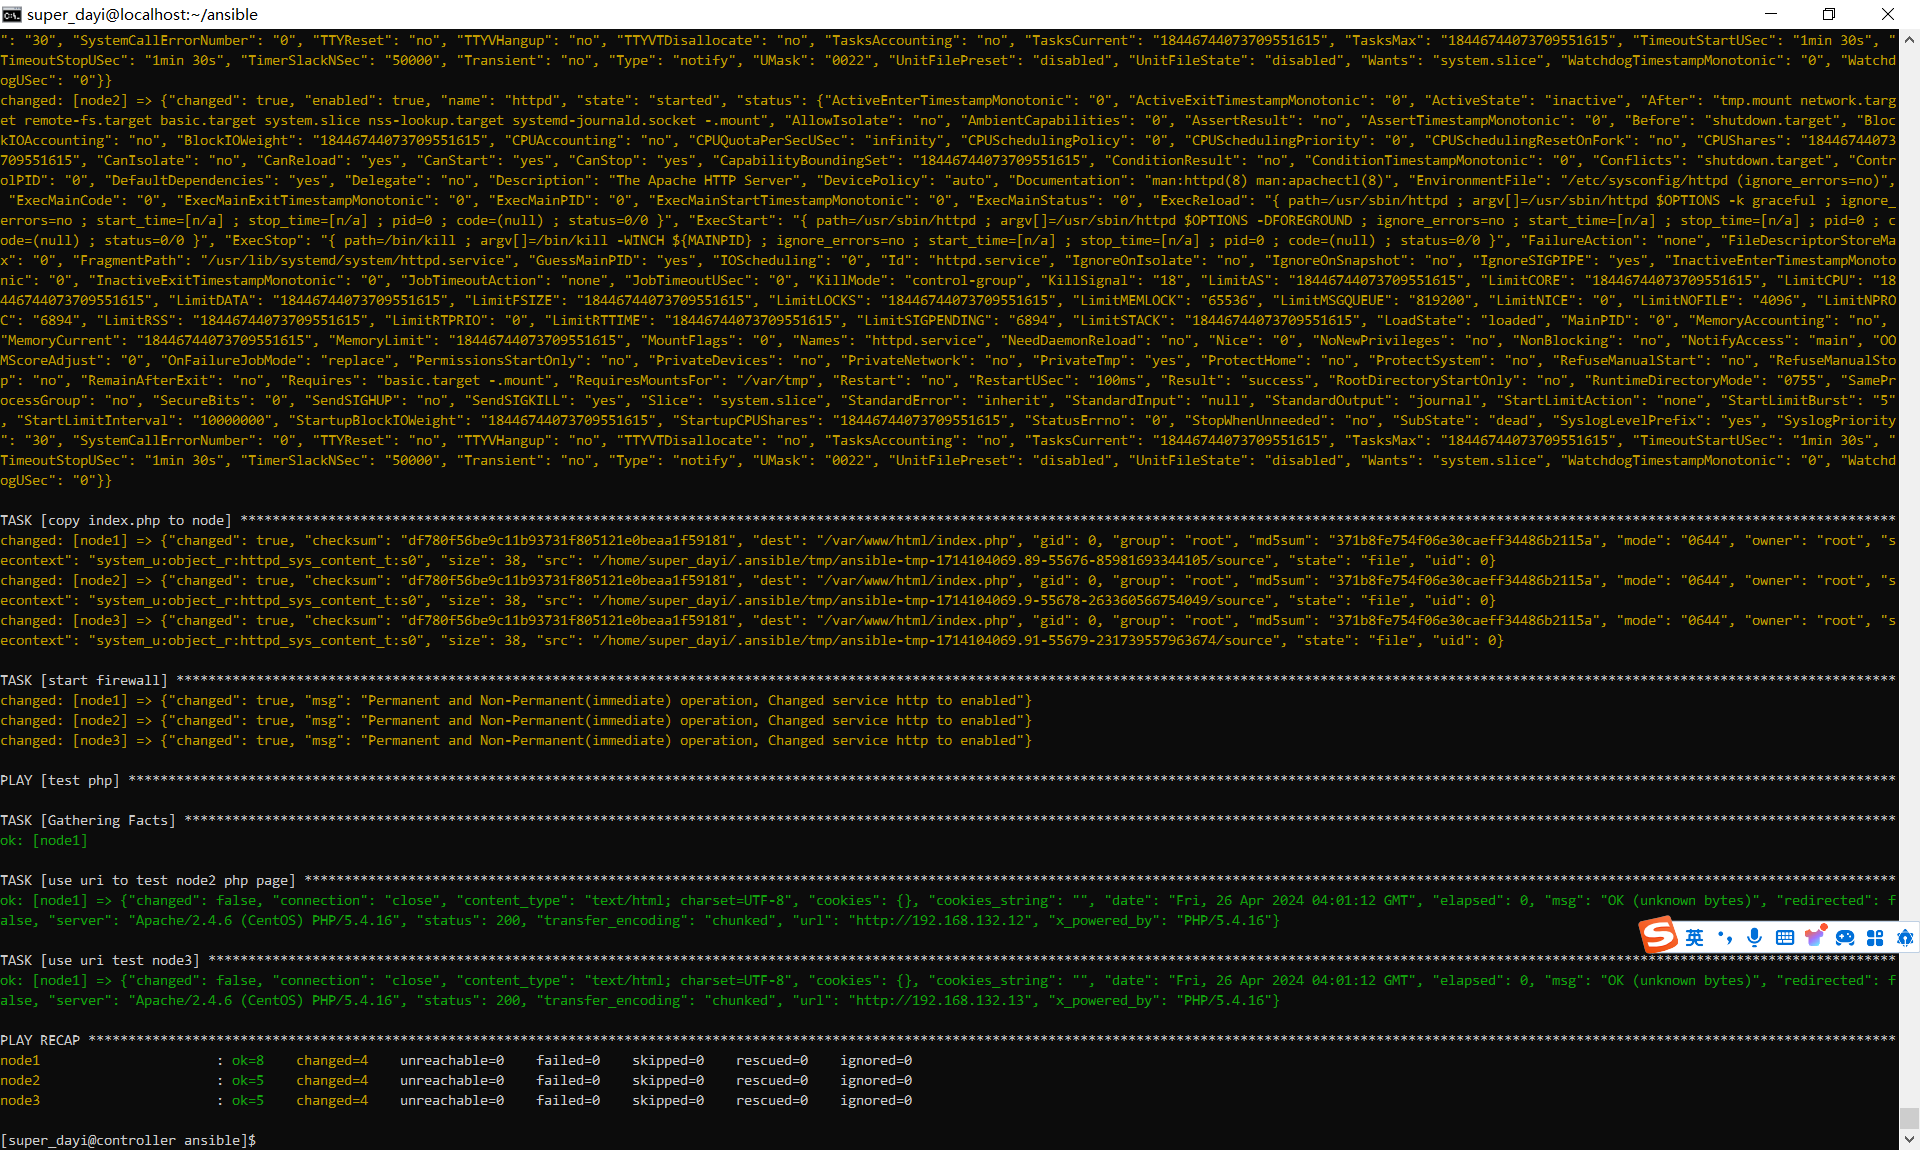
hander通知信息哦
su super_dayi
cd ~/ansible
nano task9_2_handler.yml
ansible-playbook task9_2_handler.yml  -vv
task9_2_handler.yml
---
- name: Copy files and print messages with handlers
  hosts: all
  become: true
  tasks:
    - name: Copy /etc/hosts to /home/
      copy:
        src: /etc/hosts
        dest: /home/super_dayi/hosts
        owner: super_dayi  # 确保文件属于用户upwen
        group: super_dayi  # 和用户组upwen
      notify: restart service1

    - name: Output welcome message
      debug:
        msg: "Welcome to this Ansible training session ovo!"
      notify: restart service2

  handlers:
    - name: restart service1
      service:
        name: httpd
        state: restarted
        enabled: yes

    - name: restart service2
      service:
        name: httpd
        state: restarted
        enabled: yes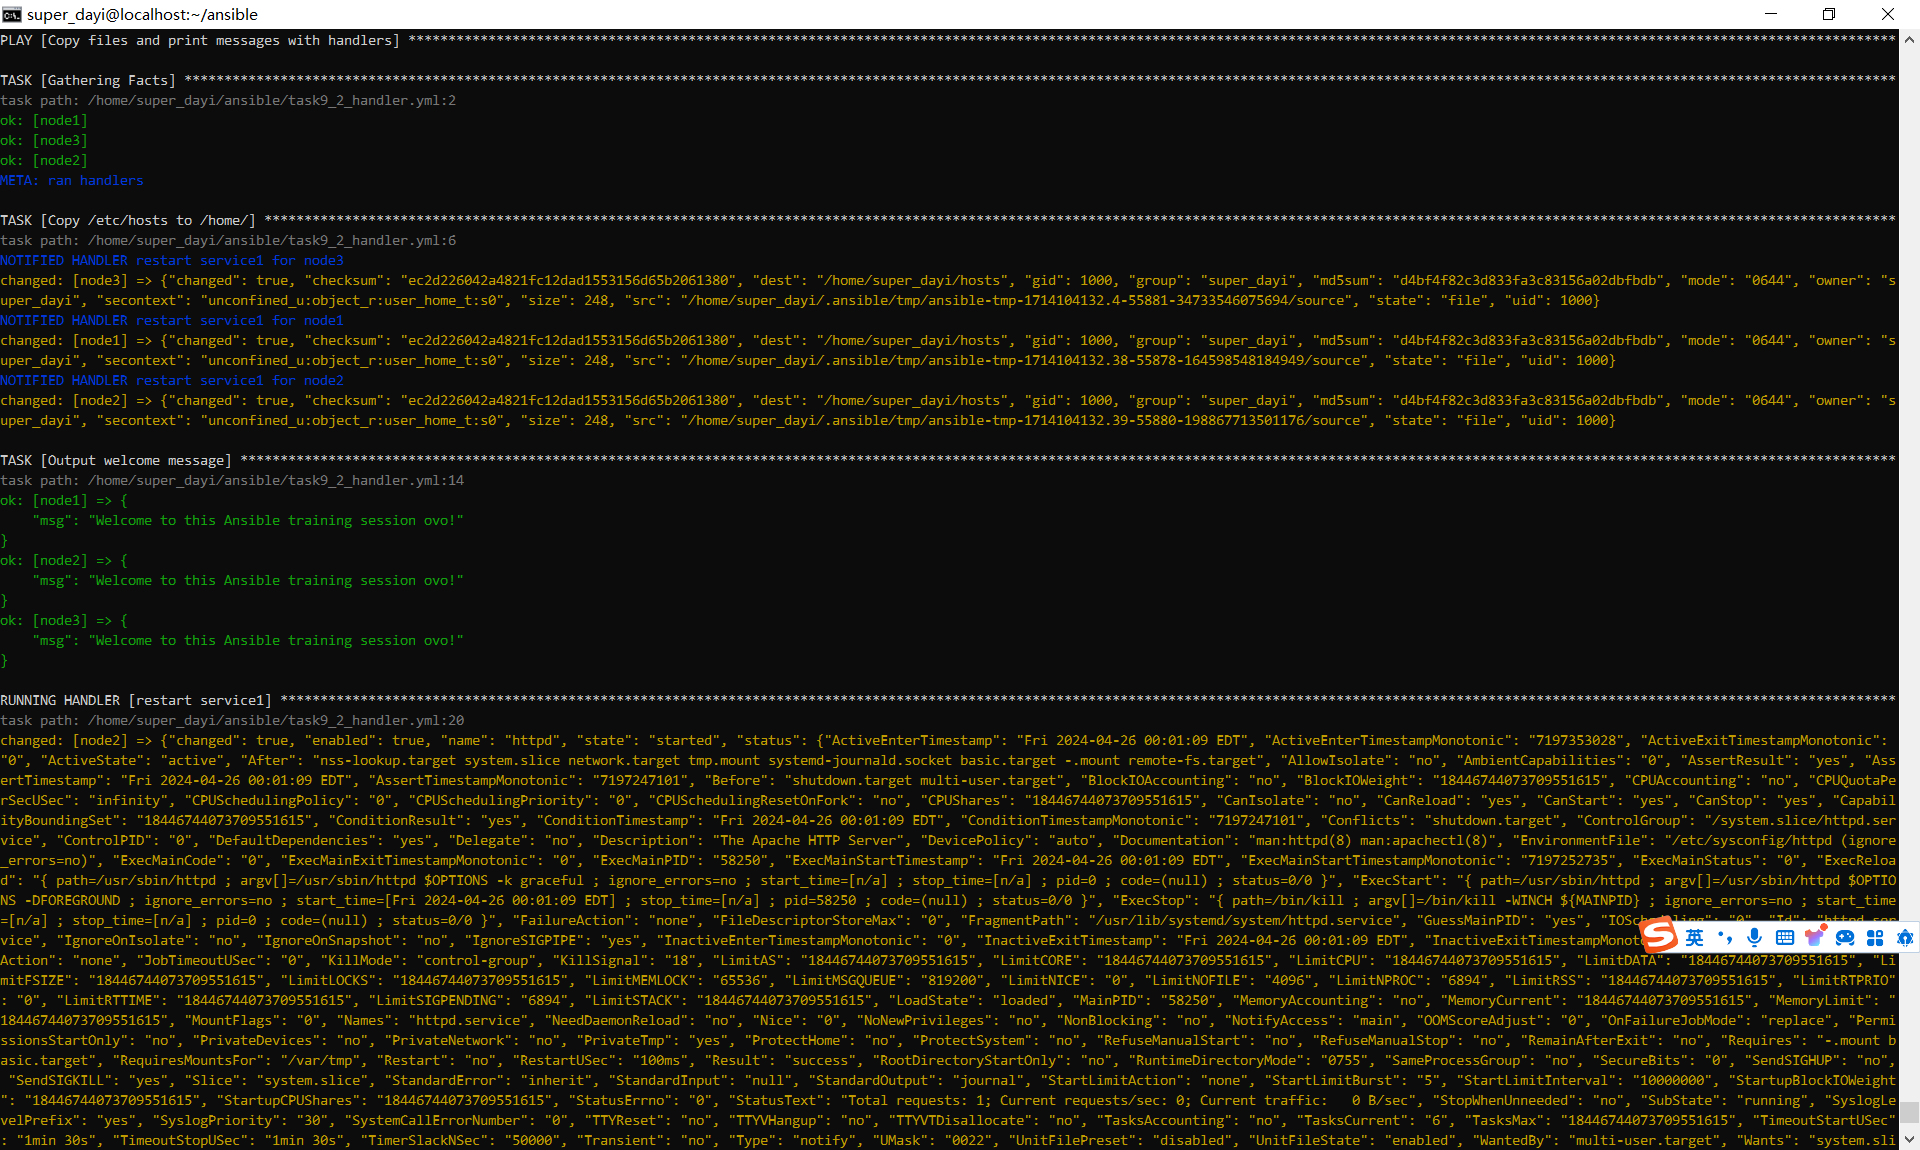
感谢陪伴
有什么问题说的及时跟咱说一下下OVO
文件下载
- 2024年4月23日10:19:18 ansible文件夹(记得自己把dayi改一下): https://p.dabbit.net/blog/pic_bed/sharex/_pn-2024-04-23-10-19-42_Eider_Puzzled_Terrible.zip
- 2024年4月24日19:53:56 ansible文件夹: https://p.dabbit.net/blog/pic_bed/sharex/_pn-2024-04-24-19-56-33_Dunlin_Visible_Pricey.tar.gz
- Xshell 绿色:https://p.dabbit.net/blog/pic_bed/sharex/_pn-2024-04-23-15-30-32_Murrelet_Junior_Realistic.7z
- controller虚拟机,周三晚上:
链接:https://pan.baidu.com/s/18kMvAkprRthODsqcBL6MdQ?pwd=n18y
提取码:n18y
--来自百度网盘超级会员V7的分享
下载ansible文件所注意的问题,输入
vim ~/ansible/ansible.cfg
把dayi改成自己的用户名
[secret] 问一下,如果一切都从头开始的话,完成实训那个第一步之后咋整,刚开始普通用户已经设置成了自己的名字,现在只有一个自己名字命名的普通用户,而且啥都没配,第二步该怎么做,第二步之后文章中的哪些步骤需要做出哪些改动吗。大佬求救
[/secret]