路由交换_作业1
版本1.1 应该不会再修改啦。
试错和修改,见文章末尾。
准备1:下载Cisco packet tracer 8.2
下载链接:https://portal.netacad.cn/resources/packet-tracer
选择:windows 64位版(需要登录下载,群文件有一份,叫:CiscoPacketTracer_820_Windows_64bit.exe):(直接下载链接)https://portal.netacad.cn/resources/file/84f3e715-2e22-435a-8742-fd51f136cf73
- 打开之后会提示登录,我点了左边的那个蓝色的按钮的。

不知道如果不登录的话是否可以用,如果可以用(能直接打开下一步的文件)则不需要登录。
加载比较慢,等一段时间就大概率就可以,会白屏一段时间。
输入注册的账号就可以。

如果一直长时间白屏,则可以试试加速器什么的。
准备2: 打开文件
文件下载:
分为一个pka,一个word,把过程写word里好像就可以。
- 超星学习通
- dayi直链:https://p.dabbit.net/blog/pic_bed/2023/03/e8f19599e54a57a9_202303052126404.pka
- word文件下载:https://p.dabbit.net/blog/pic_bed/2023/03/a3c58b3396298454_202303052128322.docx

打开之后大概这个样子
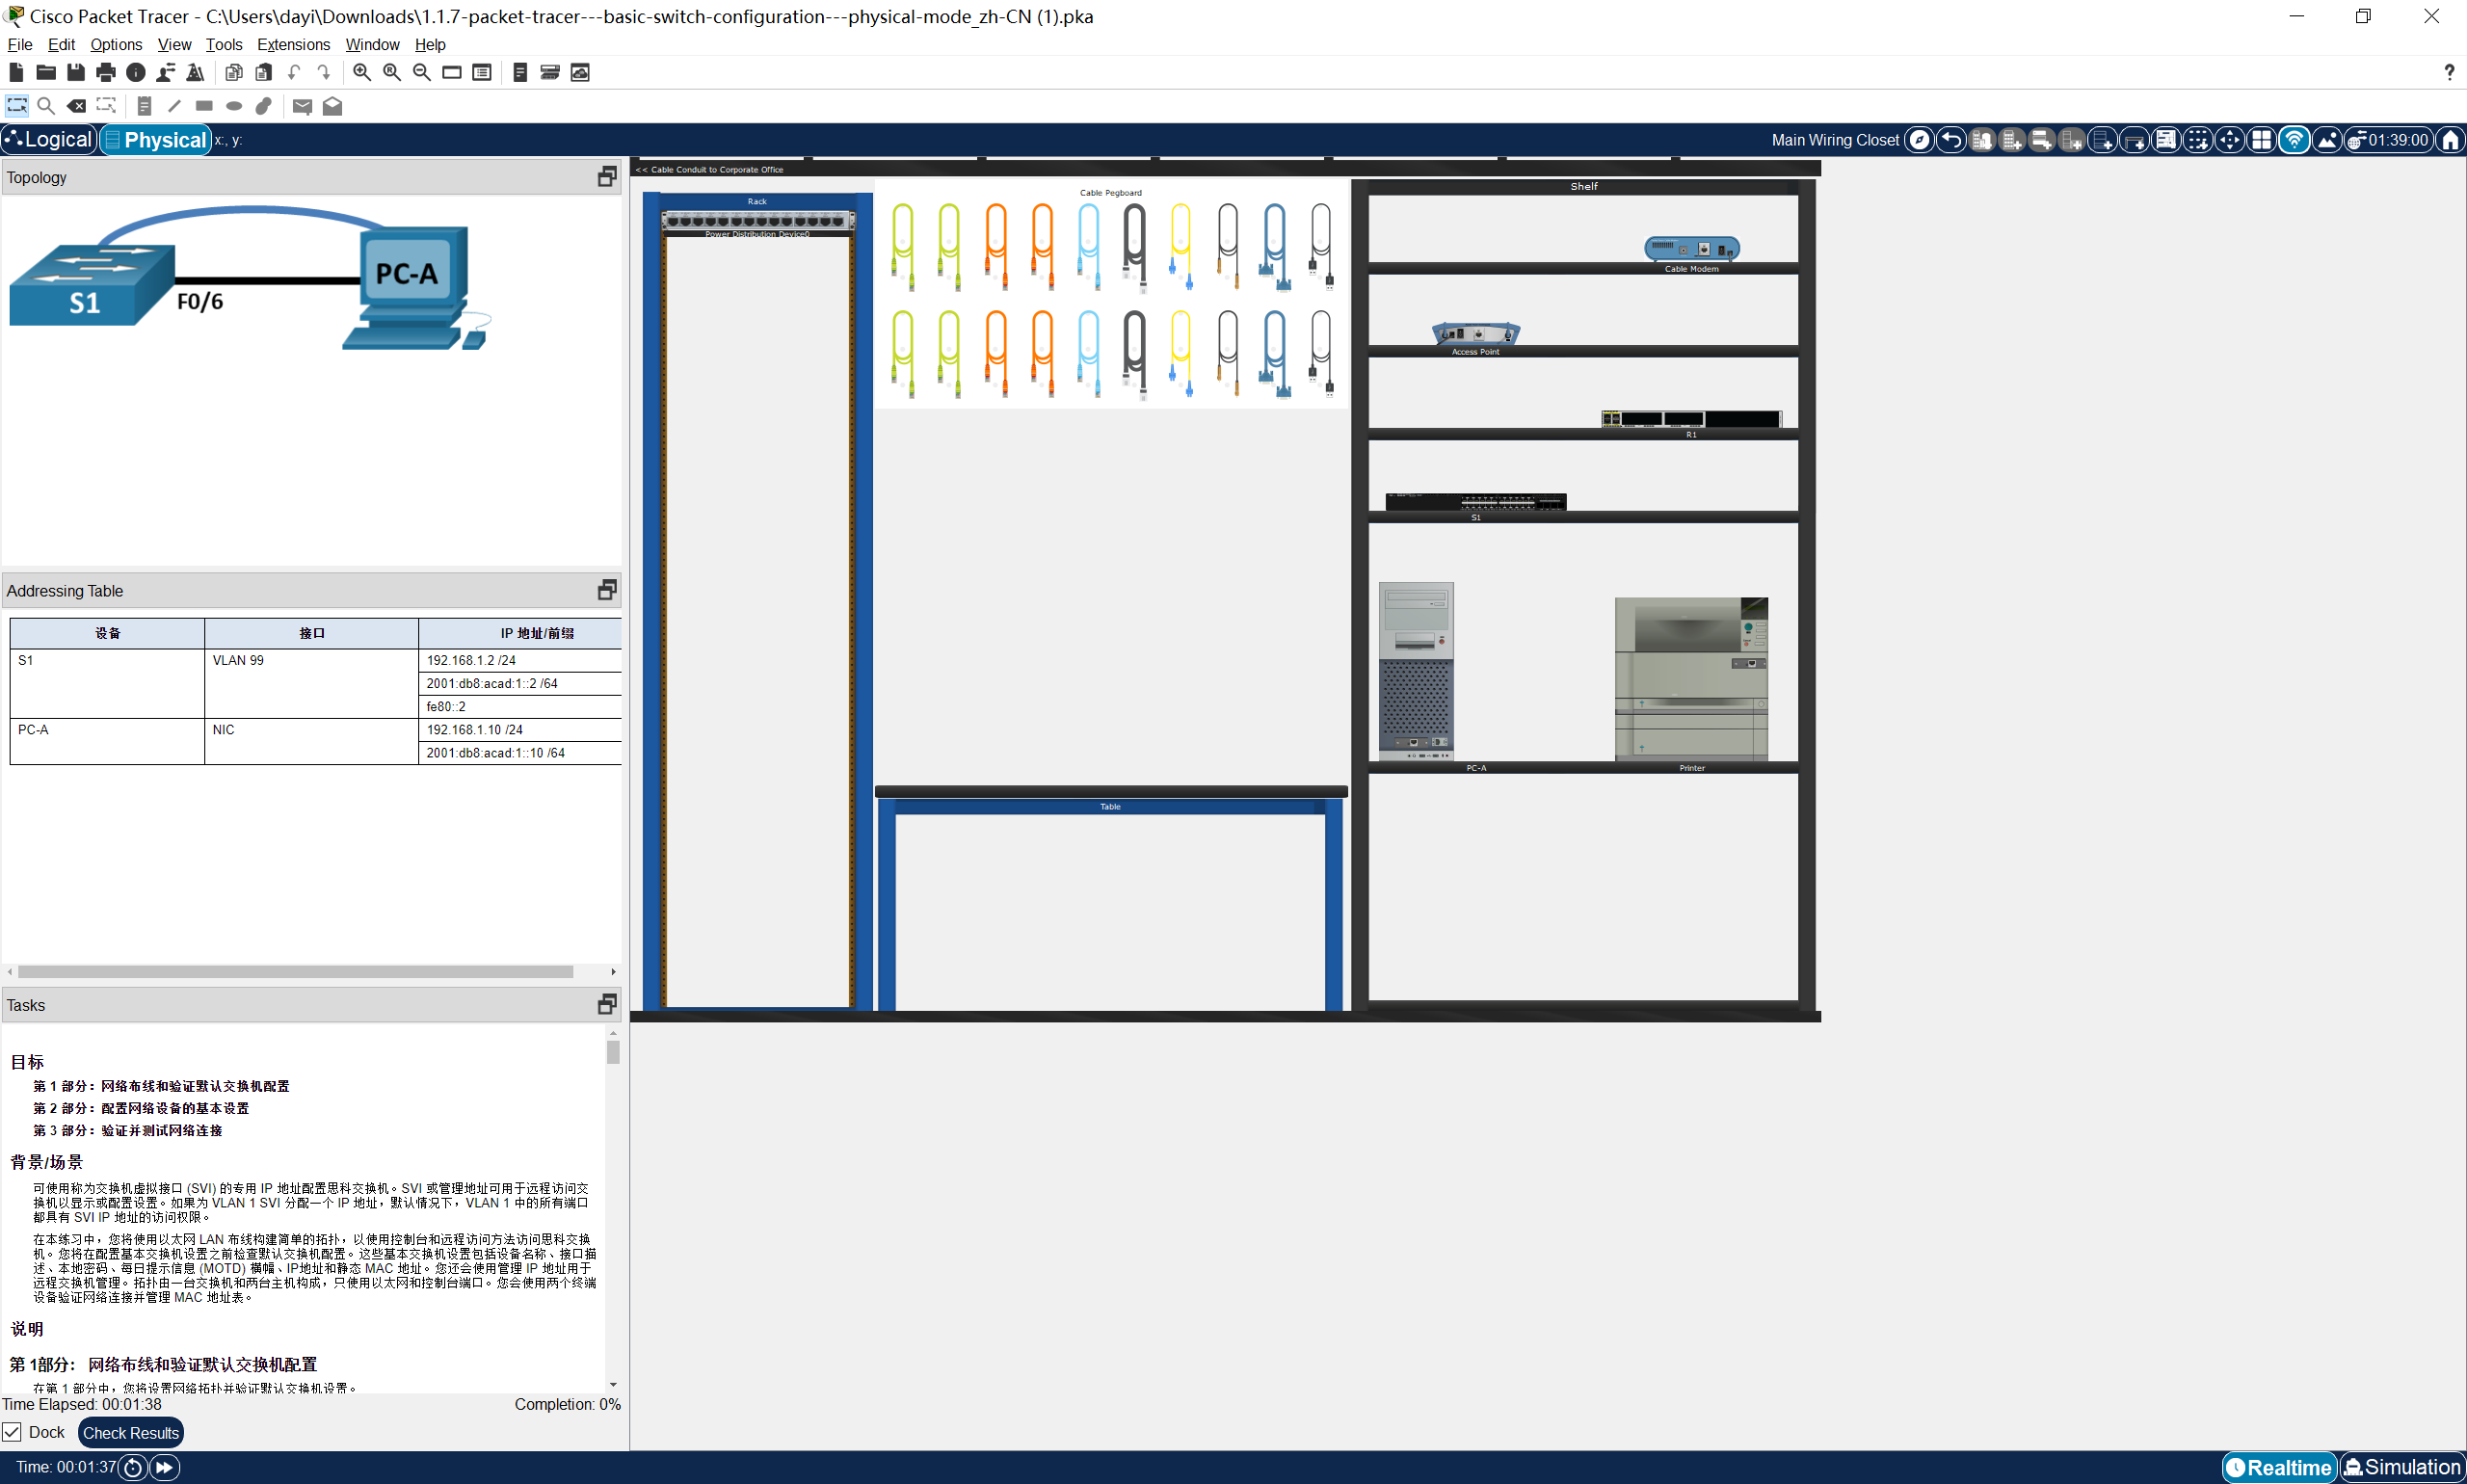
成功打开文件之后就可以正式开始了。
第一部分:网络布线和验证默认交换机配置
第 1部分: 网络布线和验证默认交换机配置
在第 1 部分中,您将设置网络拓扑并验证默认交换机设置。
这段只是描述的文字,用处不是特别大。
第一部分.步骤 1 : 建立如拓扑图所示的网络。
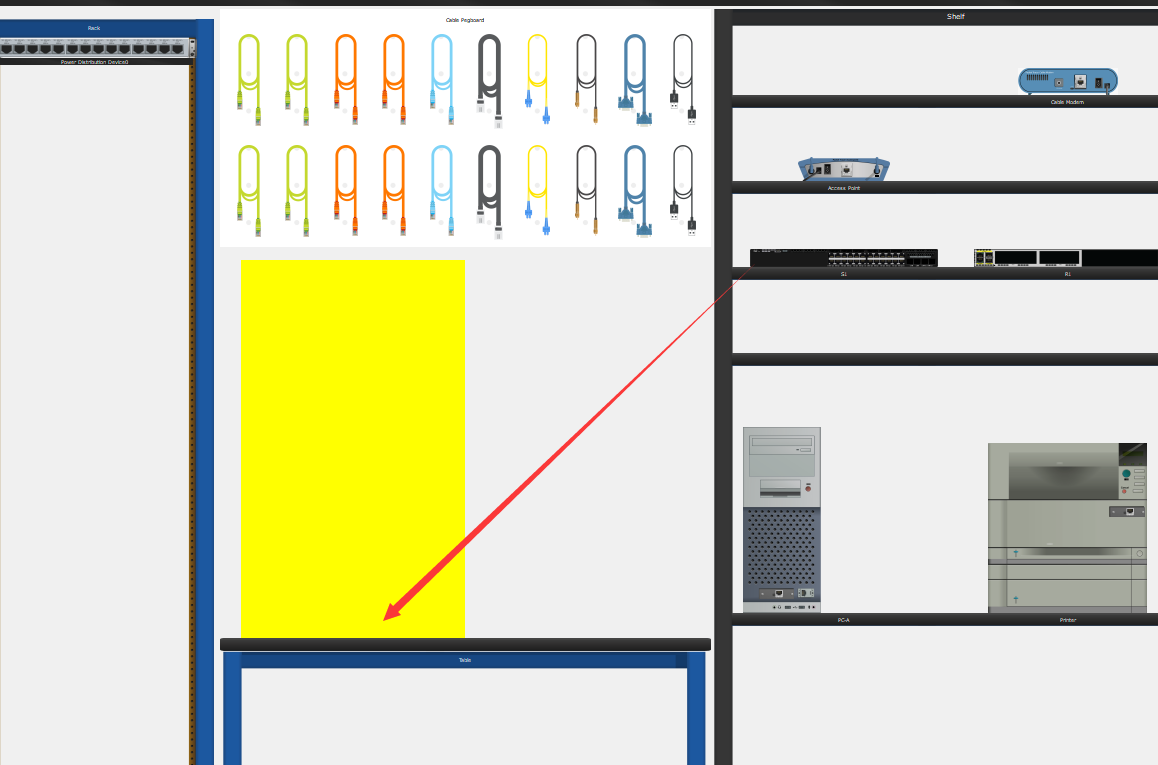
a. 从架子上单击并拖动交换机 S1 ,然后将其放在桌子的左侧。
拖过来
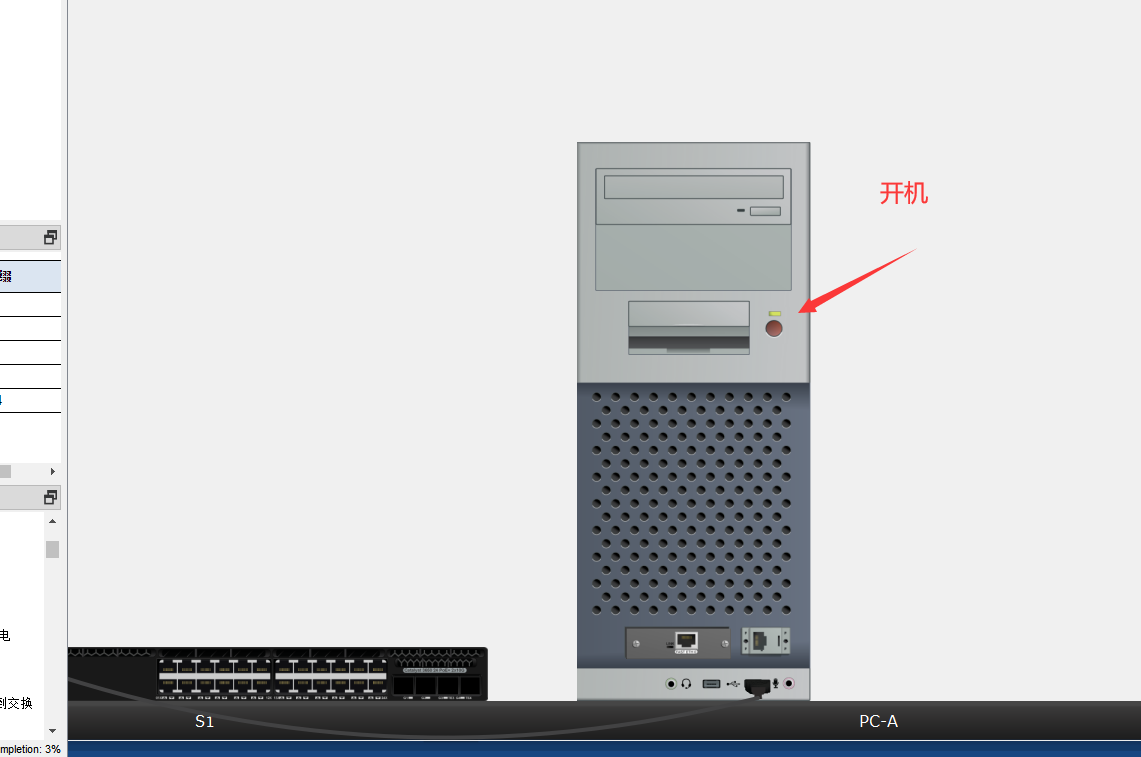
b. 从架子上单击并拖动设备 PC-A ,然后将其放在桌子的右侧。打开 PC-A 的电源。
拖过来

c. 如拓扑所示,将控制台电缆从设备 PC-A 连接到交换机 S1。此时, 请勿连接 PC-A 的以太网电缆。
他是可以放大的,这个是连接console线,但是交换机的console口好像只有USB口,于是就连上USB口就可以。这两个小口很小,ctrl+鼠标滚轮 可以放大。
交换机的这个口比较难点,稍微点一点就能点上,记得放大。
这个地方的口很小很小,放大之后点一点就可以。
后来发现,这样连正常的console口:
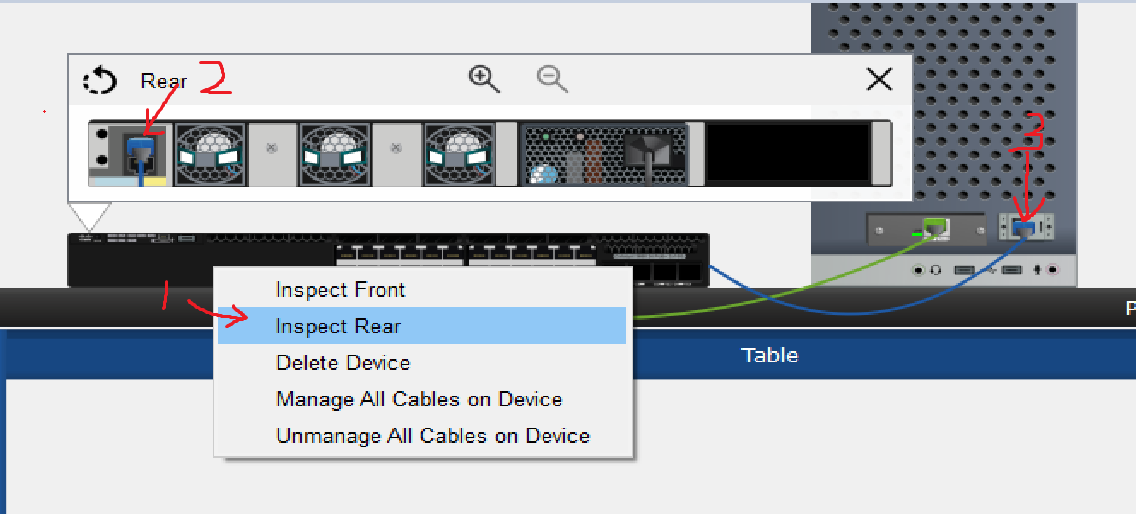
这就是正常的方法啦
不过你用USB连上之后完全不影响后序的操作进行
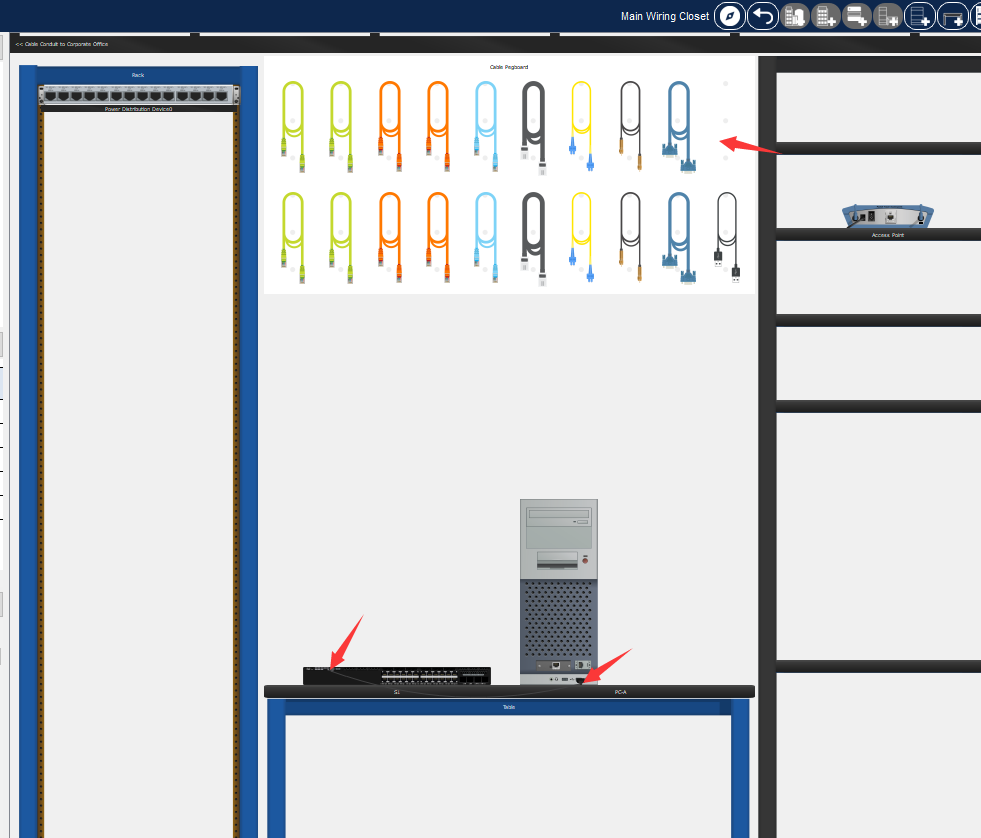
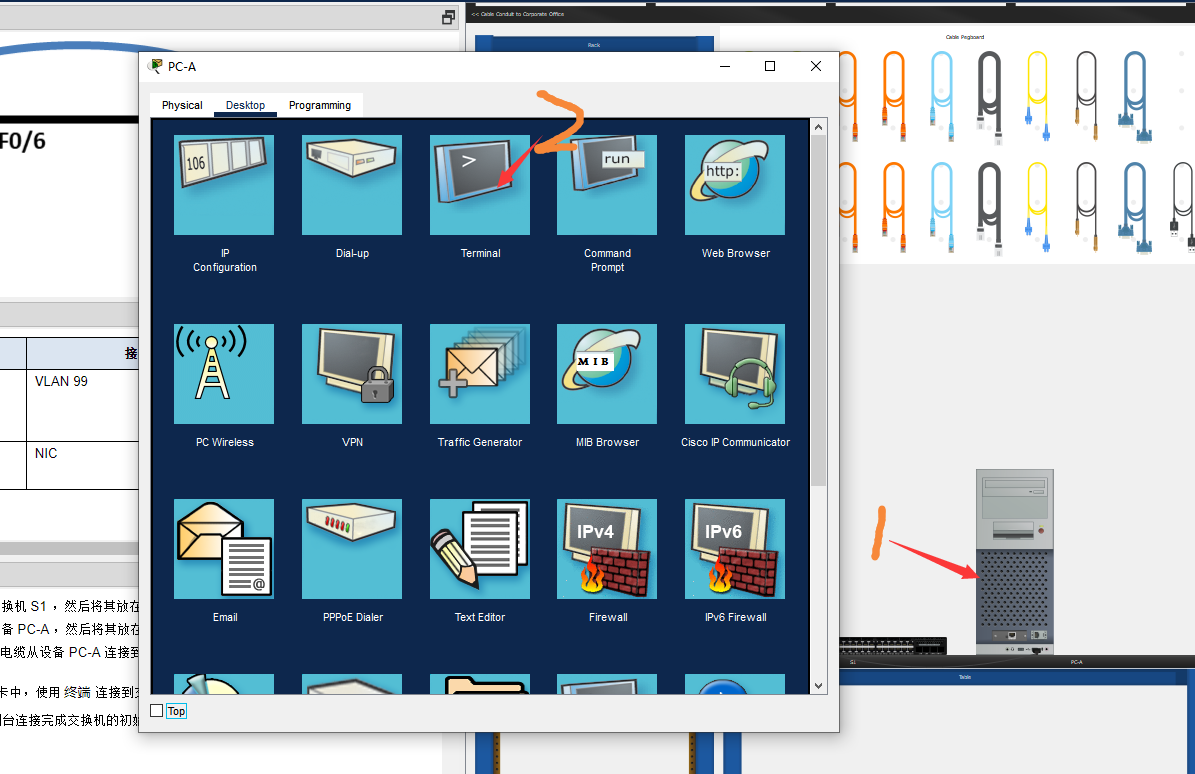
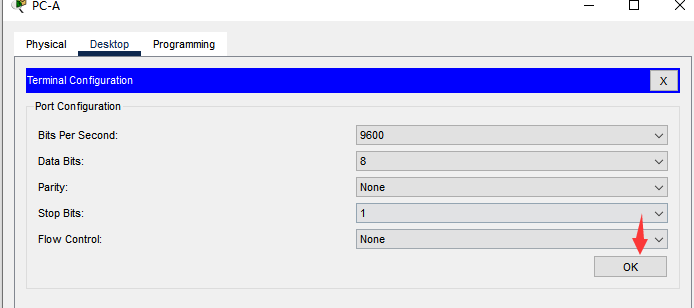
d. 在 PC-A 的 桌面 选项卡中,使用 终端 连接到交换机。
打开方式,依次点击:
- PC-A
- Desktop
- Terminal
- OK
- 下面是图片
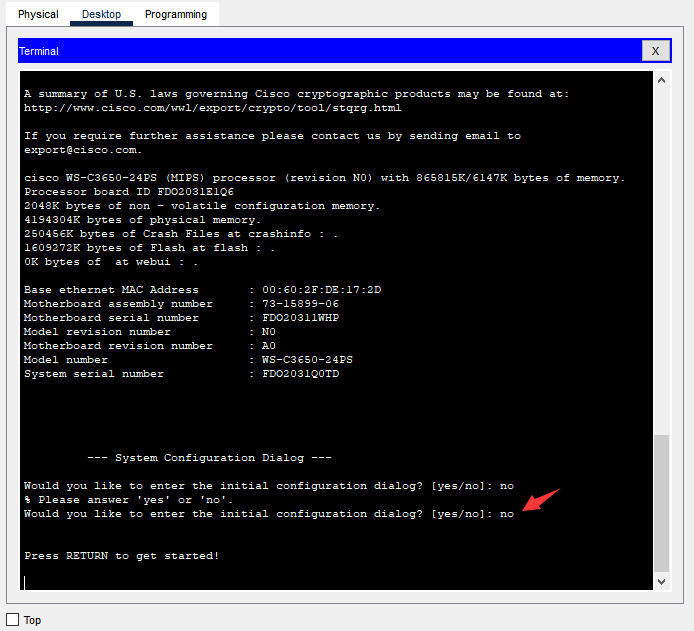
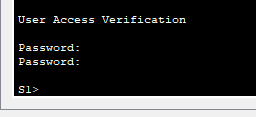
- 进入终端后会提示是否要进行初始化配置,输入no,需要在英文输入法下输入,然后一次不行多输入几次。
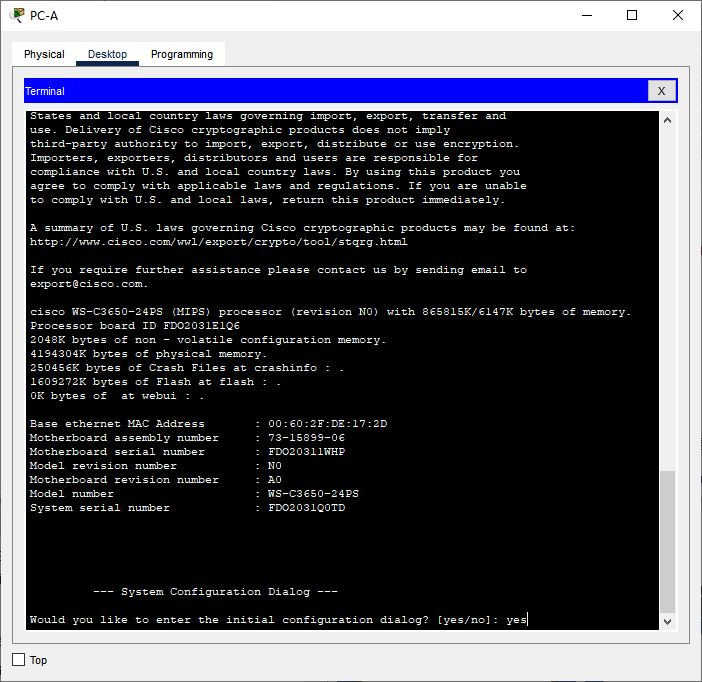
这里会提示是否要进行初始化配置,输入no,需要在英文输入法下输入,然后一次不行多输入几次。
这里的Q.1.1.d是问题的序号,因为问题数量不少,就依次这样编号。
Q.1.1.d
- Q:问题
  - 1:第一部分
    - 1:步骤1
      - d:步骤1的d节
Q.1.1.d 为什么您必须使用控制台连接完成交换机的初始配置? 为什么无法通过 Telnet 或 SSH 连接到交换机?
在这里填写答案
在交换机初始配置时,通常需要使用控制台连接,而不能通过 Telnet 或 SSH 连接到交换机的原因如下:
- 初始配置需要对交换机进行基本设置,例如设定管理IP地址,设置管理员密码等,这些设置必须在交换机启动之前完成。通过控制台连接可以在交换机启动前进行这些操作,而 Telnet 或 SSH 连接需要在交换机启动后才能使用,因此无法完成初始配置。
- 控制台连接可以通过串口直接连接到交换机的控制台端口,而 Telnet 或 SSH 连接需要在交换机上配置相关的网络参数,例如IP地址,网关等,这些配置也需要在交换机启动后完成。因此,在交换机的初始配置过程中,控制台连接是最可靠和最方便的选择。
- 控制台连接通常是物理的,而 Telnet 或 SSH 连接则是通过网络进行的。在初始配置时,如果交换机还没有被正确配置,它可能无法与网络连接,因此无法通过 Telnet 或 SSH 连接。此外,如果交换机的网络连接出现问题,Telnet 或 SSH 连接也可能会受到影响,导致无法访问交换机。
总之,控制台连接是交换机初始配置的最佳选择,因为它可以直接连接到交换机,无需网络配置,而且在交换机启动之前就可以进行必要的设置。在初始配置完成后,可以通过 Telnet 或 SSH 连接对交换机进行远程管理和监控。
连上终端之后会提示是否初始化。
后来我发现好像不初始化比较好。
初始化要改一堆东东,似乎直接把后面的任务做了,也不是个事。那就输入no比较好。
输入no即可
平行世界支线:如果选择初始化会发生什么
这个支线是咱试错的过程,如果你好奇会发生什么可以看一看,跟主线没有关系。
(删除线)我输入了两个yes,那就初始化一下吧。
因为初始化的话要改一堆东东,好像直接把后面的任务做完了。要不就按着顺序来吧。
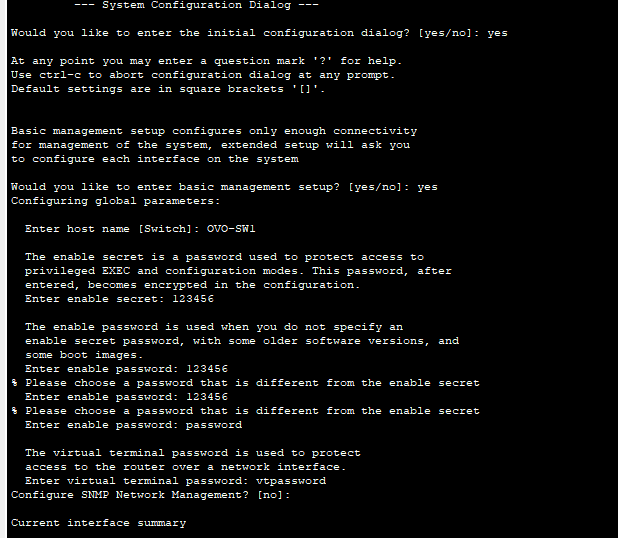
会问你管理口用哪个。
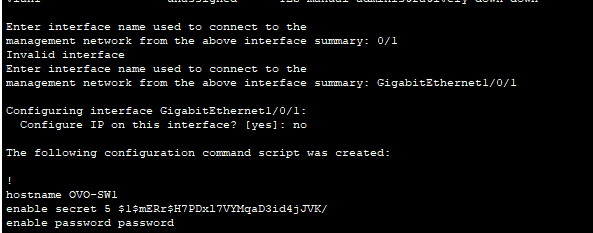
第一部分.步骤 2 :检验默认交换机配置。
在此步骤中,您将检查默认交换机设置,如当前交换机配置、 IOS 信息、接口属性、VLAN 信息和闪存。
在特权 EXEC 模式下,您可访问所有交换机 IOS 命令。对特权 EXEC 模式的访问应受密码保护限制,以防未经授权使用,因为它提供对全局配置模式和用于配置操作参数的命令的直接访问。您将在本练习稍后设置密码。
特权 EXEC 模式命令集包括用户 EXEC 模式中包含的那些命令, 以及用于获取其余命令模式访问权限的 configure 命令。使用 enable 命令进入特权 EXEC 模式。
a. 假设交换机没有配置文件存储在非易失随机存取存储器 (NVRAM) 中, 使用 终端 的控制台连接会将您置于 具有 Switch> 提示符的交换机用户 EXEC 模式中。使用 enable 命令进入特权 EXEC 模式。
打开配置窗口
请注意特权 EXEC 模式下配置中提示符的变化。
上面就是打开我们上一步输入no的窗口,我们已经打开了。
然后输入
enable
进入特权模式(#)模式
进入之后:请注意特权 EXEC 模式下配置中提示符的变化。
那个命令行会变成一个#
b. 通过发出 show running-config 特权执行模式命令,验证交换机上存在正确的默认配置文件。检查当前的 运行配置文件。
执行:
show running-config

输出:(这里是我后面补的,所以可能跟你的显示不太一样,一直按回车就可以往下翻,输入q可以退出)
S1#show running-config
Building configuration...
Current configuration : 3831 bytes
version 16.3.2
no service timestamps log datetime msec
no service timestamps debug datetime msec
service password-encryption
Q.1.2.b 交换机有多少个 GigabitEthernet 接口?
我认为是24+4=28个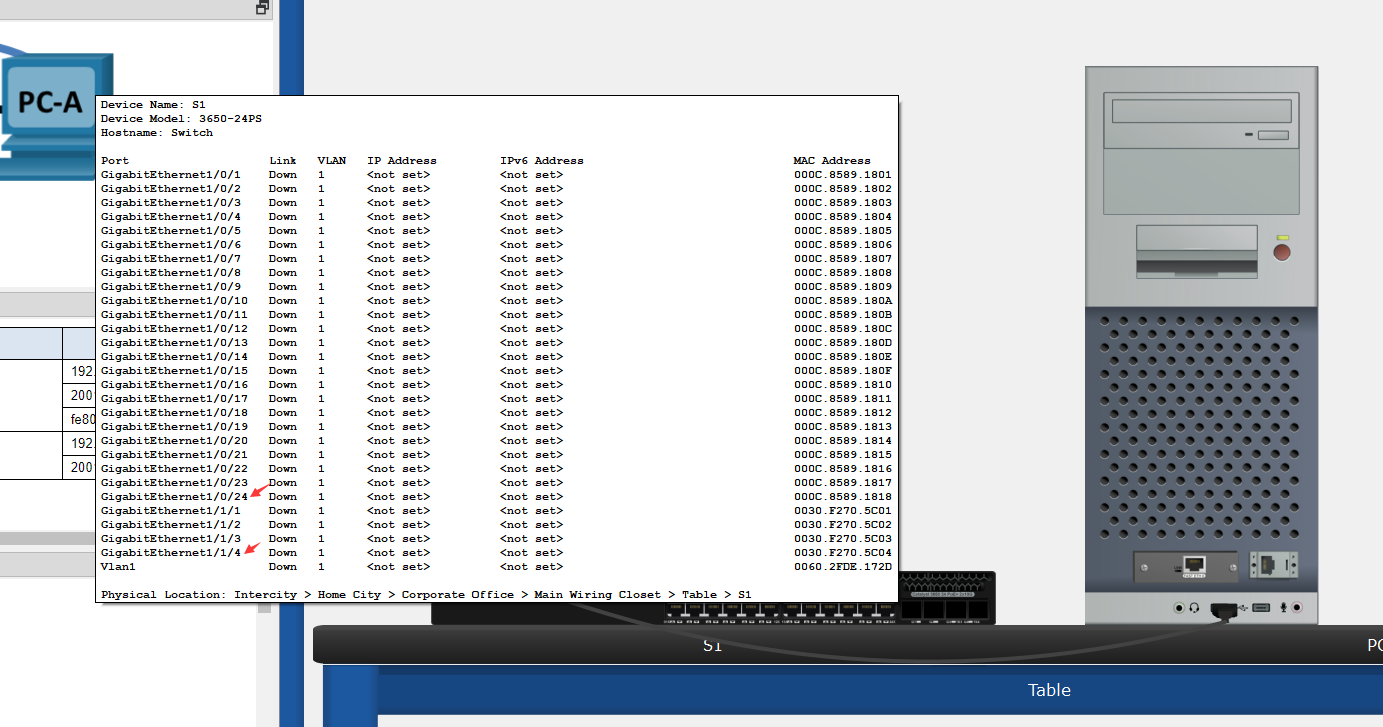
也可以从这里看:
interface GigabitEthernet1/0/1
...
interface GigabitEthernet1/0/24
...
interface GigabitEthernet1/1/4

这里是步骤b产生的输出,这样总共1-24 1-4 28个口
Q.1.2.b 显示的 vty 线路值的范围是什么?
- 在终端输入
enable请注意特权 EXEC 模式下配置中提示符的变化 - 输入
show running-config 可以得到这个信息表。(more一直回车就到底了)
Switch>enable
Switch#show running-config
Building configuration...

Current configuration : 1340 bytes
version 16.3.2
no service timestamps log datetime msec
no service timestamps debug datetime msec
no service password-encryption
hostname Switch
ip cef
no ipv6 cef
spanning-tree mode pvst
interface GigabitEthernet1/0/1
...
interface GigabitEthernet1/0/24
...
interface GigabitEthernet1/1/4
interface Vlan1
 no ip address
 shutdown
ip classless
ip flow-export version 9
line con 0

line aux 0

line vty 0 4
 login

end
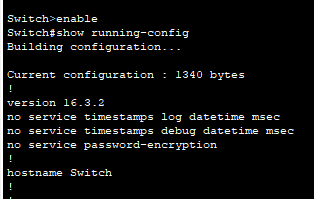
其中包含line vty 0 4也就是说,序号是从0-4。
因此,显示的 vty 线路值的范围是 0-4,共计5个线路。
c. 在 NVRAM 中检查启动配置文件。
Switch# show startup-config
startup-config is not present
Q.1.2.c 为什么会显示此消息?

说实在小编也不知道,应该是没配开机自启动参数
- 交换机上没有保存当前的配置信息。在交换机上进行配置更改时,需要使用 "write" 命令将当前的配置信息保存到闪存中,以便在下一次重启后自动加载。
- 交换机出现了硬件故障或闪存故障,导致无法加载保存的配置信息。
d. 检查 VLAN 1 的 SVI 的特性。
Switch# show interface vlan1
show interface vlan1Q.1.2.d 是否为 VLAN 1 分配了 IP 地址?
Switch#show interface vlan1
Vlan1 is administratively down, line protocol is down
  Hardware is CPU Interface, address is 0060.2fde.172d (bia 0060.2fde.172d)
  MTU 1500 bytes, BW 100000 Kbit, DLY 1000000 usec,
     reliability 255/255, txload 1/255, rxload 1/255
  Encapsulation ARPA, loopback not set
  ARP type: ARPA, ARP Timeout 04:00:00
  Last input 21:40:21, output never, output hang never
  Last clearing of "show interface" counters never
  Input queue: 0/75/0/0 (size/max/drops/flushes); Total output drops: 0
  Queueing strategy: fifo
  Output queue: 0/40 (size/max)
  5 minute input rate 0 bits/sec, 0 packets/sec
  5 minute output rate 0 bits/sec, 0 packets/sec
     1682 packets input, 530955 bytes, 0 no buffer
     Received 0 broadcasts (0 IP multicast)
     0 runts, 0 giants, 0 throttles
     0 input errors, 0 CRC, 0 frame, 0 overrun, 0 ignored
     563859 packets output, 0 bytes, 0 underruns
     0 output errors, 23 interface resets
0 output buffer failures, 0 output buffers swapped out由Vlan1 is administratively down, line protocol is down
这句话可以看出来VLAN1处于关闭状态。
Q.1.2.d 此 SVI 的 MAC 地址是什么?答案视情况而定。
你的不一定是这个哦
从输出信息中可以找到以下这一行:
Hardware is CPU Interface, address is 0060.2fde.172d (bia 0060.2fde.172d)这个输出信息表明此 SVI(即 VLAN 1)的硬件类型是 "CPU Interface"。
并且分配了一个 MAC 地址 "0060.2fde.172d"。
其中,"bia" 表示 Burned-In Address,即出厂时设定的 MAC 地址。
此 SVI 的 MAC 地址为 "0060.2fde.172d"。
Q.1.2.d 此接口打开了吗?
Vlan1 is administratively down, line protocol is down此接口是关闭的。其中,"administratively down" 此接口被管理员手动关闭
"line protocol is down" 表示链路协议处于down,接口无法正常通信。
e. 检查 SVI VLAN 1 的 IP 属性。
Switch# show ip interface vlan1
show ip interface vlan1Q.1.2.e 您看到的输出是什么?
Switch#show ip interface vlan1
Vlan1 is administratively down, line protocol is down
  Internet protocol processing disabled

Switch#
f. 使用以太网电缆将 PC-A 连接到交换机的 GigabitEthernet1/0/6。为交换机和 PC 留出时间来协商双工和速 度参数。检查 SVI VLAN 1 的 IP 属性。
要连线哦,记得用绿色的直通线。
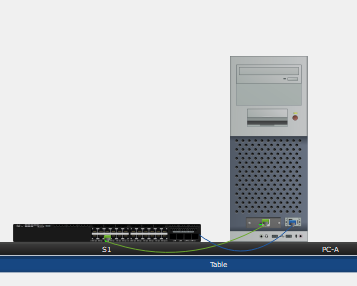
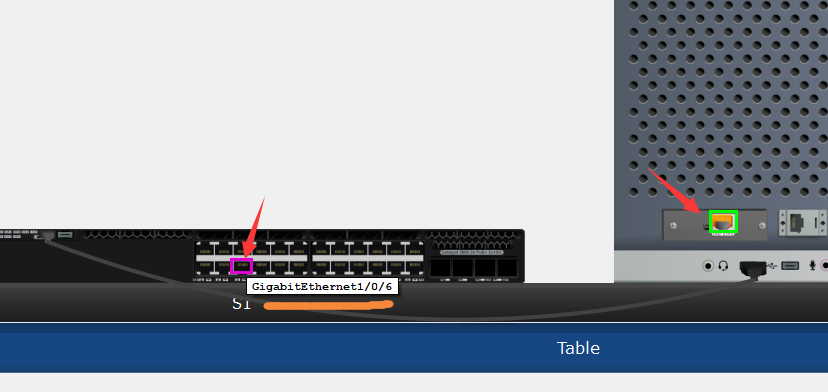

Q.1.2.f 您看到的输出是什么?
Switch#
%LINK-5-CHANGED: Interface GigabitEthernet1/0/6, changed state to up

%LINEPROTO-5-UPDOWN: Line protocol on Interface GigabitEthernet1/0/6, changed state to up

Switch#show ip interface vlan1
Vlan1 is administratively down, line protocol is down
  Internet protocol processing disabled
g. Enter global configuration and enable the SVI VLAN 1 interface.
这一步要做
输入:
configure terminal #进入特权模式
interface vlan 1 #进入vlan1接口管理
no shutdown #no shutdown = on 让它一直开着


输出:
Switch#configure terminal
Enter configuration commands, one per line.  End with CNTL/Z.
Switch(config)#interface vlan 1
Switch(config-if)#no shutdown
Switch(config-if)#
%LINK-5-CHANGED: Interface Vlan1, changed state to up

%LINEPROTO-5-UPDOWN: Line protocol on Interface Vlan1, changed state to up

Switch(config-if)#
h. 检查 SVI VLAN 1 的 IP 属性。
Q.1.2.h 您看到的输出是什么?
输入:(先进入EXEC模式)(长这个样子:Switch#)
exit
exit
show ip interface vlan1

输出:
Switch(config-if)#exit
Switch(config)#exit
Switch#
%SYS-5-CONFIG_I: Configured from console by console

Switch#show ip interface vlan1
Vlan1 is up, line protocol is up
  Internet protocol processing disabled
i. 检查交换机的思科 IOS 版本信息。 Switch# show version
运行:show version输出:
Switch#show version
Cisco IOS Software [Denali], Catalyst L3 Switch Software (CAT3K_CAA-UNIVERSALK9-M), Version 16.3.2, RELEASE SOFTWARE (fc4)
Technical Support : http://www.cisco.com/techsupport
Copyright(c) 1986 - 2016 by Cisco Systems, Inc.
Compiled Tue 08 - Nov - 16 17:31 by pt_team
...
ROM: IOS-XE ROMMON
BOOTLDR: CAT3K_CAA Boot Loader (CAT3K_CAA-HBOOT-M) Version 4.26, RELEASE SOFTWARE (P)
test uptime is 7 hours, 33 minutes
Uptime for this control processor is 7 hours, 36 minutes
System returned to ROM by Power Failure
System image file is "flash:/cat3k_caa-universalk9.16.03.02.SPA.bin"
Last reload reason : Power Failure
A summary of U.S. laws governing Cisco cryptographic products may be found at:
http://www.cisco.com/wwl/export/crypto/tool/stqrg.html
If you require further assistance please contact us by sending email to
export@cisco.com.
Technology Package License Information :
---------------------------------------------------------------- -
Technology - package Technology - package
Current Type Next reboot
------------------------------------------------------------------
ipservicesk9 Permanent ipservicesk9
cisco WS-C3650-24PS (MIPS) processor (revision N0) with 865815K/6147K bytes of memory.
Processor board ID FDO2031E1Q6
1 Virtual Ethernet interface
28 Gigabit Ethernet/IEEE 802.3 interface(s)
2048K bytes of non-volatile configuration memory.
4194304K bytes of physical memory.
250456K bytes of Crash Files at crashinfo : .
1609272K bytes of Flash at flash : .
0K bytes of at webui : .
Base ethernet MAC Address : 00:60:2F:DE:17:2D
Motherboard assembly number : 73-15899-06
Motherboard serial number : FDO20311WHP
Model revision number : N0
Motherboard revision number : A0
Model number : WS-C3650-24PS
System serial number : FDO2031Q0TD
Switch Ports Model SW Version SW Image Mode
------ ----- ----- ---------- ---------- ----
* 1 28 WS-C3650-24PS 16.3.2 CAT3K_CAA-UNIVERSALK9 BUNDLE
Configuration register is 0x102
Switch#Q.1.2.i 交换机运行的思科 IOS 版本是多少?
Cisco IOS Software [Denali], Catalyst L3 Switch Software (CAT3K_CAA-UNIVERSALK9-M), Version 16.3.2, RELEASE SOFTWARE (fc4)所以版本是:16.3.2 RELEASE SOFTWARE (fc4)
Q.1.2.i 系统镜像的文件名是什么?
System image file is "flash:/cat3k_caa-universalk9.16.03.02.SPA.bin"所以系统镜像的文件名是:flash:/cat3k_caa-universalk9.16.03.02.SPA.bin
Q.1.2.i 这台交换机的基本以太网 MAC 地址是什么?
Base ethernet MAC Address : 00:60:2F:DE:17:2D所以基本MAC地址为:00:60:2F:DE:17:2D
j. 检查 PC-A 使用的 GigabitEthernet1/0/6 接口的默认属性。
Switch# show interface gig1/0/6输出:
Switch#show interface gig1/0/6
GigabitEthernet1/0/6 is up, line protocol is up (connected)
Hardware is Lance, address is 000c.8589.1806 (bia 000c.8589.1806)
MTU 1500 bytes, BW 100000 Kbit, DLY 1000 usec,
reliability 255/255, txload 1/255, rxload 1/255
Encapsulation ARPA, loopback not set
Keepalive set (10 sec)
Full-duplex, 100Mb/s
input flow-control is off, output flow-control is off
ARP type: ARPA, ARP Timeout 04:00:00
Last input 00:00:08, output 00:00:05, output hang never
Last clearing of "show interface" counters never
Input queue: 0/75/0/0 (size/max/drops/flushes); Total output drops: 0
Queueing strategy: fifo
Output queue :0/40 (size/max)
5 minute input rate 0 bits/sec, 0 packets/sec
5 minute output rate 0 bits/sec, 0 packets/sec
956 packets input, 193351 bytes, 0 no buffer
Received 956 broadcasts, 0 runts, 0 giants, 0 throttles
0 input errors, 0 CRC, 0 frame, 0 overrun, 0 ignored, 0 abort
0 watchdog, 0 multicast, 0 pause input
0 input packets with dribble condition detected
2357 packets output, 263570 bytes, 0 underruns
0 output errors, 0 collisions, 10 interface resets
0 babbles, 0 late collision, 0 deferred
0 lost carrier, 0 no carrier
0 output buffer failures, 0 output buffers swapped outQ.1.2.j j.此接口是打开还是关闭的?
GigabitEthernet1/0/6 is up, line protocol is up (connected)所以接口是打开的。
Q.1.2.j j.什么事件会让接口关闭?
- 接口被管理员手动关闭;
- 硬件故障:例如网线断开、电缆损坏等;
- 链路层协议异常:例如物理层故障、链路层地址错误、链路层协议不匹配等;
- 配置错误:例如 IP 地址配置错误、子网掩码配置错误、路由配置错误等;
- 内存错误:例如接口缓冲区溢出等。
Q.1.2.j j.接口的 MAC 地址是什么?
Hardware is Lance, address is 000c.8589.1806 (bia 000c.8589.1806)MAC地址为:000c.8589.1806
Q.1.2.j j.该接口的速率和双工设置是什么?
Full-duplex, 100Mb/s接口设置为全双工模式,速率为100Mb/s。
k. 检查交换机的默认 VLAN 设置。
Switch# show vlan输出:
Switch#show interface gig1/0/6
GigabitEthernet1/0/6 is up, line protocol is up (connected)
Hardware is Lance, address is 000c.8589.1806 (bia 000c.8589.1806)
MTU 1500 bytes, BW 100000 Kbit, DLY 1000 usec,
reliability 255/255, txload 1/255, rxload 1/255
Encapsulation ARPA, loopback not set
Keepalive set (10 sec)
Full-duplex, 100Mb/s
input flow-control is off, output flow-control is off
ARP type: ARPA, ARP Timeout 04:00:00
Last input 00:00:08, output 00:00:05, output hang never
Last clearing of "show interface" counters never
Input queue: 0/75/0/0 (size/max/drops/flushes); Total output drops: 0
Queueing strategy: fifo
Output queue :0/40 (size/max)
5 minute input rate 0 bits/sec, 0 packets/sec
5 minute output rate 0 bits/sec, 0 packets/sec
956 packets input, 193351 bytes, 0 no buffer
Received 956 broadcasts, 0 runts, 0 giants, 0 throttles
0 input errors, 0 CRC, 0 frame, 0 overrun, 0 ignored, 0 abort
0 watchdog, 0 multicast, 0 pause input
0 input packets with dribble condition detected
2357 packets output, 263570 bytes, 0 underruns
0 output errors, 0 collisions, 10 interface resets
0 babbles, 0 late collision, 0 deferred
0 lost carrier, 0 no carrier
0 output buffer failures, 0 output buffers swapped out
Switch#
Switch#show vlan
VLAN Name                             Status    Ports
---- -------------------------------- --------- -------------------------------
1    default                          active    Gig1/0/1, Gig1/0/2, Gig1/0/3, Gig1/0/4
                                                Gig1/0/5, Gig1/0/6, Gig1/0/7, Gig1/0/8
                                                Gig1/0/9, Gig1/0/10, Gig1/0/11, Gig1/0/12
Gig1/0/13, Gig1/0/14, Gig1/0/15, Gig1/0/16
Gig1/0/17, Gig1/0/18, Gig1/0/19, Gig1/0/20
Gig1/0/21, Gig1/0/22, Gig1/0/23, Gig1/0/24
Gig1/1/1, Gig1/1/2, Gig1/1/3, Gig1/1/4
99 VLAN0099 active
1002 fddi-default active
1003 token-ring-default active
1004 fddinet-default active
1005 trnet-default active
VLAN Type SAID MTU Parent RingNo BridgeNo Stp BrdgMode Trans1 Trans2
---- ----- ---------- ----- ------ ------ -------- ---- -------- ------ ------
1 enet 100001 1500 - - - - - 0 0
99 enet 100099 1500 - - - - - 0 0
1002 fddi 101002 1500 - - - - - 0 0
1003 tr 101003 1500 - - - - - 0 0
1004 fdnet 101004 1500 - - - ieee - 0 0
1005 trnet 101005 1500 - - - ibm - 0 0
VLAN Type SAID MTU Parent RingNo BridgeNo Stp BrdgMode Trans1 Trans2
---- ----- ---------- ----- ------ ------ -------- ---- -------- ------ ------
Remote SPAN VLANs
------------------------------------------------------------------------------
Primary Secondary Type Ports
------- --------- ----------------- ------------------------------------------Q.1.2.k VLAN 1 的名称是什么?
default
Q.1.2.k 哪些端口位于 VLAN 1 中?
VLAN Name Status Ports
---- -------------------------------- --------- -------------------------------
1 default active Gig1/0/1, Gig1/0/2, Gig1/0/3, Gig1/0/4
Gig1/0/5, Gig1/0/6, Gig1/0/7, Gig1/0/8
Gig1/0/9, Gig1/0/10, Gig1/0/11, Gig1/0/12
Gig1/0/13, Gig1/0/14, Gig1/0/15, 所以:
Gig1/0/1, Gig1/0/2, Gig1/0/3, Gig1/0/4, Gig1/0/5, Gig1/0/6, Gig1/0/7, Gig1/0/8,Gig1/0/9, Gig1/0/10, Gig1/0/11, Gig1/0/12,Gig1/0/13, Gig1/0/14, Gig1/0/15,Gig1/0/17, Gig1/0/18, Gig1/0/19, Gig1/0/20,Gig1/0/21, Gig1/0/22, Gig1/0/23, Gig1/0/24,Gig1/1/1, Gig1/1/2, Gig1/1/3, Gig1/1/4
Q.1.2.k VLAN 1 是活动的吗?
active
所以是活动的
Q.1.2.k 什么类型的 VLAN 是默认 VLAN?
默认情况下,VLAN 1 是默认 VLAN。所有未分配到其他 VLAN 的接口都属于 VLAN 1。
l. 检查闪存。
发出下列命令之一,检查闪存目录的内容。
Switch# show flash
Switch# dir flash:
Switch#show flash

System flash directory:
File  Length   Name/status
  3   505532849cat3k_caa-universalk9.16.03.02.SPA.bin
  4   616      vlan.dat
[505533465 bytes used, 1034042343 available, 1539575808 total]
1.50426e+06K bytes of processor board System flash (Read/Write)


Switch#dir flash
Directory of flash:/

    3  -rw-   505532849          <no date>  cat3k_caa-universalk9.16.03.02.SPA.bin
    4  -rw-         616          <no date>  vlan.dat

1539575808 bytes total (1034042343 bytes free)
Switch#
文件的文件名末尾有扩展名,例如 .bin 。目录没有文件扩展名。
Q.1.2.I 思科 IOS 镜像的文件名是什么?
思科 IOS 镜像的文件名通常以“.bin”结尾,上面显示的文件名cat3k_caa-universalk9.16.03.02.SPA.bin。
第2部分: 配置基本网络设备设置
在第 2 部分中,您将为交换机和 PC 配置基本设置。
第2部分.步骤1
步骤 1 : 配置基本交换机设置。
a. 在全局配置模式下,复制以下基本配置并将其粘贴到 S1 中。
进入全局配置模式
Switch# configure terminal
no ip domain-lookup
hostname S1
service password-encryption
enable secret class
banner motd #
Unauthorized access is strictly prohibited. #

输出:
Switch#configure terminal
Enter configuration commands, one per line.  End with CNTL/Z.
Switch(config)#no ip domain-lookup
Switch(config)#hostname S1
S1(config)#service password-encryption
S1(config)#enable secret class
S1(config)#banner motd #
Enter TEXT message.  End with the character '#'.
Unauthorized access is strictly prohibited. #

S1(config)#
建议一行一行的复制。
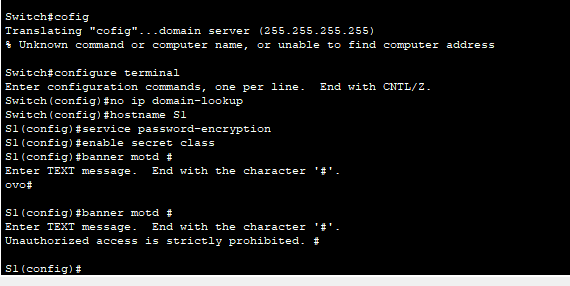
Q.2.1.a 这是什么意思?
no ip domain-lookup- 关闭 DNS 查找功能,防止在输入命令时因输入错误的主机名而出现不必要的延迟。hostname S1- 将设备的主机名设置为 "S1"。service password-encryption- 启用密码加密功能,防止密码明文在配置文件中暴露。enable secret class- 设置特权级密码为 "class"。banner motd # ... #- 设置登录提示信息为 "Unauthorized access is strictly prohibited."。提示信息是用#包围的一段文字。在思科交换机中,SVI代表
Switched Virtual Interface,是一种虚拟接口类型,通常与VLAN相关联。SVI是一个逻辑接口,它在交换机的软件中创建,代表整个VLAN。可以通过配置SVI接口的IP地址和其他网络参数来使交换机的VLAN能够进行IP通信,同时也可以配置其他功能,如网络ACL、路由协议等。
b. 设置交换机的 SVI IP 地址。这允许远程管理交换机。
在您可以从 PC-A 远程管理 S1 之前,必须为交换机分配一个 IP 地址。交换机的默认配置是通过 VLAN 1 控制交换机的管理。但是, 基本交换机配置的最佳实践是将管理 VLAN 更改为 VLAN 1 以外的 VLAN。
出于管理目的, 使用 VLAN 99。选择 VLAN 99 是随意的,决不是暗示您应始终使用 VLAN 99。
首先,在交换机上创建新的 VLAN 99。然后,在内部虚拟接口 VLAN 99 上,将交换机的 IP 地址设置为 192.168.1.2 ,子网掩码为 255.255.255.0 。SVI 接口上也可以配置 IPv6 地址。使用地址分配表中列出的 IPv6 地址。
请注意, 即使您输入了 no shutdown 命令, VLAN 99 接口也处于关闭状态。由于没有向 VLAN 99 分配交 换机端口,因此当前此接口关闭。
这里的VLAN name一直不对,我也不知道是为什么 [Vlan99] [VLAN 99]都不对。
知道了,其实不用改名。
进入全局配置模式:
Switch# configure terminal执行命令
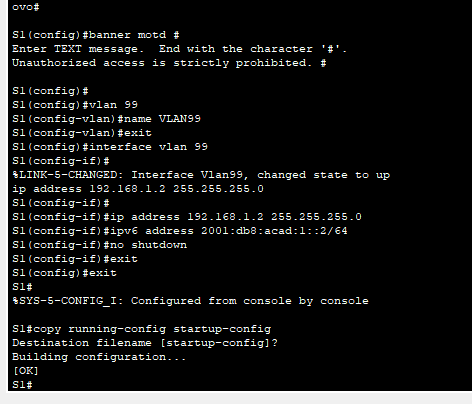
Switch(config)# vlan 99 ### 本行删除 不要再执行了。 Switch(config-vlan)# name VLAN99 Switch(config-vlan)# exit Switch(config)# interface vlan 99 Switch(config-if)# ip address 192.168.1.2 255.255.255.0 Switch(config-if)# ipv6 address 2001:db8:acad:1::2/64 Switch(config-if)# ipv6 address FE80::2 link-local Switch(config-if)# no shutdown Switch(config-if)# exit Switch# copy running-config startup-config- 创建vlan99,命名,退出vlan配置模式,配置ip,配置ipv6,不关闭端口,退出,保存配置到开机运行
输出:
S1(config)#
S1(config)#vlan 99
S1(config-vlan)#name Vlan99
S1(config-vlan)#exit
S1(config)#interface vlan 99
S1(config-if)#
%LINK-5-CHANGED: Interface Vlan99, changed state to up
ip address 192.168.1.2 255.255.255.0
S1(config-if)#
S1(config-if)#ip address 192.168.1.2 255.255.255.0
S1(config-if)#ipv6 address 2001:db8:acad:1::2/64
S1(config-if)# ipv6 address 2001:db8:acad:1::2/64
S1(config-if)#no shutdown
S1(config-if)#exit
S1(config)#exit
S1#
%SYS-5-CONFIG_I: Configured from console by console

S1#copy running-config startup-config
Destination filename [startup-config]?
Building configuration...
[OK]
S1#
c. 将所有用户端口分配到 VLAN 99。
要在主机和交换机之间建立连接,主机使用的端口必须与交换机管理端口位于相同的 VLAN 中。几秒钟 后,由于此时为 VLAN 99 中分配了至少一个活动端口(F0/6,连接了 PC-A), VLAN 99 开始运行。
进入全局配置模式:
Switch# configure terminal进入配置模式:
#配置第一组接口
Switch(config)# interface range GigabitEthernet1/0-1/1-24
Switch(config-if-range)# switchport mode access
Switch(config-if-range)# switchport access vlan 99
S1(config-if-range)#exit

#配置第二组接口
S1(config)#interface range GigabitEthernet1/1/1-4
S1(config-if-range)#switchport mode access
S1(config-if-range)#switchport access vlan 99
S1(config-if-range)#exit

#退出config模式
S1(config)#exit
S1#
输出:

d. 发出 show vlan brief 命令,以验证所有端口均位于 VLAN 99 中。
执行(在特权模式下)(config 模式=特权模式)
show vlan brief

S1#show vlan brief
显示
S1#show vlan brief

VLAN Name                             Status    Ports
---- -------------------------------- --------- -------------------------------
1    default                          active
99   VLAN99                           active    Gig1/0/1, Gig1/0/2, Gig1/0/3, Gig1/0/4
                                                Gig1/0/5, Gig1/0/6, Gig1/0/7, Gig1/0/8
                                                Gig1/0/9, Gig1/0/10, Gig1/0/11, Gig1/0/12
                                                Gig1/0/13, Gig1/0/14, Gig1/0/15, Gig1/0/16
                                                Gig1/0/17, Gig1/0/18, Gig1/0/19, Gig1/0/20
                                                Gig1/0/21, Gig1/0/22, Gig1/0/23, Gig1/0/24
                                                Gig1/1/1, Gig1/1/2, Gig1/1/3, Gig1/1/4
1002 fddi-default                     active
1003 token-ring-default               active
1004 fddinet-default                  active
1005 trnet-default                    active
所有的接口都在VLAN99中。
e. 配置 S1 的默认网关。如果未设置默认网关,无法通过距离超过一个路由器的远程网络管理交换机。虽然本 练习没有包括外部 IP 网关,但可以假设您最终会把 LAN 连接到路由器进行外部访问。假设路由器上的 LAN 接口为 192.168.1.1 ,据此为交换机设置默认网关。
config模式/特权模式 下进行:
如何进入config模式见上文即可。(Switch# configure terminal)
S1(config)# ip default-gateway 192.168.1.1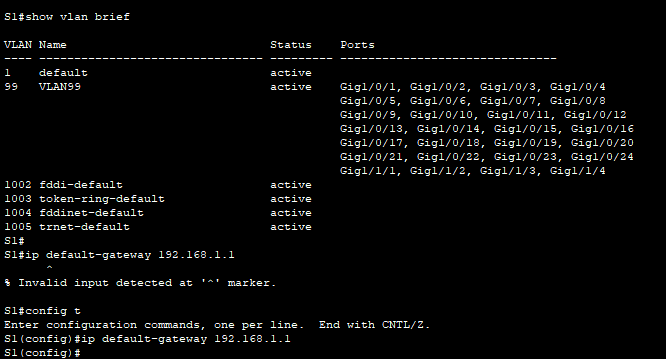
f. 还应该配置一个密码来限制控制台端口访问。在此练习中使用 cisco 作为控制台登录密码。默认配置是允 许所有控制台连接,无需密码。为防止控制台消息中断命令,请使用 logging synchronous 选项。
S1(config)# line con 0
S1(config-line)# logging synchronous
执行下面的命令就可以
S1(config)# line console 0
S1(config-line)# password cisco
S1(config-line)# login
S1(config-line)# logging synchronous
S1(config-line)# exit
命令的意思(不是问题)
- 在网络设备中,
login通常指的是需要进行身份验证才能登录设备的功能。当启用了login功能后,用户需要提供正确的用户名和密码才能进入设备的命令行界面。这有助于保护设备的安全性,防止未经授权的访问。 - 配置了
logging synchronous选项,以防止在输入命令时被控制台消息中断。

g. 为交换机配置虚拟终端 (vty) 线路以允许 Telnet 访问。如果没有配置 VTY 密码, 您将无法通过 Telnet 连接 到交换机。
Switch(config)#line vty 0 15
Switch(config-line)#password cisco
Switch(config-line)#login
Switch(config-line)#exit
Switch(config)#exit
Switch#write memory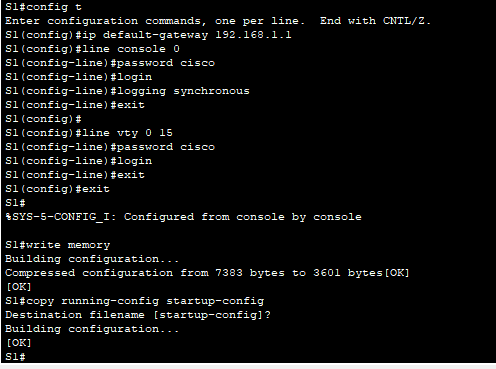
dayi.保存一下吧
copy running-config startup-config

S1#copy running-config startup-config
Destination filename [startup-config]?
Building configuration...
[OK]
S1#
Q.2.1.g. 为什么需要 login 命令?
在网络设备中,login 通常指的是需要进行身份验证才能登录设备的功能。当启用了 login 功能后,用户需要提供正确的用户名和密码才能进入设备的命令行界面。这有助于保护设备的安全性,防止未经授权的访问。
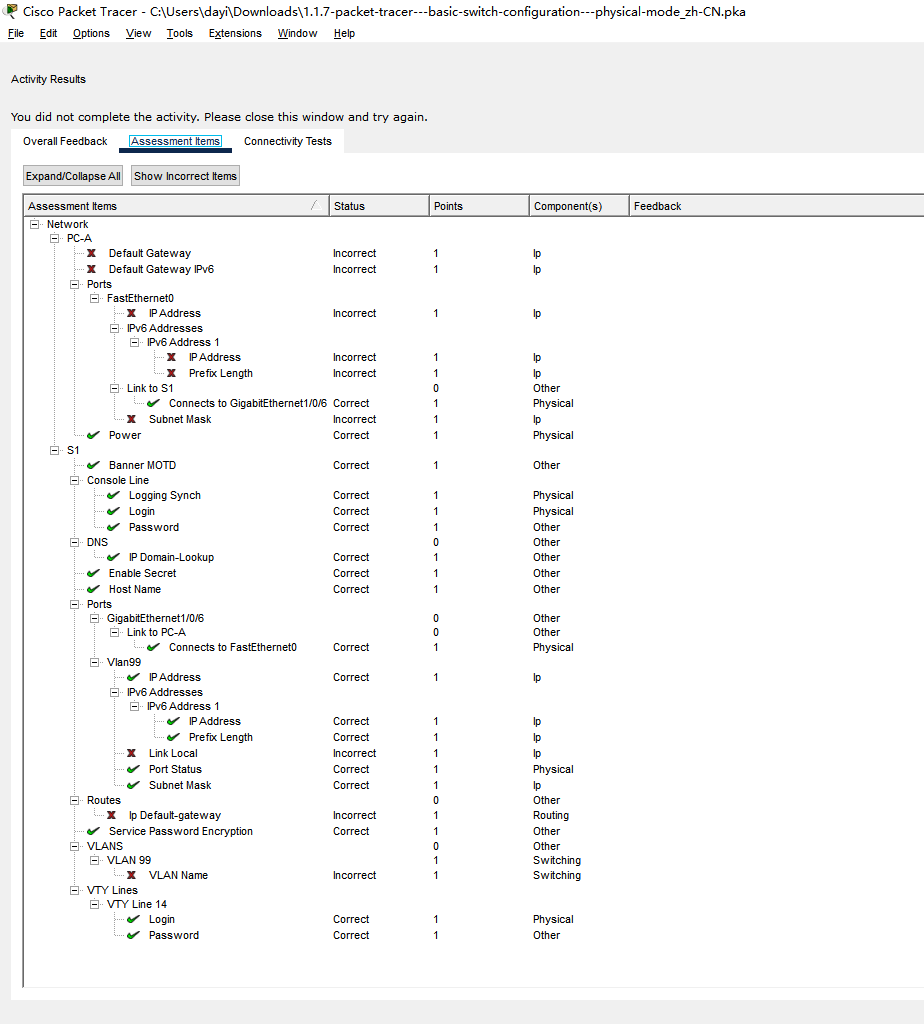
目前的进度
左下角可以看result
第二部分 步骤 2 : 配置 PC-A 的 IP 地址。
如地址分配表所示,将 IP 地址和子网掩码分配给 PC。下面介绍了简要的流程。此拓扑无需默认网关; 但是您 可以输入 192.168.1.1 和 fe80::1 以模拟连接到 S1 的路由器。
a. 访问桌面选项卡。
b. 点击 IP Configuration。
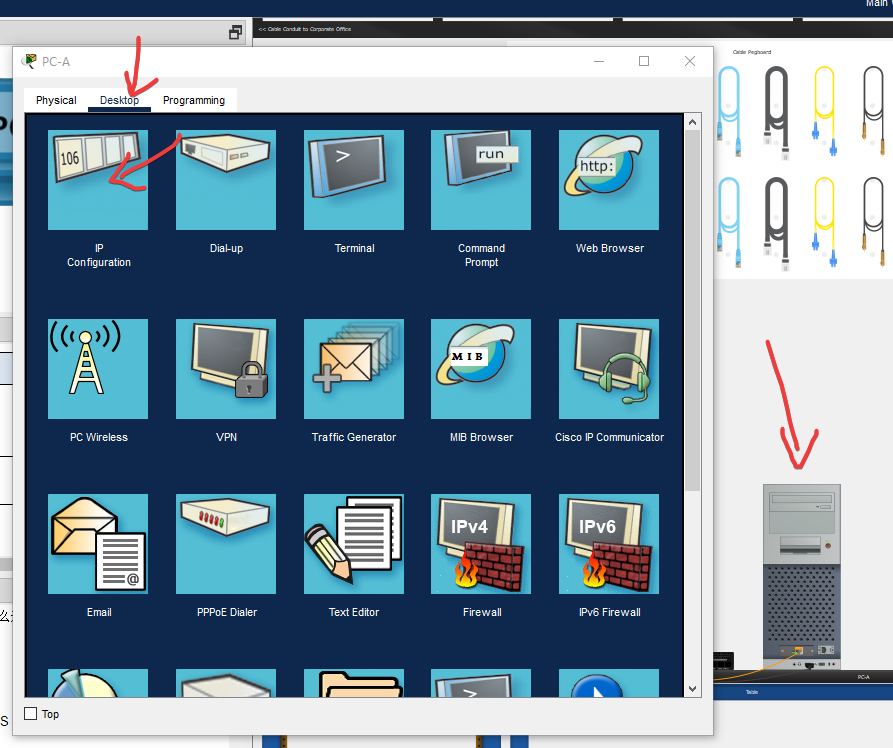
c. 验证是否选择了 静态 IP 配置单选按钮。
d. 输入 IPv4 地址、子网掩码和默认网关。
e. 验证是否选择了 静态 IPv6 配置单选按钮。
f. 输入 IPv6 地址、前缀和默认网关。
g. 点击 X 关闭 IP 配置窗口。
设置IP:
192.168.1.10 /242001:db8:acad:1::10 /64网关设置为:
192.168.1.1
fe80::1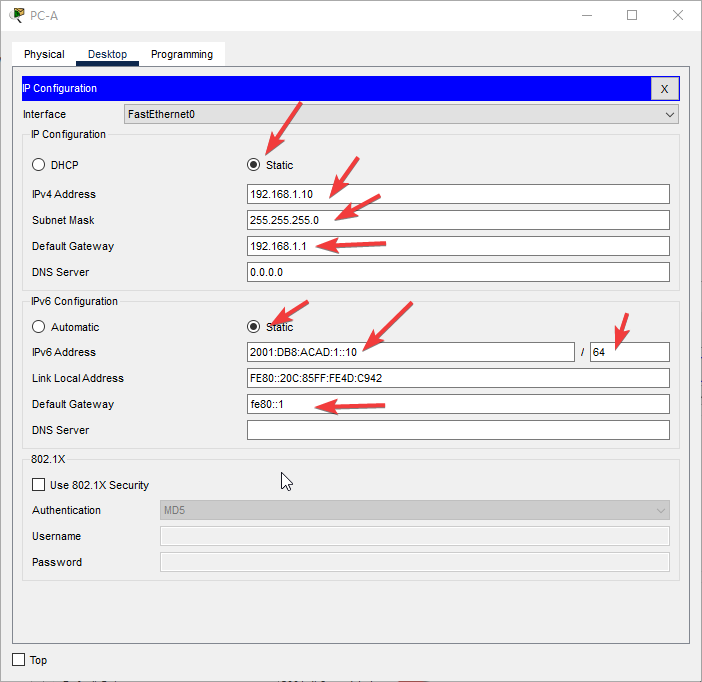
第 3部分: 验证并测试网络连接
在第 3 部分中,您将验证并记录交换机配置,测试 PC-A 和 S1 之间的端到端连接,以及测试交换机的远程管 理功能。
第三部分.步骤1
步骤 1: 显示交换机配置。
使用 PC-A 上的控制台连接,以显示和验证交换机配置。使用 show run 命令可显示整个运行配置,每次一页。使用空格键拓展分页。
a. 下面显示了配置示例。用黄色突出显示您配置的设置。其他配置设置是 IOS 默认值。
如果有密码的话根据之前设置的是cisco,也可能是class
登录密码:cisco
特权密码(enable):class
S1# show run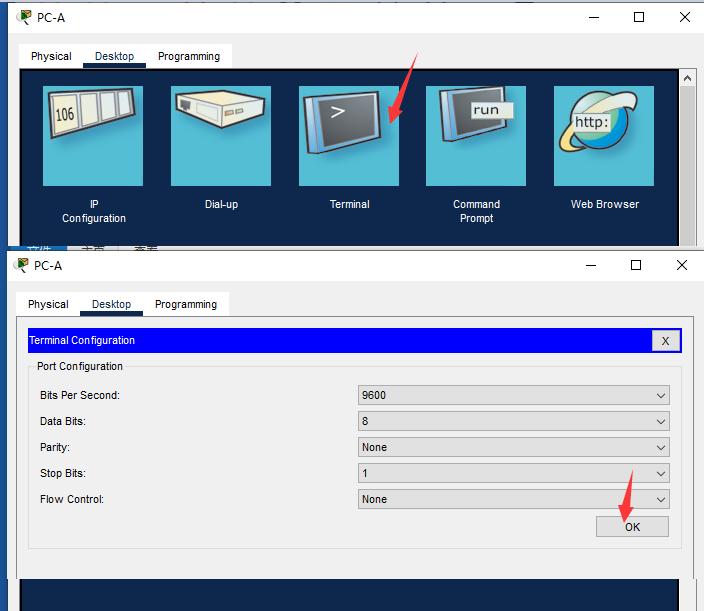
----这里是输出内容----
输出:(#开头的是新的配置)
S1#show run
Building configuration...

Current configuration : 3831 bytes
version 16.3.2
no service timestamps log datetime msec
no service timestamps debug datetime msec
service password-encryption
#hostname S1

#enable secret 5 $1$mERr$9cTjUIEqNGurQiFU.ZeCi1

no ip cef
no ipv6 cef

no ip domain-lookup

spanning-tree mode pvst

interface GigabitEthernet1/0/1
# switchport access vlan 99
# switchport mode access
# switchport nonegotiate
!
...

interface GigabitEthernet1/1/4
# switchport access vlan 99
# switchport mode access
# switchport nonegotiate
!
interface Vlan1
 no ip address

#interface Vlan99
# mac-address 0060.2fde.1701
# ip address 192.168.1.2 255.255.255.0
# ipv6 address 2001:DB8:ACAD:1::2/64
# ip default-gateway 192.168.1.1
ip classless
!
ip flow-export version 9
!
!
# banner motd ^C
# Unauthorized access is strictly prohibited. ^C
!
!
#line con 0
# password 7 0822455D0A16
# logging synchronous
# login
!
line aux 0
!
# line vty 0 4
# password 7 0822455D0A16
# login
#line vty 5 15
# password 7 0822455D0A16
# login
!
!
!
!
end
----这里是输出内容----
b. 验证管理 VLAN 99 设置。
终端输入
S1# show interface vlan 99输出
S1#show interface vlan 99
Vlan99 is up, line protocol is up
  Hardware is CPU Interface, address is 0060.2fde.1701 (bia 0060.2fde.1701)
  Internet address is 192.168.1.2/24
  MTU 1500 bytes, BW 100000 Kbit, DLY 1000000 usec,
     reliability 255/255, txload 1/255, rxload 1/255
  Encapsulation ARPA, loopback not set
  ARP type: ARPA, ARP Timeout 04:00:00
  Last input 21:40:21, output never, output hang never
  Last clearing of "show interface" counters never
  Input queue: 0/75/0/0 (size/max/drops/flushes); Total output drops: 0
  Queueing strategy: fifo
  Output queue: 0/40 (size/max)
  5 minute input rate 0 bits/sec, 0 packets/sec
  5 minute output rate 0 bits/sec, 0 packets/sec
     1682 packets input, 530955 bytes, 0 no buffer
     Received 0 broadcasts (0 IP multicast)
     0 runts, 0 giants, 0 throttles
     0 input errors, 0 CRC, 0 frame, 0 overrun, 0 ignored
     563859 packets output, 0 bytes, 0 underruns
     0 output errors, 23 interface resets
     0 output buffer failures, 0 output buffers swapped out

S1#
Q.3.1.b 此接口的带宽是多少?
MTU 1500 bytes, BW 100000 Kbit, DLY 1000000 usec,100000 Kbit
Q.3.1.b VLAN 99 状态是什么?
Vlan99 is up, line protocol is up开启状态
Q.3.1.b 线路协议状态是什么?
Vlan99 is up, line protocol is up开启状态
第三部分.步骤2:使用 ping 测试端到端连接。
步骤 2: 使用 ping 测试端到端连接。
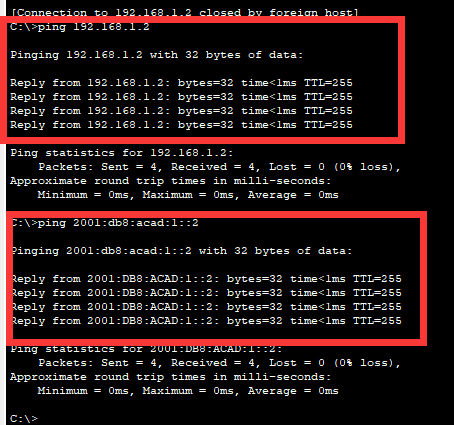
验证 PC-A 是否可以 ping 通 S1 的 IPv4 和 IPv6 地址。
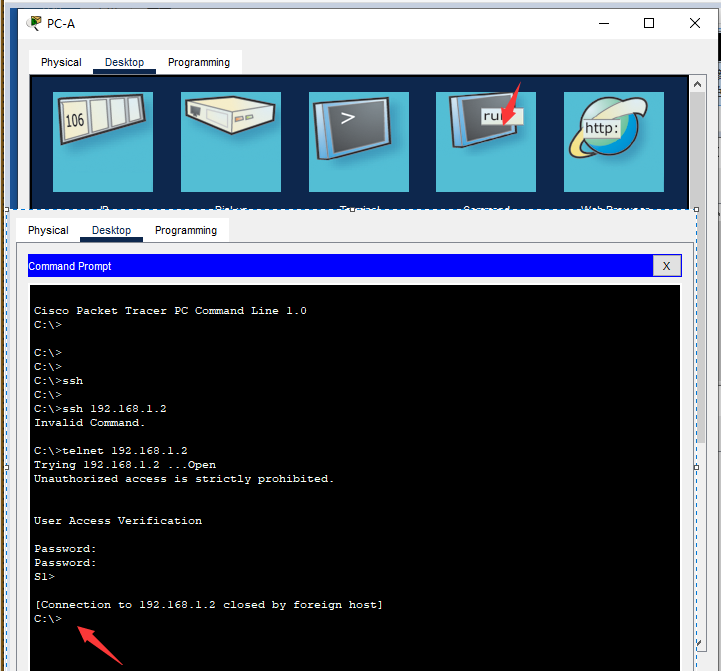
C:\> ping 192.168.1.2
C:\> ping 2001:db8:acad:1::2
ping 192.168.1.2
ping 2001:db8:acad:1::2
由于 PC-A 需要通过 ARP 解析 S1 的 MAC 地址,第一个数据包可能超时。
如果 ping 结果仍不成功,请对基本设备配置执行故障排除。检查物理布线和逻辑地址。
第三部分.步骤 3: 测试并验证 S1 的远程管理。
此时,您将使用 Telnet 远程访问交换机。在本练习中,PC-A 和 S1 并排存在。但在生产网络中,交换机可能处于顶层的配线柜中,而您的管理 PC 位于底层。在此步骤中,您将使用 Telnet,通过 SVI 管理地址远程访问交换机 S1。Telnet 不是安全的协议;但您将使用它测试远程访问。使用 Telnet 时,会以明文形式在会话中发送所有信息(包括密码和命令)。在之后的练习中,您将使用 SSH 远程访问网络设备。
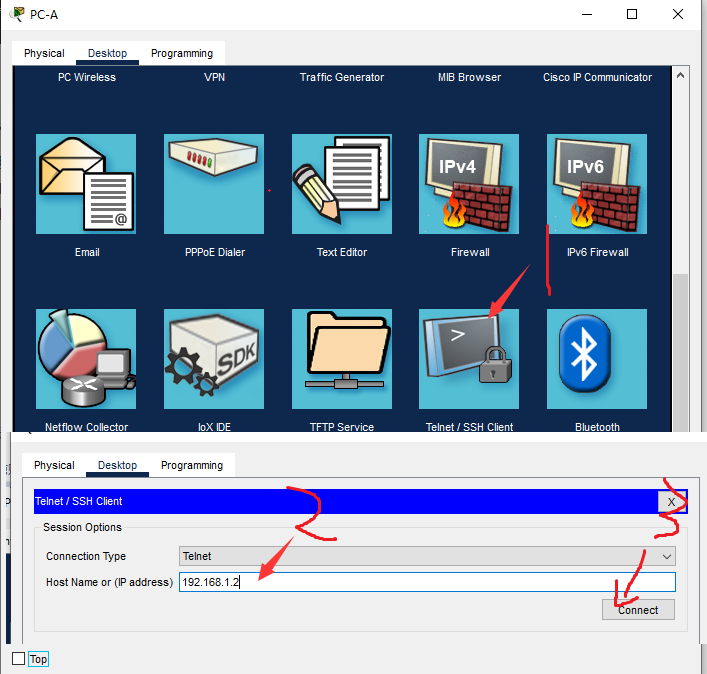
a. 在 PC-A 上打开 桌面选项卡。
b. 在应用程序列表中向下滚动,然后单击 Telnet/SSH 客户端。
c. 将 连接类型 设置为 Telnet。
d. 输入要连接到 S1 的 SVI 管理地址,然后单击 连接。
abcd过程如下
e. 输入密码 cisco 后,您将位于用户模式模式提示符处。使用 enable 命令并提供加密密码 class 来访问特权执行模式。
输入:cisco
enable
输入:class

-----
在终端里差不多这个样子:
Password: (输入:cisco)
S1>enable
Password: (输入:class)
S1#
f. 保存配置。
我也不知道保存什么,就保存下配置吧。
输入write
S1#write
Building configuration...
Compressed configuration from 7383 bytes to 3601 bytes[OK]
[OK]
S1#
g. 键入 exit 以结束 Telnet 会话。在弹出窗口中点击 No。
exit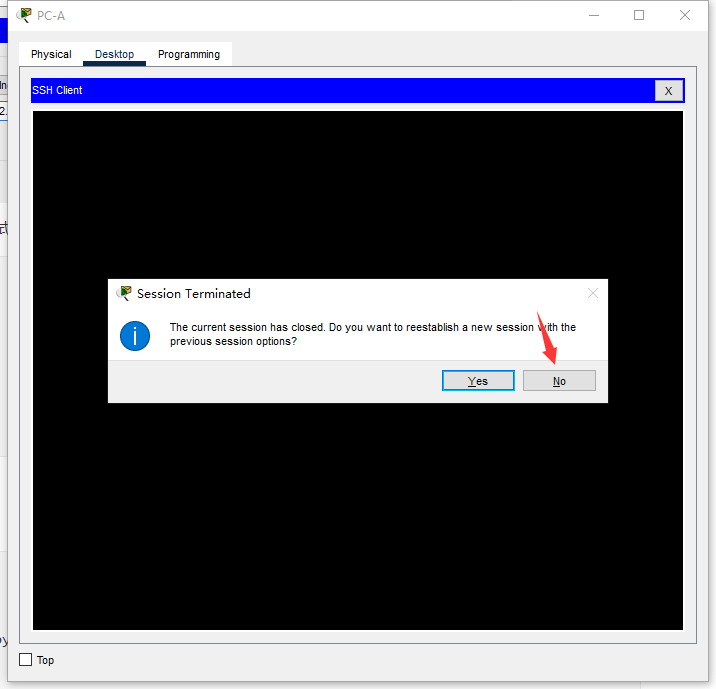
第三部分.步骤 4: 在生产网络上部署交换机 S1 。
现在,您将在生产网络上安装交换机 S1 并断开控制台电缆。Telnet 将用于远程访问交换机并完成任何其他配置和验证。在之后的练习中,您将使用 SSH 远程访问网络设备。
a. 将交换机 S1 移至 机架。
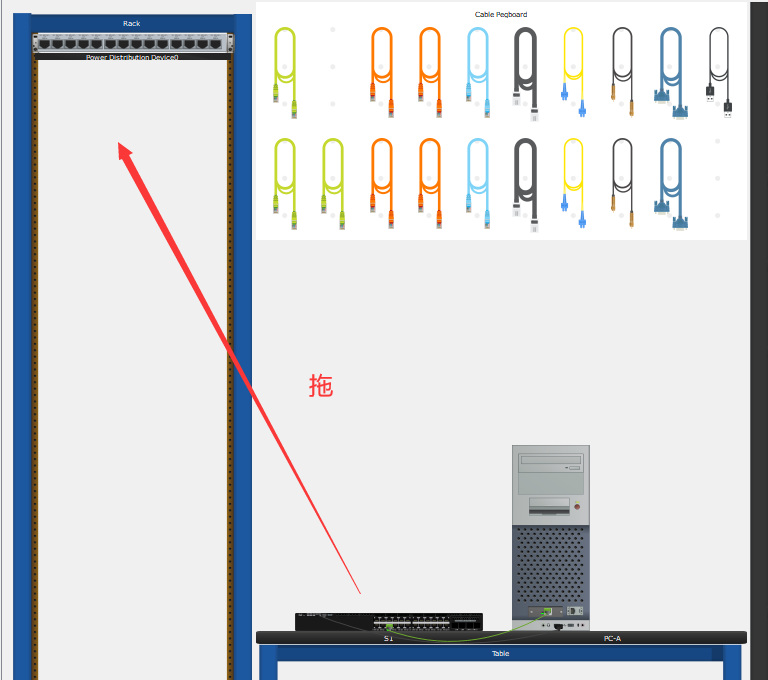
b. 右键单击交换机 S1 ,然后选择 检查后面板。
这一步没必要啦,因为插得console线是USB线。
右键交换机,选择Inspect Rear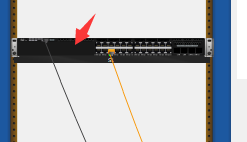

c. 单击 控制台电缆 并将其拖到 钉板上。
这里这里,他其实是要求我们把console线拔下来,但是开始插入的口真的是USB CONSOLE ,所以也不能说完全错。
一开始插在后面的口上,然后放回到架子上。
因为我们在前面插的,所以只要拔前面的USB线就可以啦。
但我们用的是USB线,你点那个USB口,然后点住,再拖到架子上,就可以把它线给拔下来!
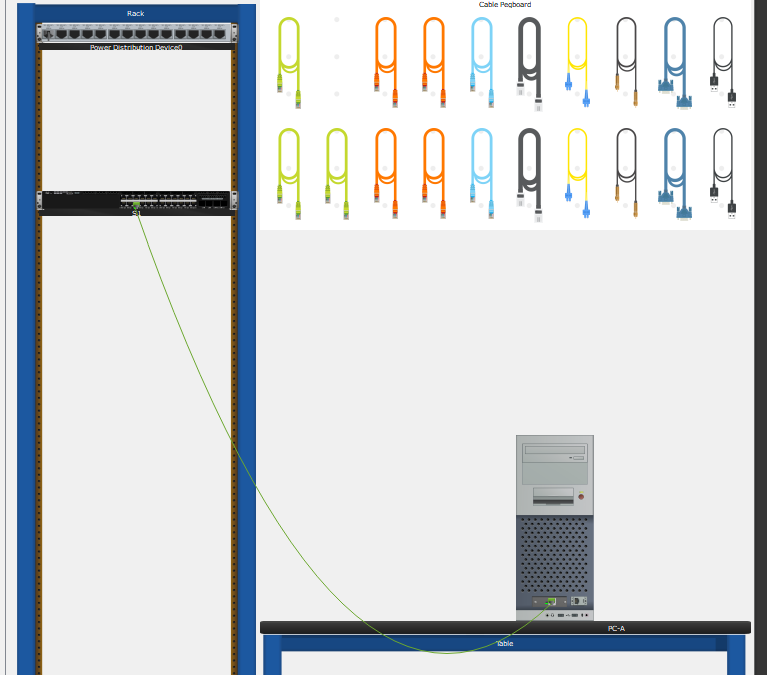
Q.3.4.1 为什么您应该为交换机配置 vty 密码?
配置VTY密码可以帮助保护交换机的管理功能,防止未经授权的用户通过Telnet协议连接到交换机,阻止未经授权的配置更改和访问。
如果没有配置VTY密码,那么任何人都可以通过Telnet协议连接到交换机,并且可以进行未经授权的更改和访问,从而导致网络安全风险。
Q.3.4.2 为什么将默认 VLAN 1 更改为其他 VLAN 编号?
将默认 VLAN 1 更改为其他 VLAN 编号可以提高网络安全性。
VLAN 1 是所有 Cisco 交换机默认的 VLAN,如果攻击者能够访问该 VLAN,他们可能会轻松地攻击网络。
通过将默认 VLAN 1 更改为其他 VLAN 编号,攻击者将不再能够访问默认 VLAN,并且网络安全性会得到提高。
Q.3.4.3 您怎样才能防止密码以明文形式发送?
使用加密协议来保护密码,例如使用 SSH(Secure Shell)代替 Telnet 。
这些协议都使用加密技术来保护传输过程中的数据,包括密码和其他敏感信息。
最后的结果啦(7个小时多):
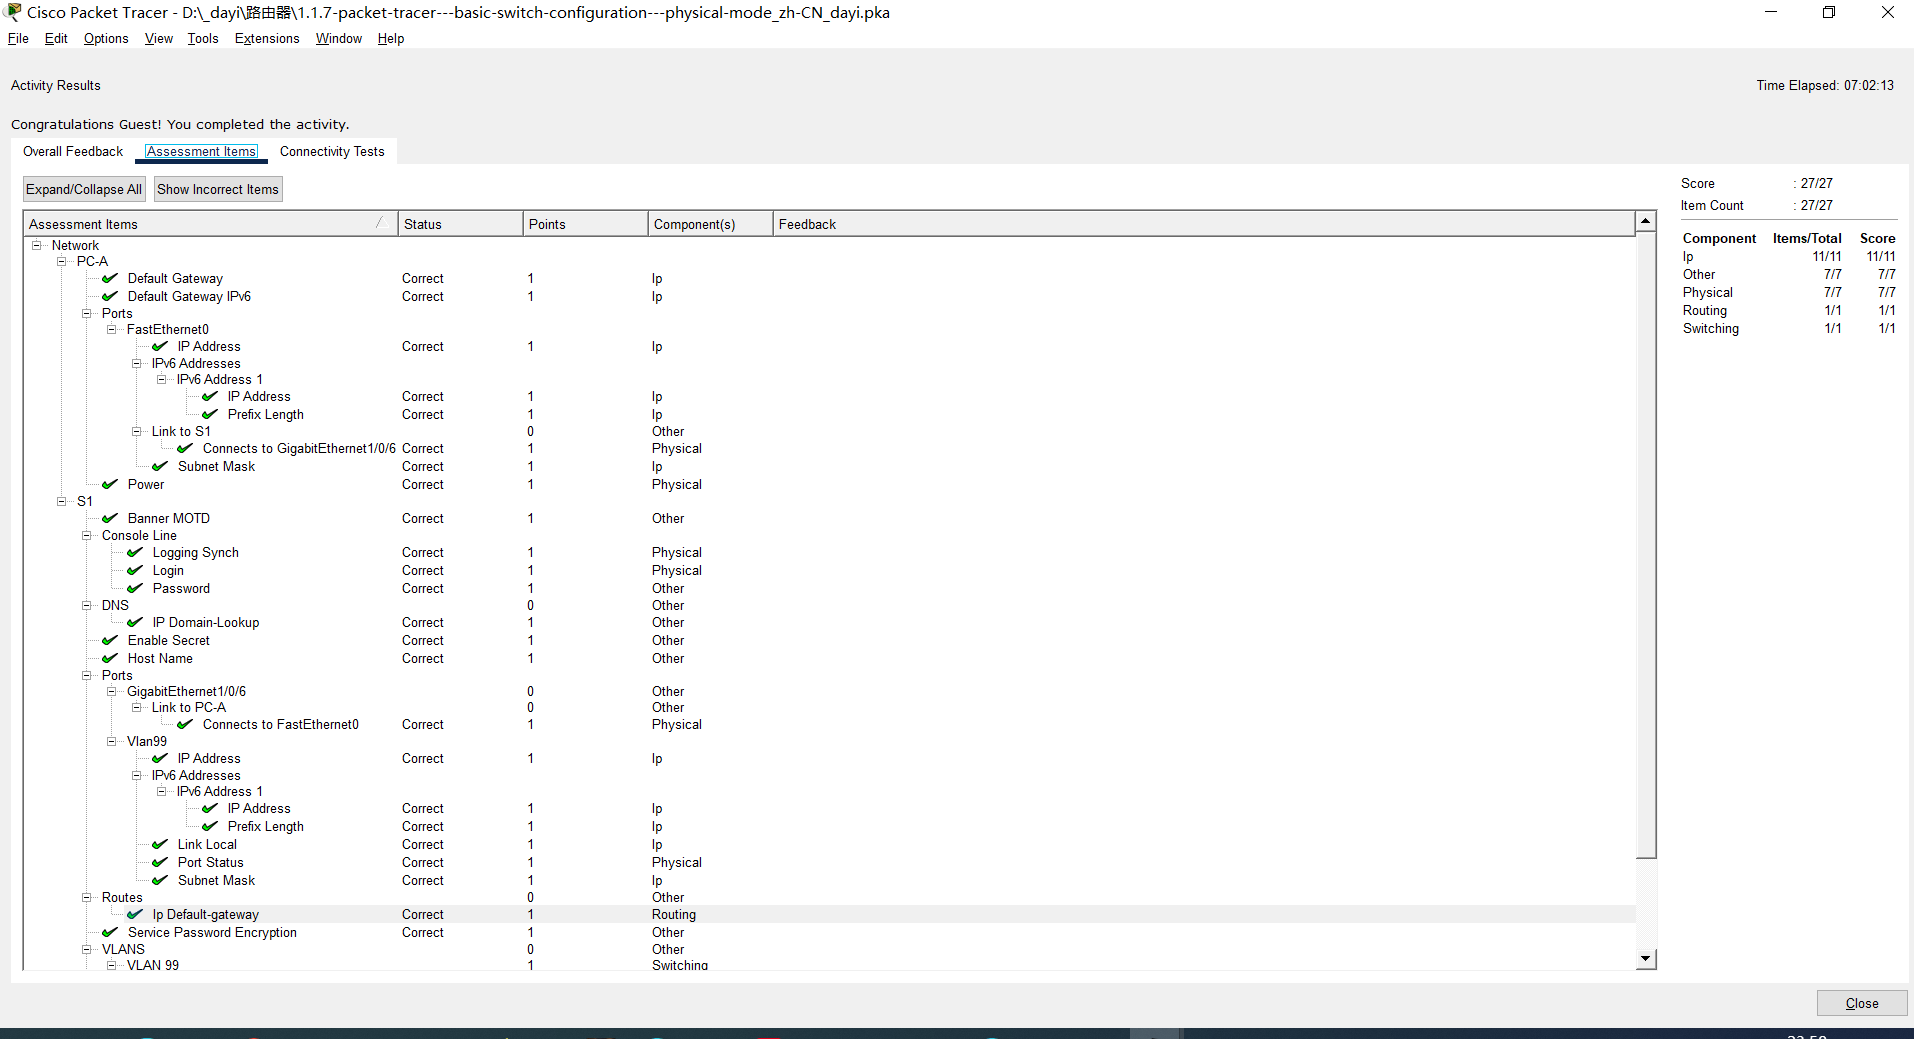
试错和修改
2023年3月11日 0:19 相对1.0更新信息:
- 插上去的线实际上是可以拔下来的。(拖住线头,到架子上,就可以拔下来)
- 可以直接用蓝色的console线,连电脑的RS-232口,交换机后面也有console口。但是用USB口对后序步骤没有什么影响,在现实中也可以这么用USB哒。对应章节: 第一部分.步骤 1 : 建立如拓扑图所示的网络。文件下载:https://p.dabbit.net/blog/pic_bed/2023/03/6f231edc04b5a719_202303110023174.pka
好耶!催更(雾
出现的原因一般是 启动配置文件不存在 或者 启动配置文件不是最新 两种原因。而我们是按照Word里的操作步骤,还没有开始配置,这里原因选择前者。解决办法就是初始化,进入特权模式,输入“wr”指令。
纯手码,狠狠支持一波up